You can also find me on:

Wednesday, February 21, 2018

her industrious soul

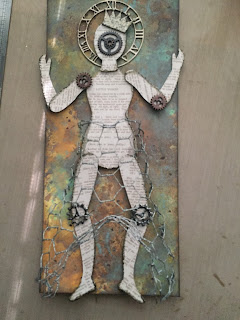
Hi everyone, I am on the Gypsy Soul Laser Cuts Blog today, sharing something a little different.
From the moment I saw this Gypsy Soul Laser Cuts art doll form, I had envisioned her in an industrial/steampunk fashion. What I was thinking was very different from my usual style, but I generally tend to go with an idea once I am inspired and modify, as needed, along the way...


I begin by removing pieces from the Gypsy Soul Laser Cuts Art Doll Female - small card. Next, I cover each body part with collage medium and adhere Little Women text paper to one side. I find that positioning the pieces as a complete shape helps ensure that the paper is adhered to the correct side.
After the collage medium has dried, I use an exacto knife to trim the excess paper from the doll form pieces. I then coat the back side of each piece with embossing ink and cover with charred gold embossing powder. The powder is melted with a heat gun. 
While I have the embossing supplies out, I also heat emboss some pieces from the GSLC Steampunk Shape Set in charred gold, hammered metal, and vintage platinum embossing powders. I am considering using these pieces on the finished doll.
Once all the pieces are embossed, I begin to work on a background. I want to create something that resembles rusty or oxidized patina. In order to achieve this, I use Distress Oxide inks in walnut stain, cracked pistachio and spiced marmalade. The inks are smooched onto my craft mat, spritzed with water and then heavyweight paper is inked and heat set repeatedly. When I have achieved the desired finish, I splatter the page with distress ink in walnut stain. Lastly, I spritz the page with Tattered Angels Glimmer Mist in patina.
This paper will be centered in a large Idea-ology vignette tray, above a piece of "riveted metal" textured paper that I created using a Tim Holtz Sizzix embossing folder on copper colored Kraftcore cardstock. Once the paper is embossed, I add a layer of grunge with Distress paint in black soot.
 When I begin to layout the pieces on the background, I decide that I would like the industrious soul to have a petticoat beneath her cage crinoline framework. After consideration over materials, I decide to add a lacy feminine touch with a doily, die cut from a piece of sage parchment paper, that has been inked with Distress inks in walnut stain and ground expresso.
Once I have settled on all of the pieces I will be using, I begin to adhere everything into place with a strong glue. Since the pieces are arranged in a layered fashion, the process requires patience while each layer dries prior to adding the next. Everything is glued into place on the patina paper. 
  I trim the lace petticoat to fit beneath the cage crinoline. The cage is held in place with an Idea-ology word band. The band has been bent with a pair of wire shaping nylon jay pliers, and each side is secured with a piece of hemp cord that has been colored with walnut stain ink. The ties secure at the back side of the panel, accessed via 1/8" eyelets.
Once the cage is securely in place, the entire piece is attached to the "riveted metal" background that has been adhered inside the vignette tray.
Some Idea-ology industrious stickers as well as metal hex head fasteners to the top left and bottom right corners of the vignette tray complete the piece.


Thanks for taking time to check out all the details of my industrious soul.
Hope you find time to create something.
~Ann


I am entering this in:
SanDee & amelie's Steampunk Challenge - Anything Goes-Steampunk/Industrial
Simon Says Stamp Monday Challenge - Grunge It Up
A Vintage Journey February Challenge - Melt It
  

Tuesday, February 13, 2018

key to my heART

Lately, I have found myself fascinated with assemblage. This form of art can take on so many variations, especially depending on the artist and their interpretation. Some of Pablo Picasso's cubist constructions are considered assemblage. There are many artists, both historic as well as contemporary, creating these three dimensional pieces of art.
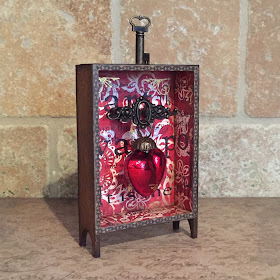
Today I am sharing "key to my heART" an assemblage piece that I created.


My base is an ATC Shrine with Feet by Gypsy Soul Laser Cuts. These laser cuts are made from sturdy chipboard and arrive flat, then you assemble the piece yourself. This makes it very easy to alter with paper or paints prior making it three dimensional. 
 I began by selecting a paper pattern with a design that would complement the main focal point without overpowering it. I selected a paper from the Tim Holtz Mini Stash Christmas pad. Although the design is fairly bold, I intend to use distress inks to soften the impact. Using collage medium, I coat the face of each chipboard piece and adhere the patterned paper. I use a brayer to ensure that there are no air bubbles and to flatten the paper onto the surface. Once dry, I use an exacto knife to cut around the edges where the paper overhangs. I ink around the edges with walnut stain distress ink. Using black archival ink, I stamp the back and sides with a stamp from the Stampers Anonymous Classics #4 set.  
I would like the assembled shrine to appear that it is actually made out of wood. In order to achieve this effect, I trace the outline and cut pieces of wood grain cardstock to fit the outsides of each of the pieces. These cardstock pieces will be inked with gathered twigs, walnut stain and ground expresso distress inks, before being glued into place. 
Before I assemble the shrine, I add some ideology gilded accents remnant rubs on the main panel. 
I use tacky glue to assemble the shrine and allow it to dry. Next, I adhere some idea-ology (regions beyond) design tape around the edges of the main opening. I like to add a thin line of glue beneath the tape to ensure that it doesn't lift once the project is completed and handled.
After the design tape is in place, I glue the wood grain pieces to the outside of the shrine. Be sure to ink the edges of the cut cardstock so that it blends well and looks like authentic wood, with no white edges showing.  I did not cut pieces for the inside of the legs, I simply used my ink to achieve a matching color. I select a piece of coordinating cardstock for the back side of the main panel of the shrine. Using the second stamp from the Stampers Anonymous Classics #4 set, I stamp the paper, and allow it to dry.
My design incorporates an idea-ology locket and key, as well as a mercury glass heart that I found while gathering supplies for valentine making. In order for the heart to be suspended from the keyhole, I need to attach the locket plate so that it sits away from the main back panel. I will be using wooden beads that I have painted with black soot distress paint.
I secure the beads to the back of the locket in a location that will be hidden from view. Once that glue has dried completely, I mark the location where the locket (via the beads) will be adhered to the back panel. I drill two small holes at the marks so that I can use a fastener for additional stability when securing the beads to the panel. Everything is attached with a strong glue and set aside to dry overnight. The last piece to be adhered is the key at the top.


I hope you enjoyed this step by step, and maybe even want to try to create your own assemblage.
Thank you for taking the time to visit my blog.
May your valentines's day be filled with love. 
~ Ann

Wednesday, February 7, 2018

love note

I am a huge fan of handmade valentines.
 There is something so absolutely wonderful about a token of love that has been created with care, for someone special. Handmade love notes seem to be few and far between these days. Today I am sharing "love note," a piece I created with Valentines Day in mind.   


I started with Gypsy Soul Laser Cuts Arch Top House Silhouettes. These chipboard pieces are so nice and sturdy. This set could be used to create three individual pieces or used in multiples, as a pair or even a trio.
 I used all three to create my piece.


Once I had an idea in mind, I looked through my stash of paper in search of something that would lend itself to being a good base to build upon. I then coated one side of the chipboard piece with collage medium and placed my paper onto the shape, centering the design. I used a brayer to make sure there were no air bubbles and that the paper was completely flat. I repeated this process for each of the three panels. After allowing the glue to dry completely, I turned the pieces over onto a cutting mat and used my Exacto knife to trim the paper around the edge of the chipboard shape.


Next, I completed this same process for the back side of each panel using a coordinating paper. I inked the edges of the pieces and inner areas of the paper with Distress Ink in brushed corduroy. 
I knew that I wanted the pieces to be "hinged" at the two interior seams when the pieces were situated side by side. Contemplating a few ideas for how I would accomplish this, I settled on using wire.
I first marked the location of each hole. Using a dremel, I drilled four holes onto each panel edge. Be sure to use a cutting mat or board beneath the piece that you are drilling through so that you don't ruin your tabletop. These holes aligned with four holes along the edge of the adjacent panel. I threaded a piece of soft wire through the holes to create an "x" at two locations along each seam.


Now it was time to add all the special details. Using the Gypsy Soul Laser Cuts Words & Phrases 1, I carefully removed the word "Love." I covered it with embossing ink and coated it with Ranger embossing powder in pink. Using a heat gun, I melted the embossing powder.  I repeated this step three times, giving the word a faux enameled finish. This set of Words & Phrases contains two sheets of different sentiments, and can be used in so many different ways.  


I cut a piece of pink parchment paper and using black soot archival ink, I stamped an image from the Tim Holtz Stampers Anonymous Nature set and allowed it to dry. I distressed the edges, inked with worn lipstick and brushed corduroy distress ink, and then spritzed with a bit of water and rumpled the paper to give it a tattered look.  


I die cut some roses out of coordinating paper using Tim Holtz Sizzix tiny tattered florals dies. These were inked along the edges and rolled into shape, then glued and set aside. I colored a Tim Holtz idea-ology paper doll with distress ink, Copic marker and distress crayons. Everything was arranged on the panels and manipulated until I was pleased with the layout. I like to play around with the embellishments before gluing everything down. That way I can make adjustments and decide if it needs additional pieces without disrupting everything.


 When I examined the piece, I decided that I wanted to increase interest by adding a few more elements and removing some others. On the first panel, I added an idea-ology sticker from the clippings collection. The sticker was inked around the edges and then layered onto a piece of chipboard that had been inked with worn lipstick distress ink. Using a charm from my stash, I cut a circle of coordinating paper inked around the edges and added the "love" rub-on to the middle. I used a mini hex-head fastener as an "attacher" and glued this onto the face of the panel. I also added a charred gold heart and a couple mini heart cutouts leftover from a different project.


 On the central panel, I decided to add a larger heart to give added height. Using the Tim Holtz Sizzix mini love struck die, I cut a heart out of thin chipboard.  I inked directly onto the chipboard with Distress Ink in worn lipstick. I then embossed around the edges with Emerald Creek charred gold embossing powder. I brushed a small amount of Ranger alcohol ink in gold onto an idea-ology pen nib and then adhered it on the heart to give the impression of an arrow. When the piece was dry, I adhered it to the top of the middle panel with a quick dry multi-purpose glue. I also added some mini hearts that I inked around the edges with brushed corduroy distress ink.


The third panel only needed a few hearts to tie it in with the other panels. I heat embossed a small and a medium heart with charred gold, and combined them with a few mini hearts.  


 Once I was satisfied with the layout, I glued everything into place and allowed it to dry.


Wishing you a love-filled February and beyond, and hoping that this inspires you to create a love note for someone special.
 ~Ann


I am entering this in: