Creating the perfect holiday cards takes time; I know many people who like to get a head start mid- summer, I am not one of those people. However, I do know that the holiday card making must begin before the month of December when all the decorating and celebrations happen, and there is never enough time to get everything done, let alone card making.
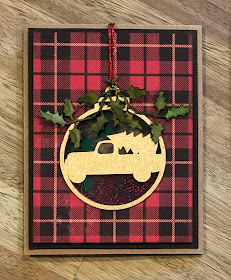
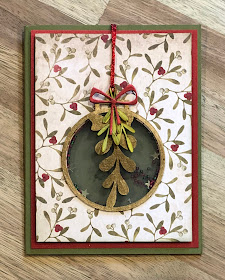
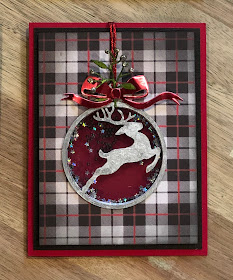
Today I am on the Gypsy Soul Laser Cuts Blog sharing a fairly quick, holiday shaker window card with a detachable ornament.
I think that these cards will be perfect for friends you may want to give a little something extra to, without all of the expectations that come with giving a gift.
Let's begin.
Pull out your favorite holiday papers and some solid color card bases, along with the Gypsy Soul Laser Cuts Christmas Baubles 1 set and a 2" circle die. The baubles come in a set of four. Carefully remove each ornament shape from the surround. I prefer to use an Exacto knife to cut the tiny areas where the shape is still attached to the surround.
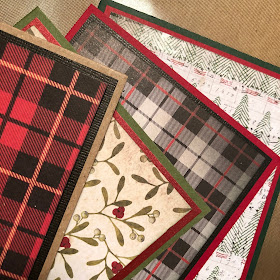
Pair up each shape with a patterned paper and then find a coordinating color card base. Since I am making Christmas cards, I am using red, green and kraft colored card bases. Each base is a folded 4 1/4" x 5 1/2" (A2 size) card. I cut a piece of patterned paper for each card front. These patterned pieces measure 3 3/4" x 5". I also add a layer of solid "fancy" paper between the card and the patterned piece. These pieces are cut to measure 4" x 5 1/4".
Next, I decide what color I want my ornaments to be. I use a paint pen to color both sides of the ornament. You can choose whatever colors you would like. I use silver and gold. I always love adding a touch of fancy. While the paint is drying, I return to the cards.
When complete, the ornament will be located in front of a shaker window. To create this window, use a 2" circle die. Layer all of the papers onto the flattened card front, secure the papers temporarily so they do not shift while die cutting, and place the die in the bottom half of the card. This serves two purposes, it allows for space at the top of the card to "hang" the ornament from, as well as gives an area at the top of the inside to include a sentiment, thus not obstructing the window.
Cut two 3" x 3" acetate squares for each card. (I am making 4 cards, so I cut a total of 8 squares.) These squares are easily cut from recycled plastic packaging. I love the idea of repurposing and especially with plastics. Attach the first acetate square on the card base front, covering the opening. (Try not to get any adhesive within the area that will be within the circular opening.) Next, attach the solid "fancy" layer to the card front, making sure that there is adhesive completely surrounding the circular opening. (This is to ensure that none of the fillers will have anywhere to escape from.) I use a Tombow permanent adhesive tape runner for these cards. It is easy to run the adhesive right around the circles without stopping.
The next layer is created with a 3 1/2" x 4 1/2" piece of fun foam. Center this piece on the patterned paper, flip over, and trace the circular opening. Die cut the circle from the fun foam. Using the tape runner, apply adhesive on one side of the foam piece. Be sure to completely surround the circular opening, as well as along the top and bottom edges. Attach the foam piece to the fancy layer, making sure that it is aligned with the circular opening and straight. Rub all the edges to ensure contact.
Now it is time to add the filler. You can use a variety of items for the shaker contents. I have used some festive red and green glass seed beads as well as some decorative sequins. Each card was filled with things I believed were complementary to the patterned paper as well as the respective ornament.
Add the second acetate square to the reverse side of the patterned paper, again trying to keep the adhesive to the edges so it will not be seen from the window. Apply adhesive to the exposed side of the fun foam and pay special attention to the edges of the circular opening. Align the top patterned piece of paper over the layers and secure in place. The shaker window portion of the card is complete.
I cut a length of metallic floss and tie the two ends together, This looped end is fed through the hole in the ornament and the knotted end slips through the loop created. This creates the hanger for the ornament. I glue pieces of inked die cut greens onto the ornaments to embellish.
Thank you for stopping by today, I truly appreciate it.
~Ann
xxx
supplies used:
circle die: 2"
Deco Color Premium Paint pens: silver and gold
Distress ink:
black soot, crushed olive, evergreen bough, forest moss, peeled paint, pine needles
DMC embroidery floss: red metallic
Emerald Creek / Quietfire Designs modern gilding powder: burnished silver
Exacto knife
glass seed beads
Gypsy Soul Laser Cuts: Christmas Baubles 1
plastic packaging or acetate sheets
sequins
Stickles: mercury glass
Tim Holtz Ideaology paper stash: christmas, blackout kraft
Tim Holtz / Sizzix: festive greens, funky festive, holiday greens, holiday greens mini
Tombow permanent adhesive
Tim Holtz / Stampers Anonymous: Christmastime (CMS352)
VersaMark embossing ink
I am entering these ornament shaker window cards into the following challenges:
Simon Says Stamp Monday Challenge: Recycle
Today I am on the Gypsy Soul Laser Cuts Blog sharing a fairly quick, holiday shaker window card with a detachable ornament.
I think that these cards will be perfect for friends you may want to give a little something extra to, without all of the expectations that come with giving a gift.
Let's begin.
Pull out your favorite holiday papers and some solid color card bases, along with the Gypsy Soul Laser Cuts Christmas Baubles 1 set and a 2" circle die. The baubles come in a set of four. Carefully remove each ornament shape from the surround. I prefer to use an Exacto knife to cut the tiny areas where the shape is still attached to the surround.
Pair up each shape with a patterned paper and then find a coordinating color card base. Since I am making Christmas cards, I am using red, green and kraft colored card bases. Each base is a folded 4 1/4" x 5 1/2" (A2 size) card. I cut a piece of patterned paper for each card front. These patterned pieces measure 3 3/4" x 5". I also add a layer of solid "fancy" paper between the card and the patterned piece. These pieces are cut to measure 4" x 5 1/4".
Next, I decide what color I want my ornaments to be. I use a paint pen to color both sides of the ornament. You can choose whatever colors you would like. I use silver and gold. I always love adding a touch of fancy. While the paint is drying, I return to the cards.
When complete, the ornament will be located in front of a shaker window. To create this window, use a 2" circle die. Layer all of the papers onto the flattened card front, secure the papers temporarily so they do not shift while die cutting, and place the die in the bottom half of the card. This serves two purposes, it allows for space at the top of the card to "hang" the ornament from, as well as gives an area at the top of the inside to include a sentiment, thus not obstructing the window.
Cut two 3" x 3" acetate squares for each card. (I am making 4 cards, so I cut a total of 8 squares.) These squares are easily cut from recycled plastic packaging. I love the idea of repurposing and especially with plastics. Attach the first acetate square on the card base front, covering the opening. (Try not to get any adhesive within the area that will be within the circular opening.) Next, attach the solid "fancy" layer to the card front, making sure that there is adhesive completely surrounding the circular opening. (This is to ensure that none of the fillers will have anywhere to escape from.) I use a Tombow permanent adhesive tape runner for these cards. It is easy to run the adhesive right around the circles without stopping.
Now it is time to add the filler. You can use a variety of items for the shaker contents. I have used some festive red and green glass seed beads as well as some decorative sequins. Each card was filled with things I believed were complementary to the patterned paper as well as the respective ornament.
Add the second acetate square to the reverse side of the patterned paper, again trying to keep the adhesive to the edges so it will not be seen from the window. Apply adhesive to the exposed side of the fun foam and pay special attention to the edges of the circular opening. Align the top patterned piece of paper over the layers and secure in place. The shaker window portion of the card is complete.
I cut a length of metallic floss and tie the two ends together, This looped end is fed through the hole in the ornament and the knotted end slips through the loop created. This creates the hanger for the ornament. I glue pieces of inked die cut greens onto the ornaments to embellish.
When the glue is dry, add two dots of removable adhesive to the reverse side of the ornament. (If you put the adhesive along the edge and behind the ornament top section, it will not be seen from the inside of the card when open.) The extra length of the floss hanger can be secured on the inside of the card with a small piece of holiday washi tape. Lastly, stamp and emboss a holiday sentiment on the inside of each card.
I hope that you have enjoyed these festive cards that give a little bit more. I look forward to making more holiday cards to share with loved ones and friends.
Best wishes on all the season's preparations, whichever holiday you celebrate.Thank you for stopping by today, I truly appreciate it.
~Ann
xxx
supplies used:
circle die: 2"
Deco Color Premium Paint pens: silver and gold
Distress ink:
black soot, crushed olive, evergreen bough, forest moss, peeled paint, pine needles
DMC embroidery floss: red metallic
Emerald Creek / Quietfire Designs modern gilding powder: burnished silver
Exacto knife
glass seed beads
Gypsy Soul Laser Cuts: Christmas Baubles 1
plastic packaging or acetate sheets
sequins
Stickles: mercury glass
Tim Holtz Ideaology paper stash: christmas, blackout kraft
Tim Holtz / Sizzix: festive greens, funky festive, holiday greens, holiday greens mini
Tombow permanent adhesive
Tim Holtz / Stampers Anonymous: Christmastime (CMS352)
VersaMark embossing ink
I am entering these ornament shaker window cards into the following challenges:
Simon Says Stamp Monday Challenge: Recycle


Love these Ann and love that the decorations detach! absolutely GORGEOUS!!!
ReplyDeleteI saw these on FB and had to pop by for a closer look ;-)
luv
Lols x x x
Super Gorgeous!!
ReplyDeletesame here saw them on FB.
Ann, these are GORGEOUS!!! Brilliant way to give them and add that special something with the shaker. I love them! Anyone would be thrilled to get one for a gift! ♥️ Thanks so much for sharing!
ReplyDeleteI am so in love Ann! They are truly beautiful and make such festive gifts in themselves! <3 Hugs, Autumn
ReplyDeleteThese are Beautiful! I love that there are ornaments within the card. The Reindeer is my favorite 💚 Thanks for sharing this tutorial, I'm excited to give it a try.
ReplyDeleteThe cards are beautiful Ann, I love the way you have decorated each of them and those bauble fronts give a real touch of elegance. I have never used fun foam in this way before (why I ask myself?), it is such a simple but clever idea and one I will definitely try. I am bookmarking this for future reference, thank you! Hugs, Anne xx
ReplyDeleteA lovely card design, and it works so well in all those variations of paper and the different baubles - delightful.
ReplyDeleteAlison x
Ann, these are beautiful, fun cards, and expertly constructed! I always love to use fun foam on my cards for dimension, but I seem to have hid my hefty stash of it from myself with a late summer Closet clean out! I love the idea of the ornaments, which takes this from a card to a true gift! Lovely idea! Hugs!
ReplyDeleteAnn, I'm back to say how beautiful your CAS fall card on IG is. (I'm not on IG) I love the chunky 'thanks' with those stunning embossed leaves. What an effective design. I'm so happy you played along at The Funkie Junkie Boutique blog! I hope you had a wonderful Thanksgiving! Hugs!
ReplyDelete