Wednesday, March 20, 2019

nesting place

Hi everyone, today I am on the Gypsy Soul Laser Cuts blog sharing "nesting place", a project inspired by the start of spring. We have had glimpses of what is to come with some very warm days, which have have helped the daffodil bulbs begin to peek out of the ground. Spring is my absolute favorite season of the year and today marks its official start.
My "nesting place" is created using the Gypsy Soul Laser Cut mini house shadowbox 3. This piece is fairly small (3"h x 2"w x 1"d), which was just the right size to house my tiny nest and eggs. The mini house shadowbox 3 arrives in 6 pieces and requires simple assembly. For this project, I have also used tiny shingles standard on the sloped roof to give it an authentic house feel.
Once I have all the pieces laid out, I find the papers that I want to use to cover the sides and back of the house. I trace the outline of the (interior) surfaces to be covered and cut the paper to fit within the tabbed areas. This allows the pieces to fit securely together when assembling the house. When tracing the pieces to fit on the exterior surfaces, I keep to the outside edges. These pieces are adhered once the house sides and base are glued together. They will cover all of the joints to create a finished appearance at the edges.
While the box portion of the house is set aside to allow the glue time to cure, I begin work on the roof pieces. Both sloped chipboard pieces are painted brown, and while drying, I begin inking the shingle pieces. the tiny shingles standard are the perfect scale for this house. Each row is cut to the proper length and inked with brushed corduroy distress ink. This gives the look of real wood shingles. When the pieces are ready, they are layered onto the base. I begin at the eaves and layer each row on top of the next until I reach the peak of the slope. 
Note: one of the slope rectangular pieces is slightly longer than the other. When assembling, this piece extends above the second sloped piece at the peak. I attach the shingles to the second side and the last layer of shingles meets right at the roof ridge. 
A piece of thin dresden is adhered along the front edge of the slopes. This entire assembly is set aside to dry completely before being attached to the house.
I rub a small amount of gel stain into an old thread spool. When the stain has dried, I secure a piece of crocheted lace around the spool with distress collage medium. The spool is then attached to the center of the base of the house to raise it up. 
I twist some raffia and twig roping into a circle to create a small nest. I add a lot of glue to the base to keep the shape and set aside to dry. Three mini decorative eggs are coated with glue then covered with gilding flakes. These eggs rest at the center of the nest. 
A clipping sticker is cut to fit and attached to the rear of the house reading, "the pretty little birds chirped" and at the center of the bottommost house edge, a chit chat sticker reading, "home."
I hope you have enjoyed learning how I created "nesting place." Maybe you are inspired to create your own spring project? If you do, the GSLC team and I would love seeing what you create! Please share it with us on the Gypsy Soul Laser Cuts Craft Group on Facebook. You can find it here.
Thanks so much for taking the time to stop by today, 
I really appreciate it!
~Ann
  xxx 


I am entering this project into the following challenges:
Simon Says Stamp Monday Challenge: Miniature / Tiny Things


supplies
crocheted lace
Distress ink: brushed corduroy
Distress collage medium-matte
dresden trim
Gypsy Soul Laser Cuts:
mini decorative eggs
Nuvo gilding flakes
thread spool
Tim Holtz Ideaology:
chit chat stickers, clippings stickers, memoranda paper stash

Thursday, March 14, 2019

out of the ordinary


 Hi Everyone, this month the Emerald Creek Dares Challenge is inspired by the song Ordinary Day by Great Big Sea. When I listen to the song, it helps me to understand that one's state of mind plays a huge roll in the way the days unfurl. Each day can be filled with adventures or challenges, depending on how you look at it. I find myself best able to tackle whatever life throws at me by being as prepared as possible.
For me, this "preparedness" to ensure a positive frame of mind can take the form of a list, or a quick sketch of an idea that pops into my head, sometimes it's a thought or something inspiring jotted down on a piece of paper to be put to use when needed. I have created a small wrapped journal to keep handy which will hold all of these special things.
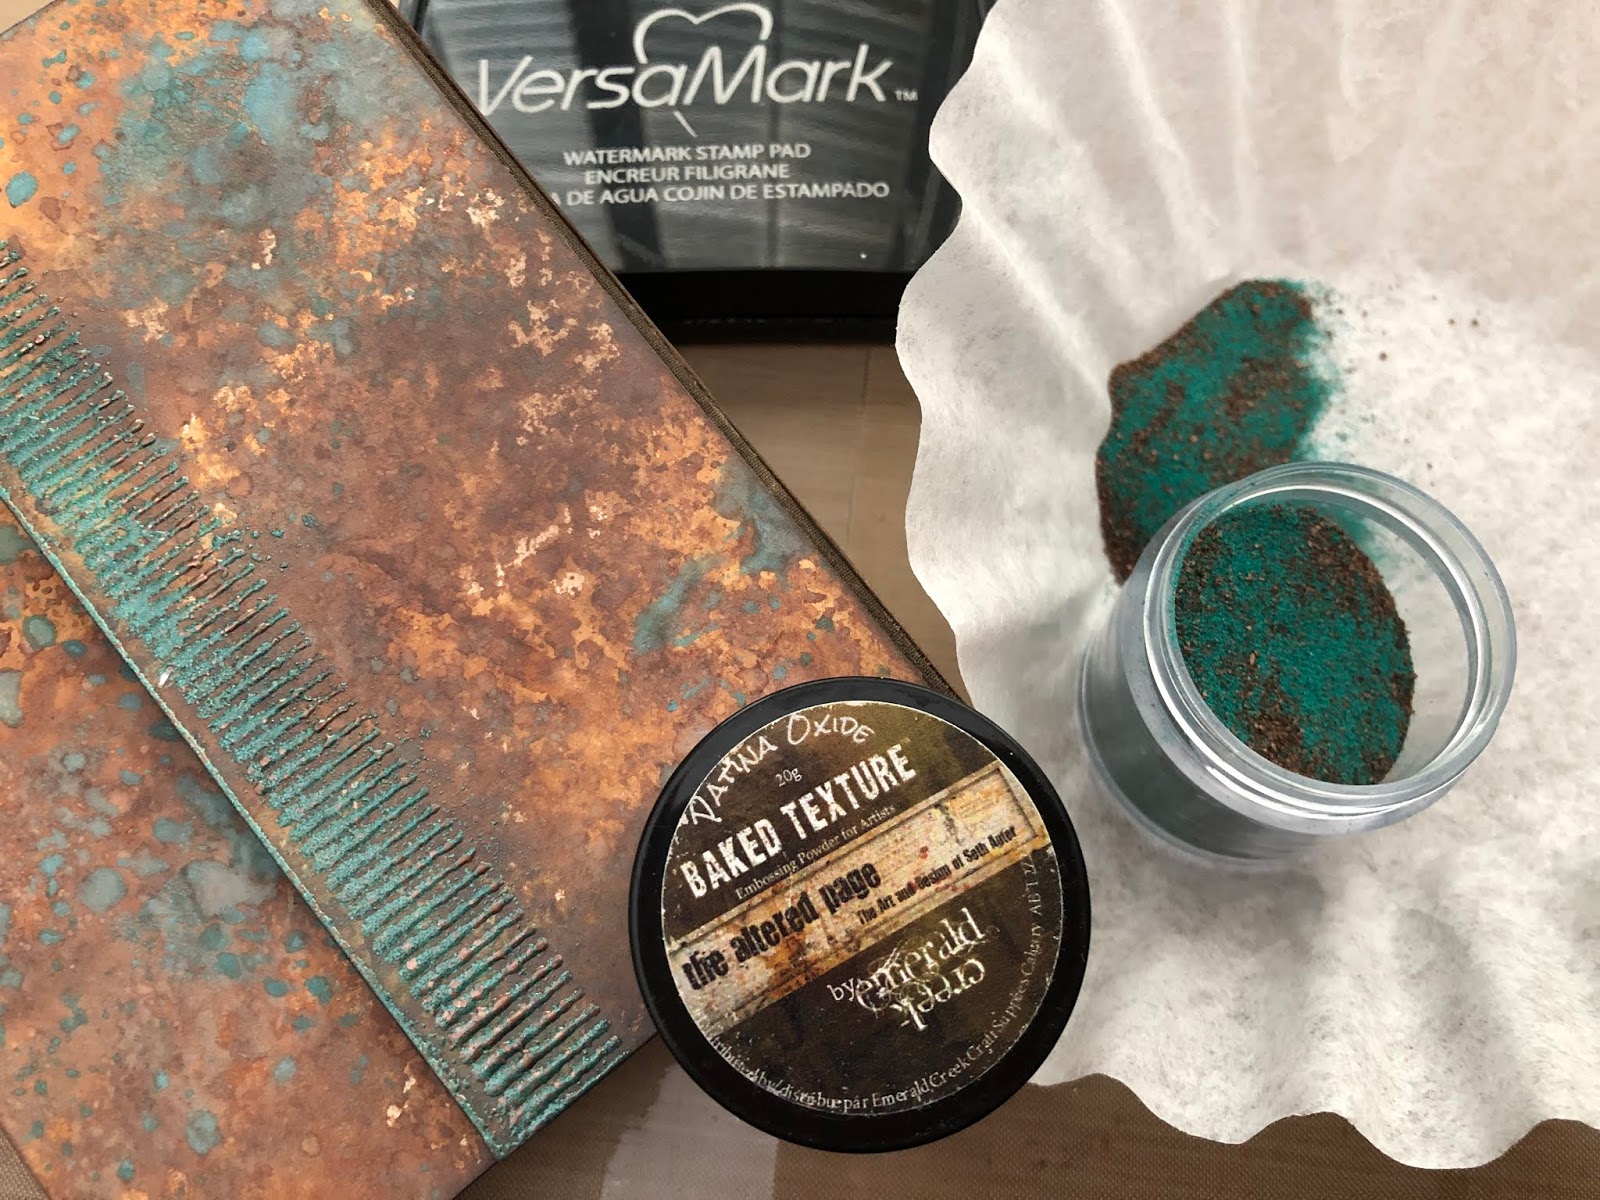
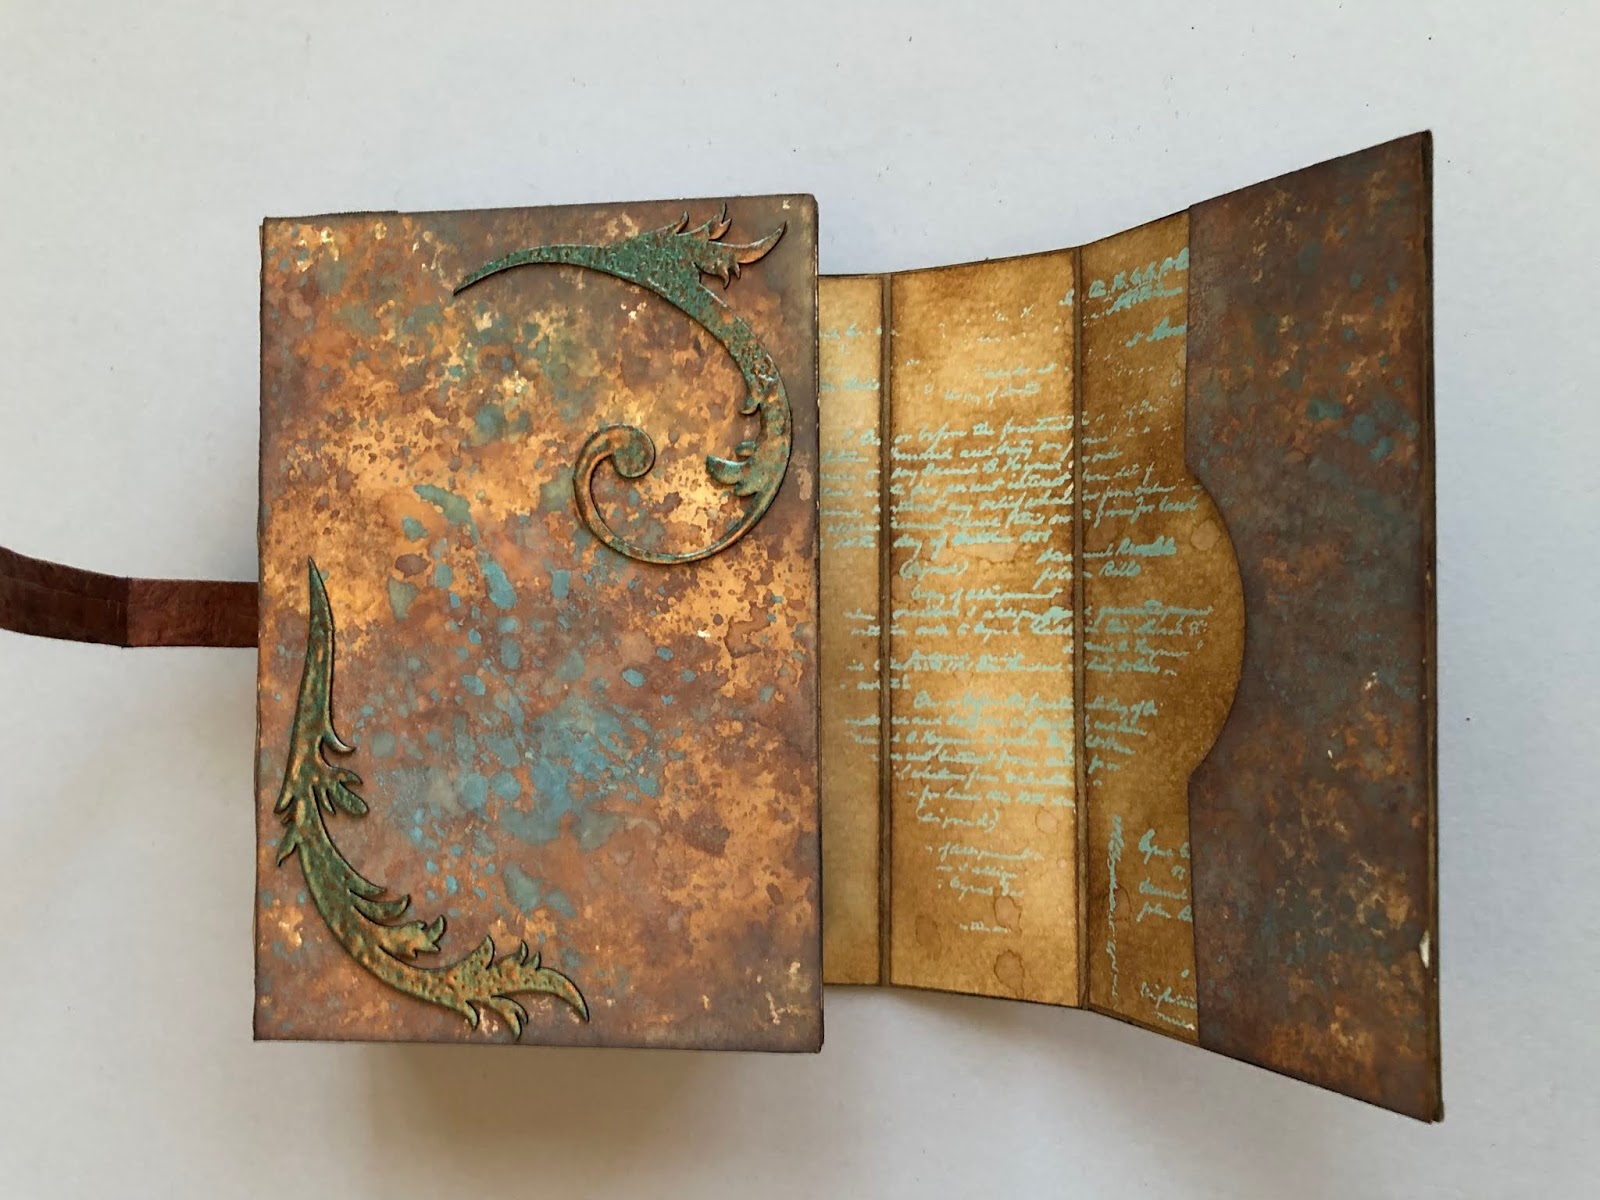
I cover an Eileen Hull wrapped journal base with handmade inked papers. On the short closure flap, I emboss a stamped image along the edge with Seth Apter baked texture in patina oxide. This powder creates the most wonderful finish, full of interest. 
I want the inside to coordinate with the colors of the exterior and to have a soothing appearance. In order to create this effect, I partially stamp (with Versamark ink) using a script stamp along the paper. This is coated with the new Emerald Creek Allure powder in Iceberg
Iceberg is a gorgeous translucent powder in a blue aqua color. It is very fine and works really well on super detailed images. When the embossing has cooled, I ink the paper with distress inks. The embossing creates a resist. I love the how the translucent color stands out against the background.
The album is assembled and mini notebooks and pocket folders are inserted. Now it is time to add the special details. 

I coat some feathery flourish chipboard laser cuts with patina oxide embossing powder and heat set. When cool, these are added in various locations.
Emerald Creek daisy brads are coated with embossing in patina oxide to coordinate and give a special finishing touch. I create a belt closure and add embossing to potions of the buckle. 
I am looking forward to putting my mind at ease by having this journal in hand. 
Perhaps you have been inspired by my take on this month's challenge? We would love to see your interpretation of Ordinary Day. Join the #ECMAR2019 challenge, if you dare!
Thank you so much for stopping by,
~Ann


supplies used:
copper 1/8" eyelets
Distress inks:
ground expresso, walnut stain
Distress oxide inks:
broken china, spiced marmalade, vintage photo, walnut stain
Distress paint: walnut stain
Eileen Hull / Sizzix wrapped journal scoreboards die
Emerald Creek Embossing Powders:
Baked Texture - Patina Oxide
Allure - Iceberg
Emerald Creek Forge:
daisy brads
Gypsy Soul Laser Cuts chipboard pieces:
feathery flourishes
Lineco: self-adhesive linen hinging tape
Tim Holtz / Stampers Anonymous stamps:
entomology, ornate trims
Tim Holtz Ideaology: buckles, fasteners
Versamark embossing ink
Xyron permanent adhesive


Wednesday, March 6, 2019

her faithful journey

Hi everyone, it's the first Wednesday of the month which means I am on the Gypsy Soul Laser Cuts blog. The Gypsy Soul Laser Cut triptychs and reliquaries are some of my most treasured pieces to work with. They are durable enough to handle all sorts of mediums and still remain straight for display. You can imagine how thrilled I was when I found out they have a large version. The arch top triptych 8 inch is the base I am using for "her faithful journey".
The first thing I like to do with any piece I am working on is to visualize a theme and how I anticipate the final appearance. Although many of my pieces take take on a life of their own once I begin, I feel it's a good idea to get a general feel for direction, size and types of finishes to help me gather my supplies.
 
I will be creating a very traditional religious triptych, one reminiscent of the old European Icons. The first step involves selecting the images that will be featured on each panel. I prefer that all three images are in the same art style. This gives the piece, when attached together, a cohesive look and feel. All three images will be linked together to represent an overall theme. When selecting my focal image, I like to lay the top "frame" piece over the picture to see how it will look. This is helpful when determining if the scale of the image is too small or large for the piece.
Once the focal images are selected, it is time to begin working on the desired finishes. I often let the style of my images dictate how the reverse side of the panel will be decorated. Since the three panels will be hinged together and free-standing when complete, I always make it a point to ensure the piece is as beautiful viewed from the back as it is from the front. I envision the triptych as if it is made from wood, with touches of gilding, worn away over time; the reverse side with simple patterns to create a relief. These raised areas will display remnants of paint and gilding rubbed away over time.
Once all the supplies are gathered, I layout a design for the reverse side using Gypsy Soul Laser Cuts. I use two sets of petal corners as well as a leafy swirls and buds set. I attach the pieces with collage medium then allow to dry.
The decorated back sides are all painted with walnut stain distress paint, unifying the elements with the panel. The front decorative frames are also painted with walnut stain.
Next it is time to trim and attach the focal images for each panel. I have used images by Giotto from a  book by Gerldine Elschner titled The Nativity. (Note: some of these images have been modified using collaged pieces from other images by Giotto) I like to leave a small edge around the image so that when the decorative frame is adhered, there are no extra edges overhanging. The ornate edge at the arched tops make it difficult to get an exact trim. The trimmed images are adhered to the flat panels with a thin coat of collage medium and set aside to dry. Adhere each image to its respective panel; when all pieces are completely dry, add a thin layer of collage medium on top to seal them. Allow to dry overnight.

Next, I want to create my envisioned wood finish. I add layers of dry brushed paints on the back sides. I prefer to work on all three panels at the same time, this helps to ensure the finished piece is cohesive. I also paint accents of chipped sapphire blue within the open flowers, and along the stems and swirls as well as within the petal corners. When I have achieved the desired look, I allow it to dry and begin recreating the finish on the front framing pieces. (Note: I always attach the framing pieces after all of the finishes are dry. This allows me better access to alter the images without being encumbered by the frame.)
While the frames are drying, I add some gold accents and collage elements onto the images, I also add color to some of the details.
When dry, the entire surface is covered with crackle finish and set aside to cure. I rub dark stain into the cured crackle to accent the finish.
The next step is attaching the cover frames to each panel. I coat the back side of the cover frame with collage medium and align the frame with its respective back panel, then clamp together, and allow to dry. Depending on the number of small clamps available, this step may take quite a bit of time.
When all three panels are assembled, I attach miniature hinges to the back along the edges where the panels meet. I take care to make sure all the three pieces are lines up horizontally so that when the triptych is stood up, all the bottom edges with rest completely on a flat surface. (Note: the triptych can be hinged in various ways, I simply prefer to use hinges.)
As a final step, I add gilding wax to some of the raised spots on the back and along the decorative arched edge.
If you are inspired to create your own triptych, be sure to check out the Gypsy Soul Laser Cuts Shop, there are many different styles and sizes to choose from.
Thanks so much for stopping by today,
I truly appreciate it.
~Ann


supplies:
Art C: gold gilding wax
DecoArt Americana gel stain: walnut
DecoArt one step crackle
DecoColor metallic gold paint pen
Distress collage medium: matte
Distress paints: chipped sapphire, ground expresso, tarnished brass, walnut stain
Gypsy Soul Laser Cuts:
arch top triptych 8 inchleafy swirls and budspetal corners
Woodpile Fun: antique brass plated hinges

Friday, March 1, 2019

Relics & Artifacts Muse - Lotus Blossom

Today I am on the Relics & Artifacts Muse blog, sharing a very special piece. 
The lotus blossom is a sign of awakening, rebirth, and enlightenment. I could not imagine a more appropriate project to begin my journey with Relics & Artifacts.


I hope that you will stop by and learn more about this fascinating laser cut lotus blossom and resin buddha from the collection. You can visit the post by clicking here.


I have included a list of supplies below for your convenience.
Thanks so much for stopping by,
I truly appreciate it.
~Ann
 xxx


supplies used:

Aleene's wood glue
DecoArt acrylic paint: dazzling metallic worn penny
DecoColor Premium gold oil based paint pens: extra fine, fine, chisel
Dina Wakley heavy body acrylic paint: penny, gilt
Distress paint antique bronze
Emerald Creek oil rubbed bronze embossing powder
Folk Art acrylic paint: brushed metal brushed bronze
gold gilding wax
 Minwax stains: golden oak, provincial
miscellaneous jewelry findings: headpins, gold chain
miscellaneous wooden beads
Ranger embossing ink dauber
Relics & Artifacts Deity Trio
Relics & Artifacts Lotus Blossom


Wednesday, February 20, 2019

taming creative chaos

Hi everyone, this year one of my goals is to tame the "creative chaos" by getting my studio space more organized. I spent some time at the beginning of the year cleaning, organizing, and quite honestly, simply putting things where they belong. It seems that the more creative I am, the more of a mess my studio space becomes and the harder it is to find things that I have set aside for a specific purpose. To that end, I need a place to keep all of my handmade cards. I seem to have quite a pile and yet when a birthday or holiday rolls around, I am always searching. 
Today I am on the Gypsy Soul Laser Cuts blog sharing this card organizer with you. There are so many ways that it can be used. The trim organizer (as it is titled in the GSLC shop) is very generous in size. The base measures 11" by 5" and has a central divider creating two equal compartments. These compartments easily fit A2 cards, and even slightly larger. The organizer comes with 12 dividers. These are shaped like flat bobbins, so could technically be used to store ribbons or trim; however, I am using them as simple dividers between types of cards. The box arrives arrives flat (6 pieces) and requires assembly. The twelve bobbin cards can be used as bare chipboard or finished with paints or papers as I have.
I always find it easiest to test assemble the piece, this way I can better understand what areas will be visible as well as facilitate the order in which things should be glued. I sort through my paper stash and select a design that I think will work well for my purpose. The interior surfaces can be covered with smaller sized pieces; however, a 12x12 sheet will work best on the long exterior sides (one sheet will cover both the front and the back.)
Before I begin adhering my chosen papers, I paint all of the edges with black soot paint. This will create a finished appearance along the edges where the different papers meet as well as conceal any cuts that may be just a bit too short. Then I begin cutting the papers to size. Oftentimes, when there are multiple sized pieces and they are close in size, I turn them over and give them a designation (letter or number) then also write that onto the chipboard at the location it will be adhered. It helps to keep everything from getting mixed up when it is time to assemble.
I like to add may papers to the Chipboard pieces white they are flat. I find it easier to adhere the papers correctly and, when necessary, weigh them down until dry to keep the edges from curling. On this particular piece, I realized that it would work better to attach the two long exterior paper pieces after the box was assembled. There are no "right" and "wrong" ways to assemble the Gypsy Soul Laser Cut pieces, generally whatever works best for your project. The main piece of advice I always follow is: to ensure the tabs are able to connect easily, do not cover with paper, the added thickness generally does not allow for the tabs to insert into one another.
Once I have all of my paper pieces adhered to the interior surfaces of the box pieces, I begin to assemble. I spread clear, quick dry multi-purpose glue on the tabs and flat areas to be joined, then insert the tabs into the corresponding slots, beginning with the central divider. Next, I attach the front and back box sides and clamp together at the central divider until dry.
The final pieces I assemble are the two end pieces. I use clamps to secure these as well; however, it is not necessary.
With the box assembled, I add the final papers to the front and back exterior sides. (Note: I always ink the edges of any cut pieces so that the white does not show.)
I consider adding feet to the base of the box for a more decorative look, but decide on adding a piece of crafting felt to the very bottom of the organizer. This will allow the box to be situated on a solid or wire shelf, as well as protect any surfaces that it will be set upon. Once assembly is complete, it is time to begin work on the bobbins. 
 My original thought was to divide by months of the year (there are 12 dividers/months), but I believe what would work best for me is to sort by occasion or theme. To this end, I keep the dividers simple. I have learned over the years that my storage solutions are often evolving and this will allow me to change things up easily (if necessary) at a later date. I select some of my favorite worn wallpapers, and paper stash designs for the bobbins. The edge of each bobbin is painted with black paint and allowed to dry. One side of the bobbin is coated with collage medium, I secure the desired paper in place, and weigh down until dry. Once dry, I trim the paper edges with an Exacto knife. All of the bobbin pieces are covered on both the front and back sides.
 
I finally have a special place where I will be sorting and storing miscellaneous cards I have made. There will be no more searching amidst the piles, only flipping through my organizer to find the correct one.
I hope that you are finding time to get creative this year, I have found that even in organizing there are ways to exercise my creativity. Thanks so much for stopping by, I truly appreciate it.
~Ann
  xx

Supplies:
3M quick dry tacky glue
Distress collage medium - matte
Distress ink- brushed corduroy
Distress Paint - black soot
Gypsy Soul Laser Cuts - trim organizer
Tim Holtz Ideaology -
worn wallpapers (original and halloween), french industrial paper stash