Wednesday, October 3, 2018

a hallowed haunt

Welcome to Skelly's shed,
 a place to rest her weary head...
I can hardly believe that the hallowed month of October is upon us...this means that holiday preparations are in full swing. I love decorating for Halloween; the spookier, the better! I am really excited to share this project that I created for the Gypsy Soul Laser Cuts blog using the GSLC house shrine box. The chipboard shrine was the perfect base for this spooky haunt.
The house shrine box is made up of seven pieces. It arrives flat and requires assembly. 
I always like to test how the pieces fit together before adding any finishes to the chipboard. This way I know the correct direction for any patterned paper that I will be using, as well as which areas of the pieces will remain unseen. Viewing the piece in its 3D form also allows me to envision how I hope the finished project will look. 
Once I have a good idea of the direction the project will be taking, I invade my paper stash to find the perfect surface coverings. I paint all of the exposed chipboard edges with black soot distress paint and allow to dry before starting the assembly. By painting the edges, it allows for some margin of error and presents a finished appearance when I when I add papers.
The exterior of the shed is covered in a Tim Holtz wood plank patterned paper. Using the chipboard blanks as templates, I cut the paper into pieces that fit each of the exterior surfaces. I apply crackle paint to random planks on each section. When dry, this will create an aged wood look. Once the crackle has cured, I apply hickory smoke and black soot distress ink over the paper, paying special attention to the crackled areas. I then cut solid black cardstock pieces to match the shape of each patterned piece. The planks are cut apart all edges are inked, and then each plank is put back in its place onto the solid black card. Some planks have multiple layers of double sided adhesive to raise them sightly while others are glued directly to the card. This gives the exterior surfaces an authentic plank siding appearance. When I have completed this technique on each of the exterior templates, I set them aside and cut the papers for the interior. 
I use a halloween worn wallpaper for the interior surfaces. The wallpaper is distressed with ink and I do a test fit to ensure proper alignment. Collage medium is applied to the interior walls, and the papers are adhered and set aside to dry. Once dry, the box is constructed. I often use clamps to hold everything in place while the glue is drying. Depending on the project, sometimes I assemble the box and then apply paper; however, on this piece I attach all of the interior
surface papers prior to assembly. Either way that you prefer to work is fine.
The sloped roof pieces are covered with shingles cut from copper metallic kraft paper that has been die cut, sanded and inked. Each layer of shingles is attached to the roof slab beginning at the bottom edge and working up towards the peak so that the shingles layer on top of one another, like an actual roof shingle would be laid. 
After the roof is installed, I add the topmost row of shingles and then lift random pieces to give the roof even more dimension.  
When the exterior finishes have all been applied, I add embellishments to the shed. A die cut spiderweb is located at the internal roof apex, set away from the rear wall for added dimension. A lone spider dangles from his web awaiting its next prey. 
 Skelly holds her prized pumpkin, while a riotous raven stakes his claim on one of the castaways. 
The raven is a Gypsy Soul Laser Cut piece from the creepy critters set that has been embossed. 
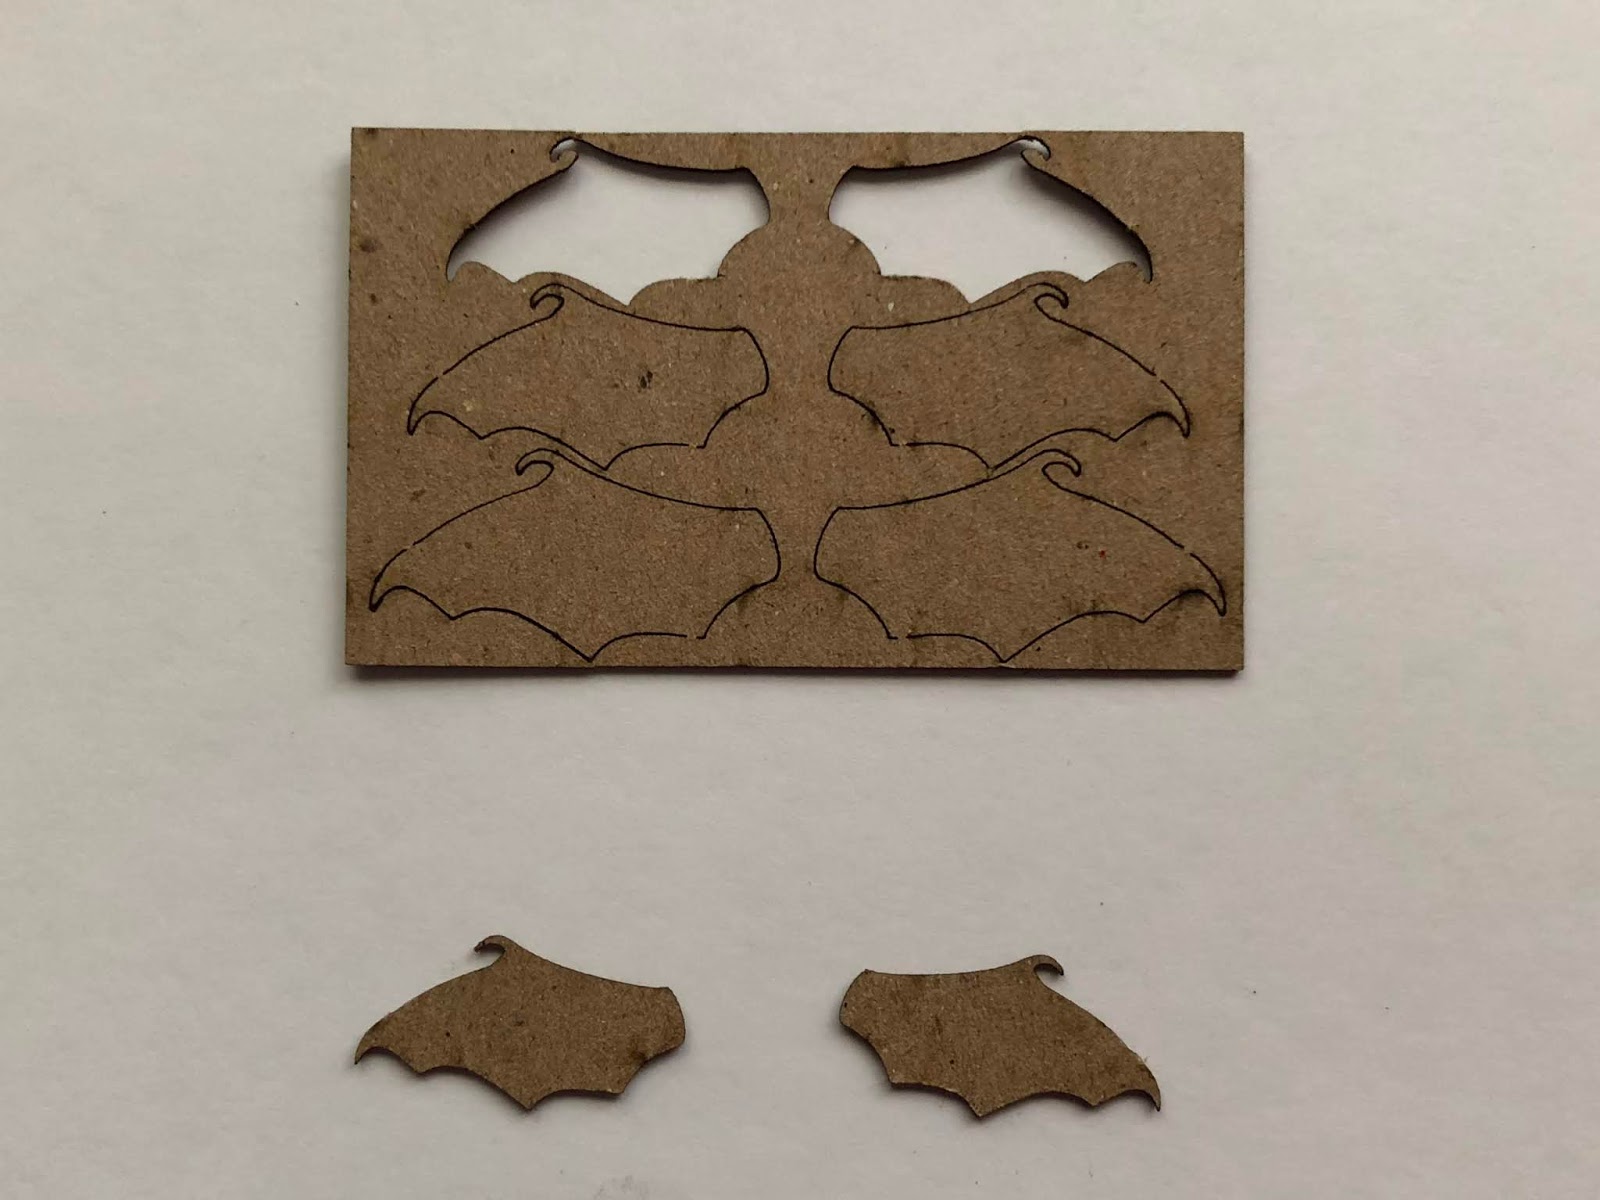
 This set is fabulous for all of your spooky creations; it contains various critters, ranging from bats to cats, rats and birds. There are eight moderately sized critters on the sheet. I coat the piece with embossing ink, sprinkle on black embossing powder and melt it with a heat tool. After the first layer has cooled, I coat with a second layer of ink and sprinkle small amounts of Emerald Creek java embossing powder, then heat set. I cut a small wedge out of the pumpkin so that it fits snugly against the corner. The pumpkin is attached to the base/leg of the shed, and then the raven is secured to the pumpkin's stem with hot glue.
A skull and crossbones "jolly roger" adornment declares this is Skelly's shed. It has been painted with distress paint in areas to give it an aged look. 
Lastly, a quote token dangles from the roof:
 "here in the silence dark & deep, i offer you eternal sleep."


Wishing you a month full of halloween creativity. 
These holiday seasons allow an opportunity to bring new and different ideas to life. 
I hope you are inspired to create something spooktacular! 
~Ann 


Supplies used:
artificial butterfly wings
DecoArt one step crackle
dollar store skeleton
distress collage medium
distress ink: black soot, hickory smoke, ground expresso
Emerald Creek embossing powder: black, java
Gypsy Soul Laser Cuts: 
Tim Holtz idea-ology:
 adornments halloween, adornments jolly roger, adornments treasures, paper stash halloween, paper stash metallic kraft, quote tokens halloween, worn wallpaper halloween, jump rings, pumpkin pieces, 
Tim Holtz Sizzix alterations:
 mixed media halloween, village rooftops 


Wednesday, September 19, 2018

in the dead of night


in the dead of night, souls come to life. 
they dance and play, and haunt away; 
until the dawn, when night night is gone.

It's that time of year when we begin to see all the wonderful Halloween and seasonal creations that designers are sharing. I thought it would be fun to incorporate some of my favorite Gypsy Soul Laser Cut seasonal embellishments in a spirited display box.
I start with a chipboard trinket box die cut from Eileen Hull/Sizzix. Instead of using the latch mechanism that is cut out along with the box pieces, I decide to use small hinges and a clasp to secure the cover panel. This will ensure that the box remains closed when it is in the upright position. I paint all of the exposed box edges with black soot distress paint and allow them to dry before I begin the box assembly. The box is covered with some halloween papers from my stash. The front and back covers use a vintage Halloween candies print paper, while the main compartment is kept simple to showcase the focal piece. Using a small black and white check paper as a base, I stamp with the script stamp from the entomology stamp set. Once the ink has dried, all of the papers are edged with black soot distress ink. The front cover of the box features a flying bat from the Gypsy Soul Laser Cuts creepy critters set.
The sheet contains eight different creatures, including cats, rats and ravens, perfect for all your spooky creations. I know I will be using all these creatures up in my Halloween makes! I envision the flying bat with swooping wings creating a wonderful frame above the oval opening on the front of the trinket box.  I remove the bat piece from the sheet and coat it with embossing ink. The embossing ink is covered with rocky road baked texture and heat set, creating an eye-catching textural effect. Small black rhinestone gems are adhered around the oval opening.
I love the look of frozen charlottes and have a stash of various sizes. Adding wings to them can instantly change the look from doll to winged soul, whether it be beautiful or haunting. The main focal point of "in the dead of night" is one of these charlottes featuring a pair of wings from the Gypsy Soul Laser Cuts bat wings miniatures set. 
These wings are exactly as they are labeled, miniatures. The set contains three pairs of wings, graduated in size. My project features the smallest pair. I carefully remove the wings by using an exacto or sharp craft knife to cut the spots where the wings are attached to the sheet. These tabs are mainly to keep all the pieces intact during shipping. Once the wings are removed, I coat the front side of each wing with embossing ink and sprinkle with rocky road baked texture embossing powder. The powder is heat set to create a wonderful finish and set aside to cool. Once cool, the wings are adhered to the charlotte's back and some copper wire is wound around the body creating a harness.
This winged soul needs a special backdrop to shine. I select a frame from the delicate frames and ornaments shape set that seems to be made to fit my box opening, as well as the winged charlotte.
This is another awesome set from Gypsy Soul Laser Cuts, it contains thirteen different pieces with wonderful detail. The oval frame I am using contains an open scallop edge. I use chunky rust baked texture to create an interesting finish on the frame, that coordinates with the oranges in the paper design as well as gives the piece a very realistic rusty look. I adhere a piece of coordinating paper behind the oval to complete the backdrop.
When I begin to assemble the piece, I decide that it will add interest if I include some additional small bat die cuts in flight within the box. Using thin wire with the die cuts attached at one end, I wind a few around the frame in various spots. The wires are wrapped and twisted to give the appearance of taking flight. 
This piece will be attached to the inside of the box so that it is centered within the oval opening. I paint a wooden spindle with black soot distress paint and drill a hole in the center to accommodate a screw. A coordinating hole is drilled into the bottom of the trinket box for the screw to pass through and secure into the spindle.
A quote chip is distressed and areas are coated with chunky rust baked texture. This title piece is adhered to the bottom of the front cover. 
I am really excited to begin decorating for the Halloween holiday, and I know just where I would like to display this one. 
If you are creative and like to make your own decorations, or perhaps have been inspired to create a decor piece, I highly recommend trying out some of the seasonal sets available in the Gypsy Soul Laser Cuts Shop, the possibilities are endless. 
I hope you enjoy the remainder of September, fall is definitely in the air. 
Thank you so much for stopping by today.
~Ann


Supplies used:
4mm back rhinestone gems
copper wire
distress collage medium
distress inks: black soot
distress paint: black soot
Eileen Hull / Sizzix: trinket box die
Emerald Creek / Seth Apter baked textures: chunky rust, rocky road
frozen charlotte (cast resin)
Gypsy Soul Laser Cuts:
Tim Holtz ideaology: quote chips,
Tim Holtz / Sizzix: mixed media halloween (bats) 
Tim Holtz / Stampers Anonymous: entomology stamp set
wooden spindle 


Wednesday, September 5, 2018

affirmation accordion

Life is full of ups and downs and twists and turns; oftentimes, the unknown can lead to doubts and questioning. For my project today, I created a small affirmation accordion journal. Something little that can make a big impact in turning your thoughts around, just by opening it. A friend of mine had sent me a stamped saying a while back that really struck a chord with me. I have had it on the corner of my work table so that I could see it every time I went in to create. It is amazing how such a small reminder can make a difference. This was the inspiration behind my affirmation accordion.
Sometimes journals can be oversized and intimidating, I thought for this piece I would work with Gypsy Soul laser Cuts ATC sized ticket journals. These are a lot of fun to work with and their size is perfect to pop into a pocket or bag and carry with you. I begin with two sets of the ATC ticket journal, knowing that I will be adhering the first and last "tickets" onto my own covers, I want the inside to have more interior pages than the one piece will provide. Each piece contains a strip of five tickets.
To create the cover and back panel that the "tickets" will be attached to, I measure the size of the ticket journal when it is folded up, then add 1/8" all around so that the ticket journal will nestle snugly inside. The exposed side of each of the these cover pieces is faced with faux wood that I created using a 3D embossing folder. I love how it looks like real wood, yet is actually paper that has been embossed, painted and inked. On the interior faces of these pieces, I cut patterned paper to fit and ink around the edges. The first and last "ticket" will be attached onto these papers so I chose something that is appropriate for a background, yet adds interest.
My accordion will be secured by means of a ribbon that wraps around the outside and ties. This ribbon is kept in place by being thread through two eyelet holes in the back cover. The eyelets are set and piece of ribbon is pulled through before I adhere the last ticket to the back cover. When attaching this piece, I make sure to only adhere around the edges so that the ribbon is allowed to move freely.
Once I have prepared the covers, I set about creating the pages that will form the inside. The seasons are changing, the weather may be warm, but fall is in the air. I love the beautiful colors that nature presents to us in this time of change and decide to use this as inspiration for my color choices. I choose some favorite papers from my stash in coordinating patterns, as well as some collage tissue, solid pieces and possible embellishments. The papers are cut to fit each ticket face. This step requires a bit of planning as I want each page to work well with the one it is adjacent to, yet retain its own individual presence with in the accordion. It helps to visualize the interaction of sides by folding the accordion during this planning stage.
When considering interior pages, I decide to incorporate some pieces from the Gypsy Soul Laser Cuts honeycomb and bees small set. I think the pieces will complement the paper patterns really well. I cut some areas of the honeycomb apart to fit how I envision them on the tickets. Each of the pieces is coated with vintage beeswax embossing powder. My accordion uses one and a half GSLC ticket journal pieces, the remaining tickets can be set aside for another project. The tickets that will be secured to the covers are coated in gesso, allowed to dry and then collaged with vintage collage medium and floral collage tissue. I also create a couple extra tickets in this same manner to be used throughout.

Before adhering any of the paper pieces, I attach strips of linen binding tape to each external (mountain) fold. This will reinforce the folded edge, which will help prevent tearing. The strips are inked with distress ink so they blend into the design. All of the internal (valley) folds are covered with pieces of coordinating design tape. Since these are the inside edges of the reinforced folds, it is really more for decorative purpose. Most often when I begin to assemble the pieces, I tend to re-arrange a bit, since I have some extra pieces, it is easy to make adjustments to backgrounds. I attach the papers to the ticket bases with double sided adhesive tape. Some of the collage pieces are attached with collage medium. The front cover is attached along with all of the interior pieces; I wait to attach the back cover until the inside pages are complete. This way the ribbon does not get in the way or covered with glue. I color the seam binding ribbon with distress oxide inks to coordinate.
The final step in creating the accordion is embellishing each of the pages. I apologize for the lack of process photos during the assembly, I seem to have gotten caught up in the arrangement of pieces.
 Following are close ups of the finished pages with some description for materials:
The cover contains a quote token that has been colored with alcohol inks and edged with burnt copper leaves embossing powder. Distress crayon is rubbed into the text impressions.
The collage paper covered ticket is attached to the inside of the cover and a few metallic quote stickers are added. The adjacent page is a layering of die cut papers, the central portion cut from worn wallpaper and adorned with a few simple stitches and a rub-on "wish".
Next are a couple of my favorite pages, the inspirational piece (the stamped sentiment on a tea bag) is flanked by two lengths of inked lace trim and another metallic quote sticker. The honeycomb piece is coated with vintage beeswax embossing powder and attached to the stamped paper background. Some of the cells are filled with beeswax embossing powder and melted, remnant rub words complete this page.
Flowers are die cut from text pages and colored with distress ink, then coated with vintage beeswax embossing powder. These are tied together into a bouquet with craft thread and attached to the center of the framed ticket. On the right, a reminder to be true to yourself. It is not always easy to rise above the general flow, but it is what makes each of us important as individuals. The background paper is inked and stenciled. Golden highlights are added around the quote stickers. A hinged ticket reveals the words "be true."
Always seek wisdom, it helps us to learn and grow. The word SEEK is die cut from the base paper revealing colored paper below. Another piece of beeswax-embossed honeycomb contains open cells which include positive thoughts. The embossed bee is from the GSLC set. Another collage paper covered ticket is attached inside the back cover and contains one of my favorite sayings.
Turning the accordion over to reveal the back sides of the interior pages:
A single stem from the bouquet is attached to the ticket with the words "listen to your heart."
A framed piece of worn wallpaper displays a shadowed "love" die cut and a small ticket with a mirrored heart and clippings sticker. When we let our hearts guide us, we are destined for good.
One of the additional collage paper covered tickets is located in the center of the accordion, with a metallic quote sticker. Some craft thread with glass beads creates a page holder.  A collage frame leaves some open space to include future thoughts.
Four brads secure the band which holds tickets made of the various papers used to create the pages. These will be used to include positive thoughts and memorable sayings or events. The last ticket page is simply a beautiful layered composition.
I really enjoyed creating this affirmation accordion with the Gypsy Soul Laser Cuts ATC ticket journal pieces. I hope that you are inspired to create something beautiful. Thank you so much for taking the time to visit today. 
A little kindness can make a world of difference.
~Ann 

I am entering this project in:

(my inspiration piece is a stamped image and I have stamped bees throughout the accordion)


Supplies used:
Gypsy Soul Laser Cuts: ATC ticket journalhoneycomb and bees small
Distress collage medium: matte, vintage
Distress ink: black soot, peeled paint, walnut stain, worn lipstick
Distress Oxide ink: aged mahogany, tattered rose, wild honey, worn lipstick
Emerald Creek allure embossing powder: burnt copper leaves
Seth Apter/Emerald Creek vintage beeswax baked texture embossing powder
Tim Holtz Eclectic Elements craft thread
Tim Holtz Ideaology:
clippings stickers, collage paper - floral, crinkle ribbon, fasteners, lace, quotations metallic stickers,
 quote token, remnant rubs,
Tim Holtz/Sizzix 3D Texture Fade: lumber
Tim Holtz/Sizzix Movers and Shapers: ticket
Tim Holtz/Sizzix Thinlits:
celebration words, flower jar, gift tags, stacked label, traveler words
Tim Holtz/Stampers Anonymous mini stencil THMS075