
Hi everyone, today I am sharing some extra details for an americana accordion tag book that I created for the Mini Album Makers Challenge Blog. My post on their blog contains all the details for creating the tag book. You can read that post here.

I created my americana accordion tag book using two sets of large chipboard tags from Gypsy Soul Laser Cuts. Knowing that my book will have an americana theme, I use some of my favorite papers from Tim Holtz Correspondence Paper Stash. The tag book is made up of six tags. Each follows the common theme yet has its own unique presence within the book. The tags are covered with paper and inked with antique linen distress ink to give more of a vintage feel. I also add gathered twigs distress ink around the edges. After the base tags are done, I lay out my "pages" by manipulating different elements. The tags are hinged according to the distance required between tags to accommodate overhanging elements. Binding ribbon is adhered with glue in the correct location, allowed to dry and then the eyelets are set into place. The larger design elements are adhered after the hinges are intact.
Once all of the interior hinges are secured, I do a final check on the accordion fold and attach the hinge pieces for the first and last tags. The final step in creating my accordion tag book is to attach all of the remaining design elements and embellishments to the tags.

I use Ideaology foam type stamps inked in cobalt archival ink and clear embossed,
to form the title of the book. The decorative trim piece along the edge is created
by layering distress cardstock, metal kraft card stock, and a scalloped impresslet. The impresslet piece is cut from Correspondence paper, inked, and then rubbed with pewter distress crayon to highlight the embossed design.

The interior of the front and back covers feature images from vintage military ads. I love the look and graphics of days gone by and include ads from various branches of the military.

I create a medal of honor using an eagle charm found in my stash, some wide ribbon and a piece of metallic kraft card stock. I know right away that the Tim Holtz experience stamp is the perfect statement to go along with it.

A pocket of coordinating paper holds a mini tag featuring an americana blueprint stamp colored with distress inks.


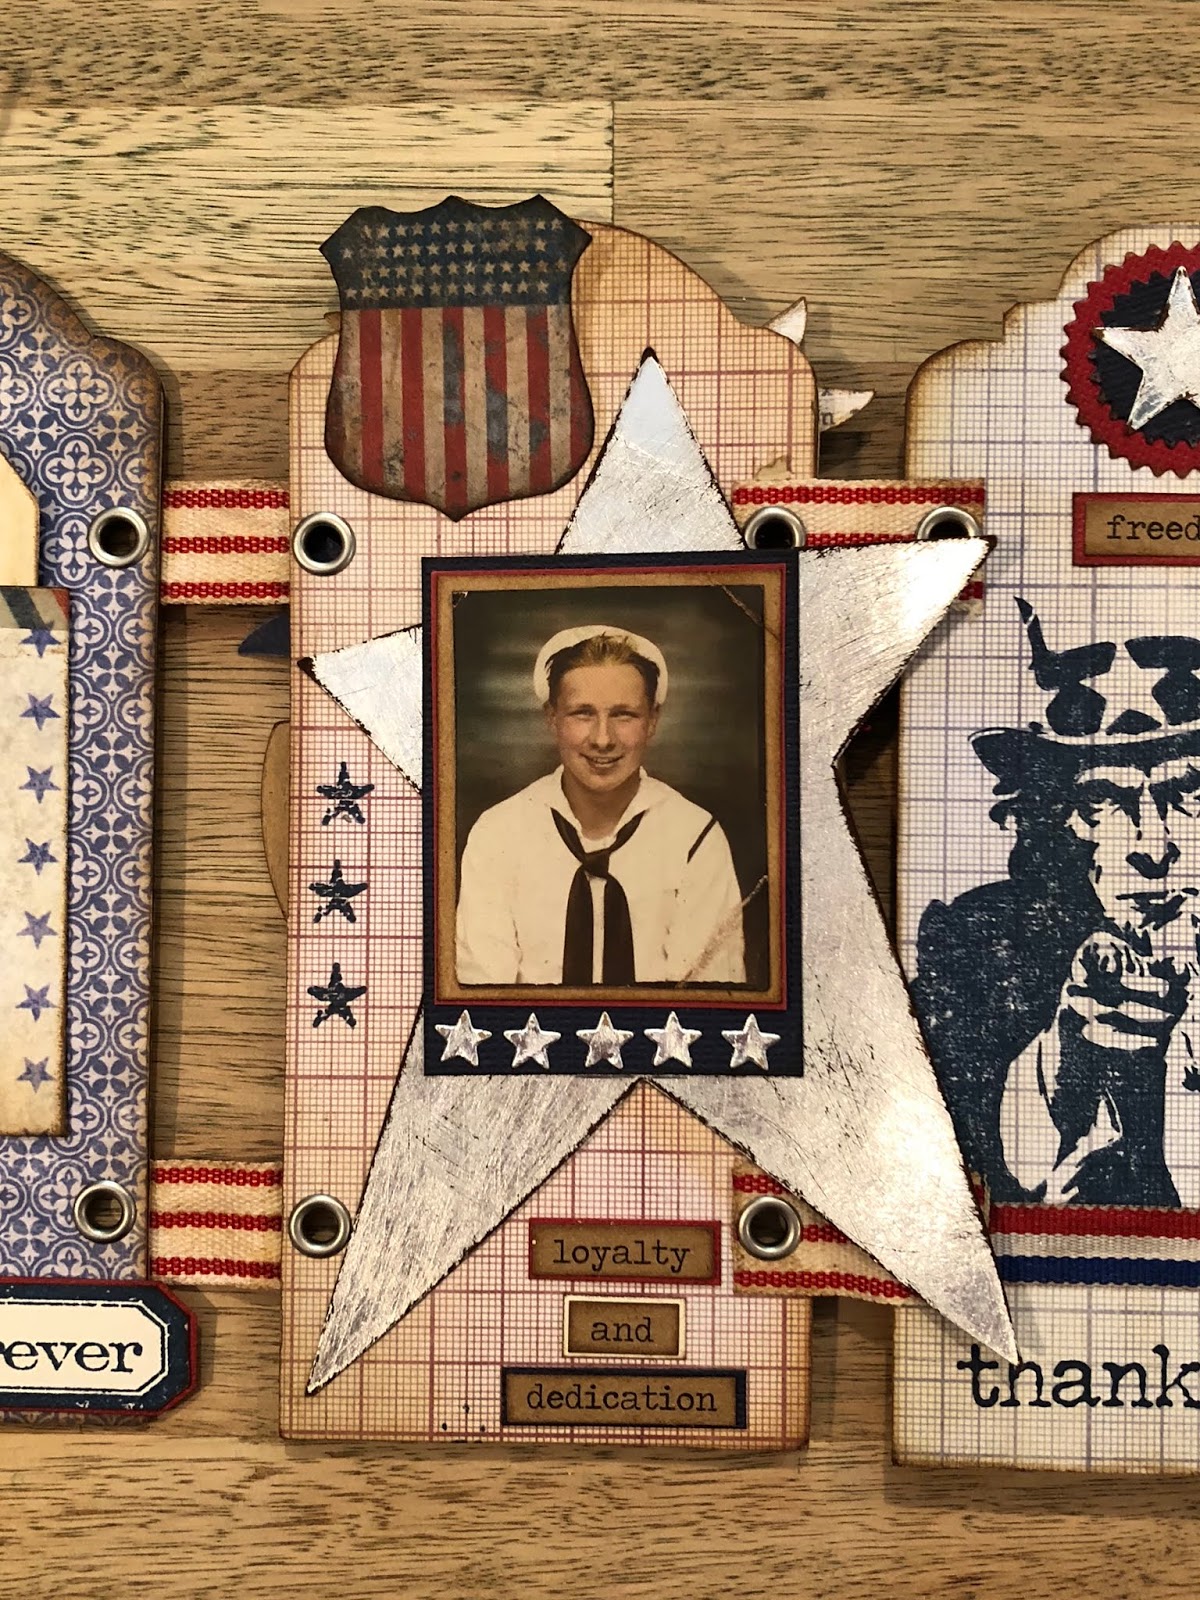
A photo booth picture of a navy sailor is showcased on a primitive star cut from metallic kraft card. The metallic kraft card has been sanded and inked with gathered twigs distress ink.
One of my all time favorite Tim Holtz stamps inked in cobalt blue archival is the focus of this tag. I also included a "thank you" from Tim's glorious bouquet stamp set. Every day is a good day to thank our service men and women for their dedication to our country.

More vintage military ads, these are from the army and air force recruitment services.

I use alphanumeric dies and cut the words "sweet land of liberty" to surround a shield charm.

A patriotic rosette is cut from paper ribbon and inked to give it a vintage feel. This sits below a stamped and embossed USA.

Funky florals cut from correspondence papers and distress cardstock fill a tarnished trophy to celebrate the red, white, and blue.

Faded jeans distress ink stenciled stars form the background for a treasured patriotic paper doll. Her responsibility: raising old glory for the pledge of allegiance.

I love the way the facing pages complement each other when the tag book is folded together and "read".


As I worked on this project, I was constantly reminded of and humbled by the servicemen and women who are always working to keep our beautiful country safe and our liberties and freedoms intact. My book is a tribute to all of those who serve or have served. I come from a very long line of patriots and have always had a huge amount of respect and gratitude for the dedication and loyalty of these fine souls.

I hope that you are inspired to create a tag book of your own and submit it to the Mini Album Makers Challenge. It's always inspiring to browse among the submissions and admire the creativity.
I am so grateful for the opportunity to be a guest designer on their blog. I would love for you to stop by to see my tutorial on how to create this accordion tag book, you can click HERE to visit that post.
~Ann
Materials Used
Gypsy Soul Laser Cuts: Chipboard Decorative Tags Large
Ranger Archival Inks: carnation red, cobalt
Ranger/Tim Holtz Distress inks: antique linen, faded jeans, gathered twigs
Ranger/Tim Holtz Distress collage medium: matte
Sizzix/Tim Holtz Alterations:
alphanumeric (3/4"), labels, funky florals 1 & 3, rosette set, shape strips, tag collection
Sizzix/Tim Holtz Bigz:
crescent moon and stars, tarnished trophies
Sizzix/Tim Holtz Impresslets: 3-D scallop
Stampers Anonymous/Tim Holtz:
americana mini blueprints, glorious bouquet, simple sayings, stars stencil,
stuff to say, the impossible, uncle sam silhouette
Tim Holtz Ideaology:
adornments arrows, adornments stars, chit chat seasonal, flashcards elementary, paper dolls,
paper string airmail, shield charms
Tim Holtz IdeaologyFoam Stamps: type lower
Tim Holtz Ideaology Paper Stash:
Correspondence, Distress Cardstock, Metallic Kraft Cardstock


