Showing posts with label emerald creek embossing powders. Show all posts

Wednesday, September 18, 2019

wicked ways

I always enjoy working on Halloween projects throughout the fall, and today, I am on the Gypsy Soul Laser Cuts Blog sharing my latest piece, "wicked ways." This piece uses a Gypsy Soul Laser Cuts filigree front shrine as its base. I love the size of this shrine, its generous interior provides the perfect opportunity for me to create a spooky scene. I have opted to use the WICKED word from the halloween word set in lieu of the filigree piece that comes with the shrine. I plan to use the beautifully detailed filigree piece for a future project.
I first paint all of the shrine pieces that I will be using with black paint. I do not add water, and try to use a light hand when applying the paint, ensuring that all edges are covered. This piece has a few edges that are exposed when it is assembled, and if you are not planning to cover the outside with paper, it is essential to paint the exposed edges the same color so the appearance will be seamless.
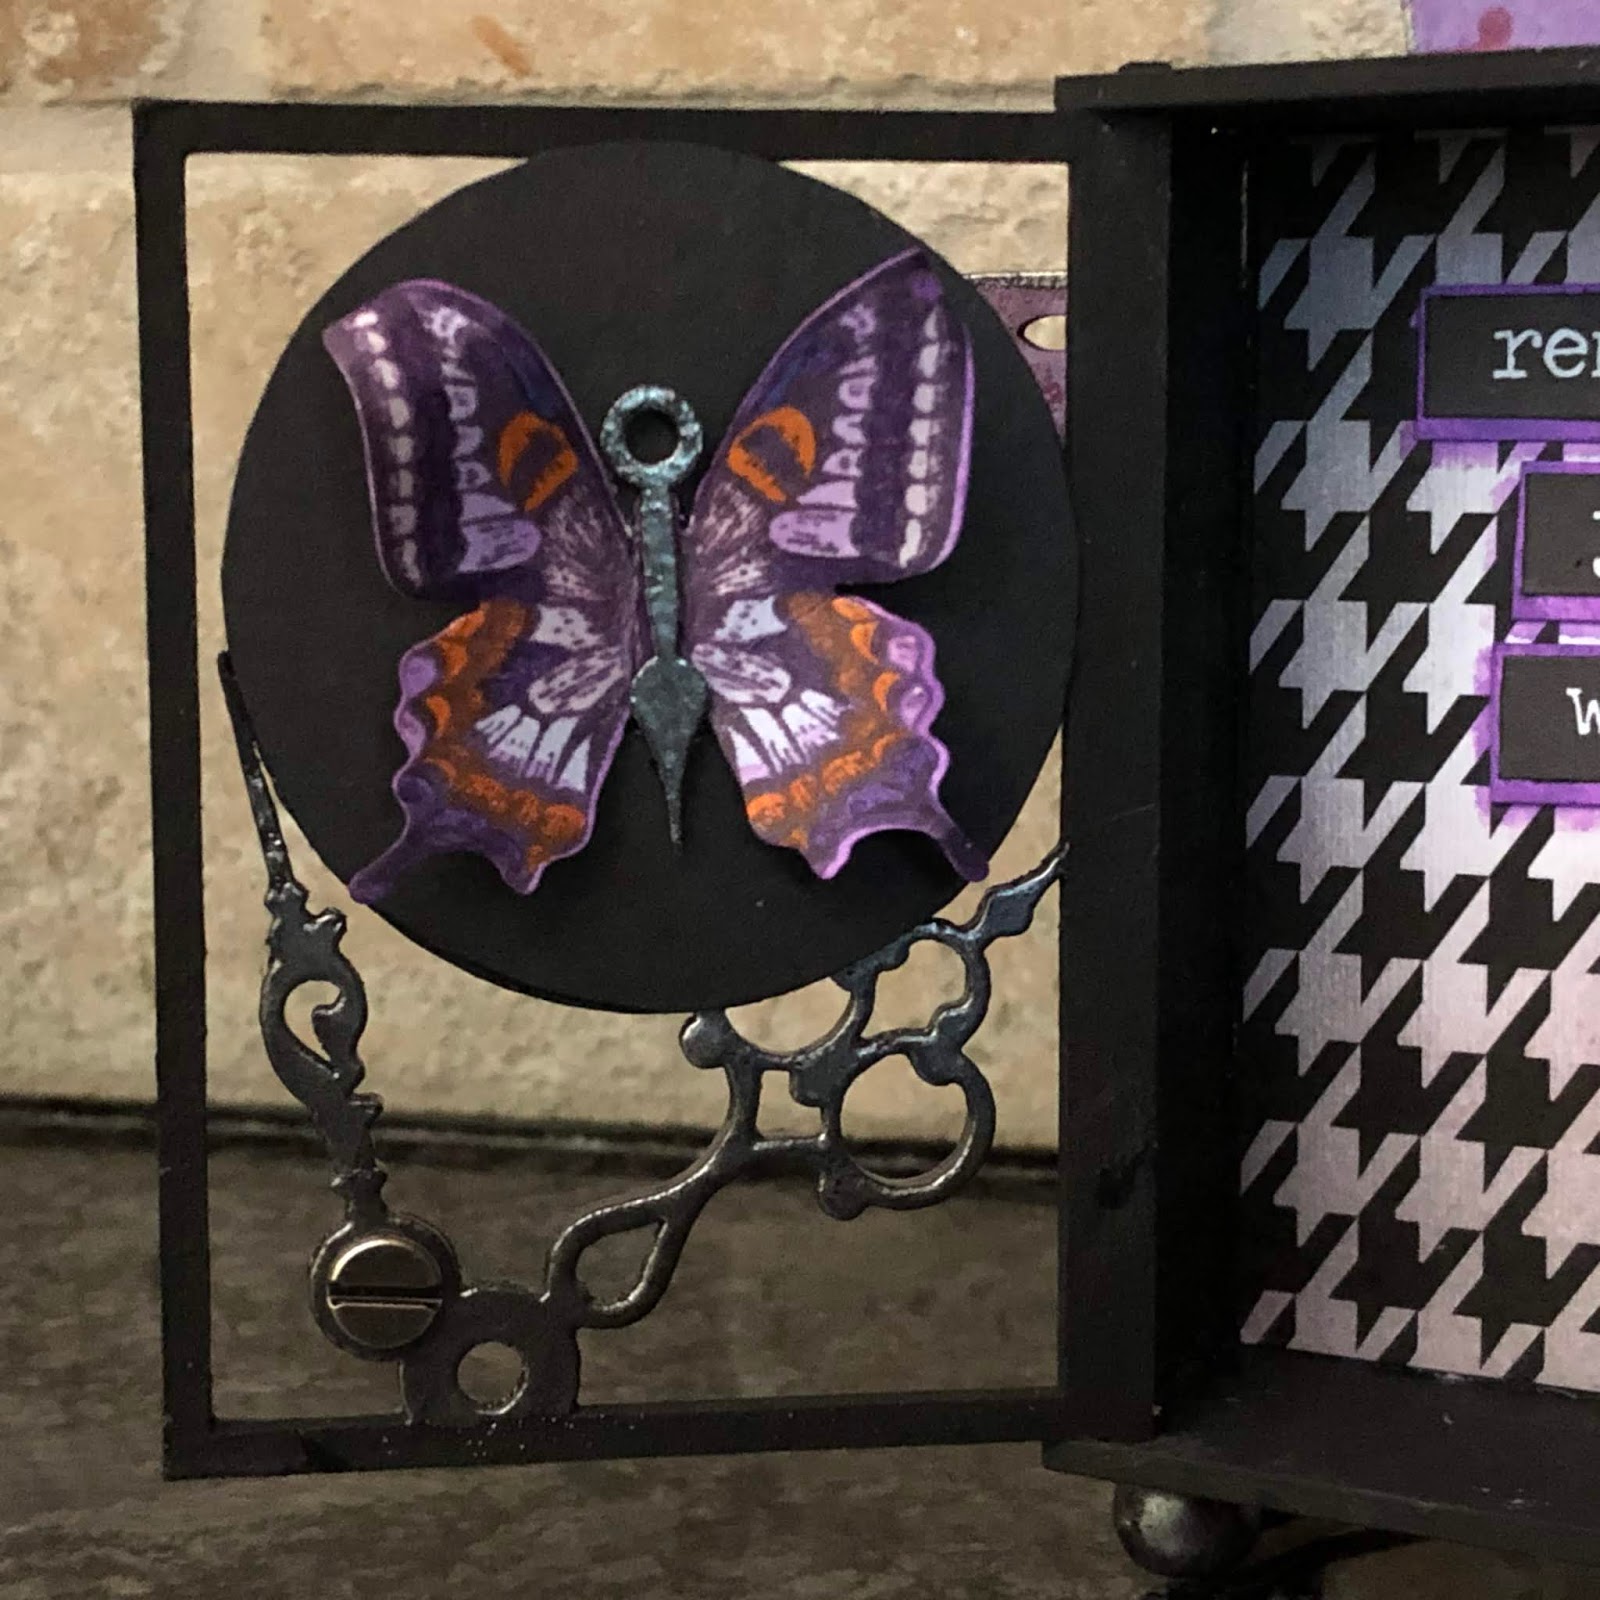
When the paint has dried, I select a paper for the interior of the shrine. I want the scene that I am creating to have a spooky quality, and find an old piece of decorative paper from my stash that will be perfect to achieve this. Since the paper is 12x12, and I want to be sure to include the area with the full moon, I lay the front piece of the shrine on top of the page to determine the area that I will need to cut out. The interior (back) panel is 4-3/4" x 5- 3/4". I also cut two adjacent strips (on either side of the main panel) to use on each interior side. These papers are inked around the edges and adhered to their respective pieces with collage medium. Once the papers are secured, I assemble the shrine box with more collage medium. I use clamps to make sure that everything stays in place as the glue dries.
Setting the shrine box aside, I work on the word Wicked that will adorn the top of my shrine. This piece is from the Halloween word set. I have other ideas for the remaining words from this set and really like how each word is cut from a different font. Knowing that there is a possibility that some sections of the word might extend beyond the top of the shrine, I paint both the front and back of the word with black paint. When the paint has dried, I coat the front side with VersaMark embossing ink and sprinkle with dragons egg embossing powder. This is then heat set. I consider adding another layer of embossing, but really like the texture that I have achieved with only a single application. I love the subtle metallic finish and the color works perfectly with my scheme. In order to keep the subtleness, but also ensure that the title is noticed, I use a silver metallic paint pen around the exterior edge of the letters. This will help the word pop without having to raise it off of the front panel. When the silver edge has completely dried, I attach the word piece to the shrine using collage medium.
Now it is time to set the scene inside the shrine. I spritz the cauldron piece from the GSLC be witched shape set lightly with water on both sides. I then gently bend the shape to create a 3-d effect. I allow the piece to dry in this altered shape. After it has dried, I coat the outside of the cauldron with embossing ink, then a layer of hammered metal embossing powder. Using a heat gun I melt the powder to a wonderful finish. The embossed piece is allowed to cool. I cut a piece of foam to raise the cauldron away from the back panel and use collage medium to attach the foam in place along the back.
A die cut witch figure is inked then covered in black soot glitter. To achieve the look of moonlight shining off her silhouetted figure, I die cut a second witch from silver cardstock and offset the two pieces. She stirs her magic potion with a "wooden" stick.
The interior base of the shrine is covered with moss; a few bones and a skull add to the spooky effect. Within the cauldron, pearls (colored with alcohol inks) create the perfect bubbly potion. Die cut bats are suspended with wire or attached to the interior of the shrine, enjoying the witch's cackling chant.
For the exterior of the shrine, I wanted it to remain simple. Black cardstock skeleton leaf die cuts are adhered to the side and fold-over to the back. An ephemera "poster" for the Witches Dance is the main attraction.
 
 
I hope that you have enjoyed this wicked piece, I look forward to sharing more of my Halloween projects over the next few weeks.  Feel free to leave a comment, I always enjoy hearing your thoughts or answering questions.
Thank you so much for stopping by,
 I hope that you have a creative day!
~Ann

      
supplies used:
Distress Collage Medium: matte
Distress Glitter: black soot
Distress Oxide Ink: black soot
Distress Paint: black soot
Distress
Emerald Creek embossing powders:
Magical Mysteries Dragons Egg, Hammered Metal
Gypsy Soul Laser Cuts:
filigree front shrinehalloween word setbe witched shape set
moss
Tim Holtz Ideaology:
baubles, boneyard, paper stash metallic kraft, skulls
Tim Holtz / Ranger alcohol inks:
 limeade, oregano
Tim Holtz / Sizzix dies:
bat crazy, skeleton leaves, witchcraft
thin jewelry wire

Wednesday, June 5, 2019

wings of time

Hi everyone, today I am on the Gypsy Soul Laser Cuts Blog sharing an ATC shrine I call "wings of time." From the moment I set eyes on the GSLC ATC Shrine-Time, I envisioned a Fornasetti face within the circular clock area of the door, but I was unsure where I would take it from there. I put off working on the project for a while and finally decided that it would be best to simply start and see where it would lead... I apologize for the lack of process photos in this post, it seems once I started working, I was so intent on creating that I forgot to stop and capture all the steps. My hope is that my description is easily understandable.
I begin by painting all the pieces of the ATC Shrine-Time black. Then I locate the image that I intend to place within the clock face. I trace the outermost edge of the circle (clock) shape onto the graphic and fussy cut. A piece of black cardstock is adhered to the reverse side of the image so that when the door to the shrine is open, it will appear as a solid plane. Before adhering the face piece, I emboss the clock hands on the shrine door. This is easily accomplished with a VersaMark pen and gun metal embossing powder. I heat set the powder on the exterior surface and then complete the same process on the inside. I let the embossing cool and then adhere the image that has been cut to size in place.  Once the iconic image is set in place, the project seems to direct itself.
I know that at some point I would like the shrine to be functional, a place to store artist trading cards. For this reason, the interior of the shrine is not embellished with protruding objects. Everything inside is kept fairly flat. The rear panel of the shrine is covered with a piece of black and white tweed pattern paper. I ink the paper with hickory smoke and milled lavender distress ink to coordinate with the Fornasetti image. A sentiment is layered onto wilted violet oxide-inked cardstock and attached to the back panel reading "REMEMBER YOUR WINGS."
A stamped and colored butterfly is attached to the solid black circle on the inside of the shrine door. The butterfly's body is an embossed clock hand from the GSLC Steampunk Shape Set.
The Rear of the shrine contains a Gypsy Soul Laser Cuts Butterfly of Gears. I love this chipboard piece. It is sold as a set of two identical butterflies, I am only using one for this piece, but I already have a plan for the second butterfly.
The butterfly has been painted with seedless preserves distress paint and then dipped in wilted violet oxide ink to create a beautiful finish. Some of the steampunk cogs and gears are embossed, as well as the body, and tips of the wings. I use the same method that was used for the shrine's clock hands, a VersaMark pen and gun metal embossing powder. When the embossing has cooled, Ideaology metal embellishments are adhered to the butterfly with collage medium. Once the collage medium is dry, the butterfly is attached to the rear panel with collage medium and set aside.  A big chat "FLY" sticker is inked with wilted violet oxide ink and then attached below the butterfly.
I secure a ball hitch through the circular opening on one of the clock hands of the shrine door. This becomes a knob that allows easy access to the shrine's interior. I also emboss four wooden beads and attach these to the base of the shrine to raise it up off the surface it stands on. The crown atop the shrine is another piece from the Steampunk Shape Set. This set has so many pieces, I find myself reaching for it often to use on my projects. The crown has been colored with wilted violet distress oxide and then splattered with seedless preserves paint. The tops and back side of the crown has been embossed with gun metal embossing powder.
I really like the way that this ATC shrine turned out. The Gypsy Soul laser cuts store has many different ATC Shrine styles from nautical, to steampunk, and everything in between. It's definitely worth checking out! I hope that you are inspired to create something of your own, perhaps something that you have put off because you are unsure of how it will turn out. You will never know if you don't start somewhere.

Thanks so much for stopping by the blog today,
 I really appreciate you taking the time.
~Ann


supplies used:
DecoArt acrylic paint: black licorice
Distress Archival ink: dusty concord
Distress collage medium: matte
Distress ink:
 dusty concord, hickory smoke, milled lavender, seedless preserves, wilted violet
Distress oxide ink: wilted violet
Distress paint: wilted violet
Emerald Creek embossing powder: gun metal
Gypsy Soul Laser Cuts:
ATC Shrine - TimeButterfly of GearsSteampunk Shape Set
Tim Holtz Ideaology: ball hitch, big chat stickers, gears, pen nibs
Tim Holtz/Stampers Anonymous Stamps: Flutter (CMS294)
VersaMark embossing Pen
Wagner Studio Precision Heat Gun

Wednesday, May 15, 2019

gathering ideas

Hi everyone, it seems like the closer we get to the summer months, the busier it is; and the more difficult it becomes keeping track of everything, especially creative ideas.
Today I am on the Gypsy Soul Laser Cuts blog, sharing an "idea" journal I created to help me keep track of things. I thought it would be fun to make the journal in a steampunk style. In my mind, steampunk and innovation go hand in hand. Gypsy Soul Laser Cuts has some wonderful steampunk shapes and pieces that are perfect for incorporating into journals.
I begin with an Eileen Hull passport journal die cut from medium weight chipboard. The base journal is covered with papers I created with Distress Oxide sprays in Vintage Photo, Walnut Stain and Cracked Pistachio. I also added some Distress spray stain in Spiced Marmalade. I love the results achieved from the combination of colors and inks. My Xyron Creative Station Lite makes easy work of adhering the papers to the journal. 
The Gypsy Soul Laser Cuts Steampunk Lightbulb Set has so many great pieces to choose from. Since my journal only uses a few, I look forward to using this set for multiple projects.
I use Tim Holtz Worn Text stamps to create the word "Ideas." This is stamped with Versamark ink then heat embossed with Oil Rubbed Bronze embossing powder, in the bottom right hand corner of the cover. I also emboss the small simple lightbulb shape from the Steampunk Lightbulb Set with the same powder.
 
The final cover is a combination of creative ideas, I use the lightbulb as the central focus of the cover, layered above a Tim Holtz Gearhead die cut and adorned with embossed pieces from the Steampunk Shape Set.
Inside the journal are three inserts.
The first is a Gypsy Soul Laser Cuts ATC folder. It has been covered with another piece from the papers I created with Distress Oxide sprays. I have added a few embossed cogs and gear pieces from the Steampunk Shape Set to complete the outside.
The interior of the folder has two pockets to store miscellaneous findings. I have edged each pocket with strips of the inked paper.
The second insert is a mini lined composition notebook. The notebook has been covered with colored card stock and adorning this cover is a section from the GSLC Collage Border Steampunk. Using snips, I simply cut the length I want and then emboss the section with Seth Apter's Patina Oxide Baked Texture embossing powder.
 I love the way the embossing color plays off the inks I have used throughout the journal. I adhere the embossed piece to the covered notebook and also add some stenciling.
The final insert is completely hand made, using the Oxide spray paper as a cover and containing watercolor papers for filler. Using a pointing hand piece from the Steampunk Lightbulb Set, I first heat emboss one side with oil rubbed bronze embossing powder, and when it is cool, I glue a paper clip to the back side to use as a planner clip. The clip will help me to hold the page I am working on and make it readily available after the book is closed. I love the way this turned out, and will definitely be making a few more clips to use in different journal inserts. It's a simple way to use up those small extra pieces that you have laying around, and super helpful for keeping organized.
Sometimes it's the embellishments that have the most impact on a project. I believe that by adding the Gypsy Soul Laser Cut steampunk pieces to this simple journal, I was able to give it the style I was looking for without a lot of added work. The perfect solution to busy days and staying organized, all the while gathering ideas.
Thanks so much for stopping by the blog today, 
I really appreciate you taking the time.
~Ann
xxx

I am entering this project into the following challenges:

SanDee & amelie's Steampunk Challenges:
May 2019 - Anything Goes Steampunk/Industrial
Mini Album Makers Challenge: May 2019
 A Vintage Journey:
 Book it! May Challenge


list of supplies:
Distress Collage medium: matte
Distress ink: walnut stain
Distress Oxide ink: cracked pistachio
Distress Oxide sprays: cracked pistachio, vintage photo, walnut stain
Distress Spray Stain: spiced marmalade
Emerald Creek embossing powders: oil rubbed bronze, patina oxide
Gypsy Soul Laser Cuts:
ATC folder, Collage Border SteampunkSteampunk Lightbulb SetSteampunk Shape Set
paper clips
Tim Holtz/Stampers Anonymous: mini stencils set 01, worn text cling mount stamps
Tim Holtz/Sizzix Alterations: Gearhead thinlits
VersaMark ink
Wagner Studio Precision Heat Gun
Xyron Creative Station Lite


Please Note: some of the direct links above are affiliate links. I am an affiliate with Emerald Creek. The links for Emerald Creek products will take you to their store. If you purchase something from this link, I receive a small percentage, at NO additional cost to you.This helps me to defray the cost of this blog and the ideas and tutorials I post here. I greatly appreciate any assistance. Thank you.

Wednesday, November 7, 2018

bountiful blessings


I am ever so grateful to mother nature for providing reassurance that the cycle of life is continuous, and that even in death there is beauty. She presents us with this confidence every fall in the stunning display of color we catch glimpses of on the trees and shrubs around us. It is from this wondrous natural display that I find the inspiration for my November Gypsy Soul Laser Cuts design team project "bountiful blessings."
I begin with the Gypsy Soul Laser Cuts wreath rings set. It contains three separate, sturdy chipboard rings that can be used individually as a base to build upon. The smallest ring measures 5" and the largest measures 11". I have chosen to use the medium sized ring as my base for this project. 
Since my wreath will use different shaped leaves to create the design, I realize that their unique shapes may not provide entire coverage of the base; for this reason, I cover the base ring with collage medium and attach a piece of burlap. When the glue is dry, I trim off any excess fabric. To add interest to this layer, I ink around the edges of the burlap as well as intermittently within the flat area of the circle. I mix tarnished brass spray stain with texture paste and apply this randomly on the burlap covered ring through a stencil. I set this piece aside to dry completely.
Next, I begin preparing the pieces that will be included in my design. Using the Gypsy Soul Laser Cuts skeleton leaves 2 set, I carefully remove the three leafy stems from the sheet. 
Each section is coated with embossing ink and then sprinkled with burnt copper leaves embossing powder and heat set. These pieces are set aside to allow space to create the other pieces for layering.
Using distress oxide inks, I create sheets of colorful papers that represent the differing leaf colors that can be found outdoors. The resulting patterns are inked with traditional distress ink to create depth. These papers are die cut into leaf shapes of various size and species.

The individual leaves are inked around the edges, as well as on their reverse sides. This will ensure a finished look for any pieces that overhang the edges of the wreath. Some of the more shaft-like pieces are coated with charred gold or moss stone embossing powder. I also gather some beautiful, natural, red maple leaves that I collected last fall, and had coated with resin to ensure their color stay true. 
I begin by laying the skeleton leaves along the circle and then "audition" different layering arrangements. During this process, I realize sometimes less is more beautiful than more. Each section is built up and when I have a section that I am pleased with, the pieces are attached to the base using a hot glue gun. I have included a few progress photos showing how the design came to life.
When I felt that the wreath was complete, I added two clippings from blades of of gilded wheat from a recently received floral arrangement. I crossed the pieces forming an X and adhered them in place with distress collage medium. When dry, I add a small acorn from my stash to the juncture.
I adhere a hanging hook onto the back of the ring once my design is complete. This step might be easier to complete prior to attaching all of the elements to the front of the form; however, I want to be sure that the wreath hangs correctly and I didn't want to worry about keeping everything aligned during the creative process.
Thank you so much for taking the time to stop by the blog.
Wishing you a colorful and creative fall, filled with bountiful blessings! 
~Ann


supplies used:
Distress collage medium
Distress mica spray: antique bronze
Distress texture paste
Distress ink:
aged mahogany, barn door, fossilized amber, gathered twigs, ground expresso, 
peeled paint, rusty hinge, scattered straw, walnut stain, wild honey
Distress oxide:
aged mahogany, fired brick, fossilized amber, gathered twigs,
 spiced marmelade, vintage photo, wild honey
Distress spray stain: tarnished brass  
Emerald Creek Craft Supplies embossing powders:
burnt copper leaves, charred gold, moss stone
Gold Leafing
Gypsy Soul Laser Cuts:
Hot Glue Gun and glue sticks
Tim Holtz/Sizzix Alterations dies:
autumn gathering, fall foliage, tattered leaves
Tim Holtz/Stampers Anonymous mini stencil set 09
Versamark embossing ink