Hi everyone, as the month of June speeds along and we near Independence Day, July 4th, I thought it would be fun to create an Americana themed project.
Today, I am on the Gypsy Soul Laser Cuts blog, sharing my "red, white, and true blue" little houses matchbox book. I am so excited to share all the details with you!
 It all starts with a GSLC little houses matchbox book. Don't let the name fool you, this accordion fold house book extends to over 14 inches long unfolded. When folded, the book fits inside its own 3 inch by 4 inch matchbox. I thought the five, double sided panels would provide many opportunities to embellish with some of my favorite supplies. The first step is creating the matchbox.
 The outside chipboard sleeve is pre-scored which makes it easily converted into a 3D shape. Before creasing and folding, I paint one side of the piece with red acrylic paint. When the sleeve piece is folded, this red will be the interior. A small dab of glue along the flap secures the piece into shape. I use clips to hold the flap until the glue has dried.
 I cut a strip of some of my favorite papers to match the height of the sleeve. The paper wraps the entire outside of the sleeve piece. I ink all the exposed paper edges. Using the Xyron Creative Station Lite, adhesive is added to the back side of the paper and then it is secured in place onto the chipboard. I add a strip of red metallic embossed lattice along one side, and wrap the sleeve with paper twine. The twine is secured in place with sealing wax. While the wax is still hot, I push a star embellishment into it and allow it all to cool.
 Next, the interior matchbox is created. This chipboard is also pre-scored; a bit of quick dry glue along each of the tabs, secured with a clamp until dry, is all it takes for the box to form. I paint the exterior of the matchbox with red acrylic paint and allow to dry. The interior of this matchbox is covered with patterned paper. I also cut strips of a coordinating paper to wrap the sides of the box. The bottom (underside) of the box is not covered with paper. I want to allow the matchbox to slide freely in and out of its sleeve.
 The accordion fold house book is so much fun to create. The long chipboard piece is pre-scored, allowing it to be easily folded. Since I envision this book being opened and closed many times, I add strips of linen hinging tape along the "mountain" folds before I begin adding any paper coverings or embellishments. This will add an extra layer of durability to the folds. Next I select some coordinating red, white and blue patterned appears for backgrounds. All of the edges of the chipboard are inked with distress ink. I trace the house shape onto the different papers and fussy cut pieces to fit each of the panels.
 All of these pieces are run through the Xyron machine to add an adhesive backing. When considering embellishments for each panel I find it best to work on one side at a time and always keeping the reverse side in my mind, that way anything that penetrates the chipboard will have an opportunity to be covered on the opposite side. I like to pull out a lot of different papers, stamps, embellishments and pieces that may or may not be used in the piece. This way I have a better idea of things that could potentially be arranged together or adjacent to one another.
 It makes for a chaotic desk but allows me to design freely without having to stop and seek too often. This is possibly the reason I do not have many process photos for the accordion book,
I got too caught up in the design.


The front flap contains a patriotic paper doll colored with distress crayons. A metal ribbon adornment is attached to the roof peak and a small ephemera piece completes the opening page.

German dresden trim is secured with star fasteners to create the decorative bands that hold special tickets from days past.
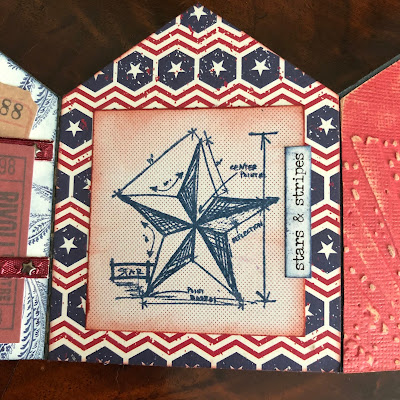 A blueprint stamp in cobalt archival ink is the focal point of this panel.
 This panel is covered with an embossed piece of colored Kraft core, sanded to highlight the design.
 Another paper doll adorns the last panel on this side of the accordion fold book. He is colored with distress crayons and appears to be holding the booklet open. A small clipping of banner border strip creates the patriotic pennants strung across the top.
 The reverse side of the booklet begins with a freedom banner, created with punched and stamped pieces, and strung on bakers twine.
 One of my favorite panels in the booklet, the metallic kraft contains layers of paper dolls, representing diversity.
 Grungeboard USA letters are painted with acrylic paint and surrounded by wooden laser cut stars.
 A blueprint stamp is colored with distress crayons and ink, then fussy cut and attached to a "flagpole."
An old dictionary page is torn and inked giving definition to the patriotic terms.
 On the final panel, quote chips display a powerful message.
Once all of the panels of the book are complete, I allow all the adhesive to dry overnight before folding it up and setting it into the matchbox. The box and book slip easily into the sleeve. I am so pleased with how this project turned out. I typically decorate my house in red, white, and blue from Memorial Day throughout the summer. I love displaying Americana themed pieces and projects.
I hope that you have enjoyed seeing my "red, white, and true blue" piece come together.
Perhaps you are inspired to create a piece of your own to proudly display.
Thank you for taking the time to stop by,
I truly appreciate it!
~Ann
xxx
supplies:
Deco Art Americana acrylic paint: Tuscan Red
Distress crayons:
blueprint sketch, candied apple, chipped sapphire, fired brick
Distress Collage Medium: matte
Distress Ink:
blueprint sketch, chipped sapphire, faded jeans, fired brick, gathered twigs
German Dresden trims
Gypsy Soul Laser Cuts:
Little Houses Matchbox Book, Banner Border Strips
Sealing wax
Tim Holtz Ideaology:
adornments ribbons, adornments stars, chitchat seasonal, ephemera: snippets,
ephemera tickets, grungeblocks (retired), paper dolls, paper stash correspondence,
paper stash metallic jewel kraft, paper string airmail, pocket cards, quote chips,
remnant rubs: botanical, remnant rubs: life quotes, star fasteners
Tim Holtz / Sizzix impresslits: 3D lattice trim
Tim Holtz / Sizzix texture trades: playing games (retired)
Tim Holtz / Stampers Anonymous stamps: Americana blueprint
Xyron Creative Station Lite
Today, I am on the Gypsy Soul Laser Cuts blog, sharing my "red, white, and true blue" little houses matchbox book. I am so excited to share all the details with you!


I got too caught up in the design.

I will share some pictures of the completed panels with descriptions.

The front flap contains a patriotic paper doll colored with distress crayons. A metal ribbon adornment is attached to the roof peak and a small ephemera piece completes the opening page.

German dresden trim is secured with star fasteners to create the decorative bands that hold special tickets from days past.


An old dictionary page is torn and inked giving definition to the patriotic terms.

Once all of the panels of the book are complete, I allow all the adhesive to dry overnight before folding it up and setting it into the matchbox. The box and book slip easily into the sleeve. I am so pleased with how this project turned out. I typically decorate my house in red, white, and blue from Memorial Day throughout the summer. I love displaying Americana themed pieces and projects.
Perhaps you are inspired to create a piece of your own to proudly display.
Thank you for taking the time to stop by,
I truly appreciate it!
~Ann
xxx
supplies:
Deco Art Americana acrylic paint: Tuscan Red
Distress crayons:
blueprint sketch, candied apple, chipped sapphire, fired brick
Distress Collage Medium: matte
Distress Ink:
blueprint sketch, chipped sapphire, faded jeans, fired brick, gathered twigs
German Dresden trims
Gypsy Soul Laser Cuts:
Little Houses Matchbox Book, Banner Border Strips
Sealing wax
Tim Holtz Ideaology:
adornments ribbons, adornments stars, chitchat seasonal, ephemera: snippets,
ephemera tickets, grungeblocks (retired), paper dolls, paper stash correspondence,
paper stash metallic jewel kraft, paper string airmail, pocket cards, quote chips,
remnant rubs: botanical, remnant rubs: life quotes, star fasteners
Tim Holtz / Sizzix impresslits: 3D lattice trim
Tim Holtz / Sizzix texture trades: playing games (retired)
Tim Holtz / Stampers Anonymous stamps: Americana blueprint
Xyron Creative Station Lite