Wednesday, April 17, 2019

bird lady

Hello everyone, today I am on the Gypsy Soul Laser Cuts blog,
sharing "bird lady," an inspired santos doll.
For me, some of the first sure signs of spring are the birdsongs. I love seeing the robins, with their feathers still fluffed for warmth, come out and grace the landscape. Then, ever so gradually, many other species arrive to join in the song.
It definitely brings hope and eager anticipation for the warmer days ahead.
 This is the inspiration behind "bird lady."
I begin with a Gypsy Soul Laser Cuts santos doll. This set arrives flat; I carefully remove the pieces and wipe off the residue from the laser cuts. Next, I like to assemble the piece (without glue) into it's three dimensional form so that I understand how it will look as a finished piece. This allows me to visualize which finishes to use as well as helps to focus my ideas. 
Once I have settled on a theme, I disassemble the piece. One side of each part is painted with raw umber paint. The two flat circular disks are painted on both sides. When the paint has dried, using collage medium, I cover the unpainted sides with french book pages from my stash. This paper will serve as a base that I will layer over.
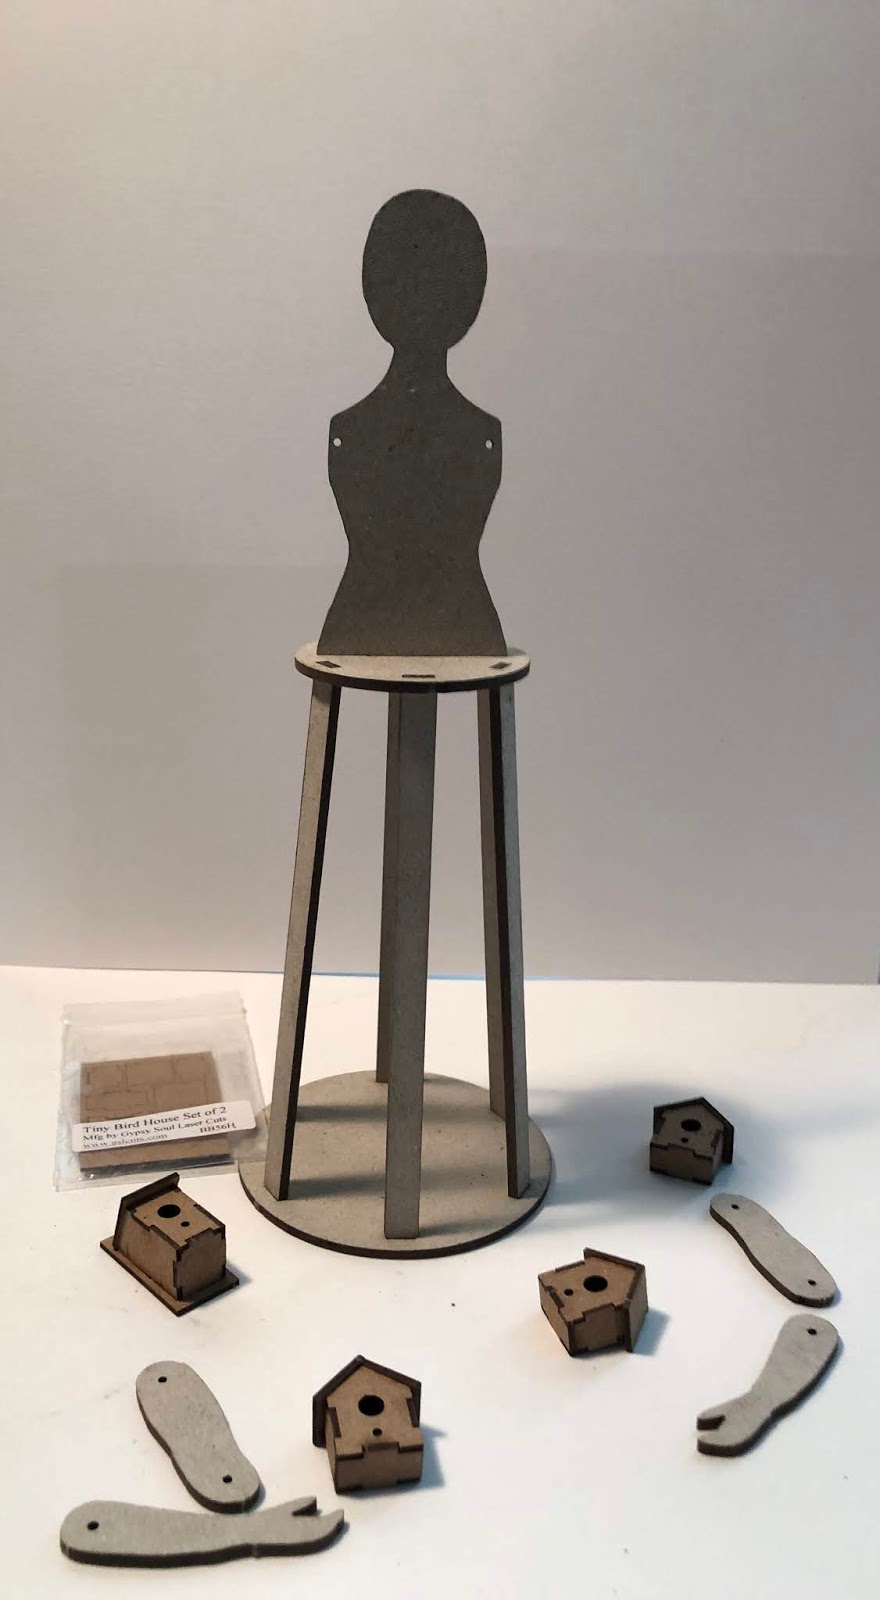
While the adhesive is drying, I put together the tiny bird box and tiny bird houses. Each of these sets contains pieces to make either: two tiny bird boxes, or two tiny bird houses. For this project, I have used one set of tiny bird boxes and two sets of tiny bird houses. The pieces are very small; however, they are fairly easy to put together. On the bird houses, one of the roof planes is just a bit longer than the other. When you assemble the house, be sure that the longer piece overlaps the edge of the smaller roof plane. I have added tiny shingles standard to the roof on one of the bird houses. The bird houses are painted with a mustard yellow color and then dry brushed with brown paint to create an aged wood look. The bird box is finished in a similar manner, but using a tuscan red color as a base. The roof of the bird box is painted with copper paint. A very small screw eye is attached to the center of each of the bird house roofs. 
Collage tissue paper is adhered over the book pages in a random pattern along the cage pieces of the santos' skirt. An image of a bird is collaged onto the bodice. The collage tissue is covered with distress collage medium to ensure translucency as well as a seamless transition. The edges of the pieces are sanded and then inked with brushed corduroy distress ink.
A branch is wedged into the santo's skirt and a small nest is secured into the "V" created by the twiggy branch. Three small eggs are safely tucked into the nest. 
The bird houses hang from chains grasped by the bird lady's petite hands.
She wears the bird box on her back, inviting another family to make it their home. Gold swirls and dots adorn the back side of the torso and arms. 
The bird lady's hair is an upside-down nest. Placed on her head and secured with collage medium. Resting atop, is a Relics & Artifacts robin preparing to take flight on a new adventure;
while we await the arrival of her littles.
I hope that you are enjoying these early days of spring and perhaps are inspired to create something that captures the beauty of this wonderful season. 
Thank you so much for stopping by the blog,
 I truly appreciate it.
~Ann
 xxx


supplies used:
branch
copper jewelry chain, jump rings
craft egg miniatures
craft nest miniatures
Deco Art acrylic paint: tuscan red, marigold, traditional raw umber
Distress Collage Medium: matte
Distress Ink: brushed corduroy
Gypsy Soul Laser Cuts:
Relics & Artifacts Resin Blanks: Mythos - bird
Tim Holtz Ideaology:
collage tissue paper- aviary, small fasteners, screw eyes  

Thursday, April 11, 2019

rainy day blues

Hi everyone, today I am on the Emerald Creek Dares Challenge blog, sharing "rainy day blues."This month's theme for the challenge is Singing In The Rain. Anything you want to create that has to do with music, rain showersor water would be perfect for the challenge. I love a good rainy day, the gray skies and raindrop sounds can be quite soothing. For this piece, I wanted to play on those feelings and really work with different blue colors, and of course, water. 
I begin with an umbrella man die cut. The umbrella portion is coated with embossing ink and Seth Apter's Baked Velvet Eclipse embossing powder by Emerald Creek. When heated, this powder creates a fairly matte finish, that is such a gorgeous shade of black. I want the man to appear dry under the cover of his umbrella, so he is left un-embossed. When the umbrella has cooled, I draw lines with a glue pen where the water would run down the spines of the opened top, these are covered with Seth Apter's Deep Sea Baked Texture. When the glue has dried securing he embossing powder, I heat set it to a shining watery finish. The umbrella man is complete and is set asides I can work on his setting.
Next I want to create the scene. To do this I use an architectural stamp. I stamp the image with archival ink and then I color it in with distress inks using a water brush.
Once the colored image is dry, I cut a piece of clear acetate to cover the image and its surround. I ink a waterdrops background stamp using VersaMark Ink. I stamp all areas of the clear acetate then sprinkle Agean Sea Baked Velvet (a beautiful translucent powder) over the page. I carefully heat set the powder to create the look of raindrops all over the page. This sheet will overlay the solid architectural image.
The umbrella man is attached to the water droplet sheet using collage medium. Beneath his feet, I use a VersaMark embossing pen to create the look of a puddle (a result of the umbrella shedding its water) and sprinkle more Aged Sea powder, then heat set. At the top left and bottom right corners, I want to add something to ground the composition. To do this, I emboss two decorative chipboard pieces with Oil Rubbed Bronze Allure embossing powder. These add to the architectural feel of the design as well as create a framework to the piece.
  
When the embossing has cooled, the decorative corners are adhered to the acetate sheet with Distress collage medium. A thin piece of Sookwang adhesive along the left edge of the acetate secures it to the stamped page beneath. The entire composition is secured to a card base.
A closer view of the Oil Rubbed Bronze decorative corner;
 
and the Agean Sea puddle beneath his feet.
I hope that you are inspired to participate in the #ECAPRIL2019 challenge, we would love to see your interpretation of the theme Singing In The Rain. Join us if you dare.
Thank you so much for stopping by,
~Ann 


Supplies used:
Acetate, clear
Blank Page Muse Waterdrops Background Rubber Stamp (sc0094-01)
Distress Ink:
antique linen, chipped sapphire, faded jeans, pumice stone, stormy sky, weathered wood
Emerald Creek embossing powders:
Agean Sea Baked Velvet, Deep Sea Baked Texture, Eclipse Baked Velvet, Oil Rubbed Bronze Allure
Gypsy Soul Laser Cuts: Wrought Iron Set (D44D)
Tim Holtz/Sizzix: Umbrella Man Bigz die
Tim Holtz/Stampers Anonymous Architecture Stamp Set (CMS369)
VersaMark embossing ink: pad and pen


Wednesday, April 3, 2019

steampunk spinner


Hi everyone, today I am super excited to be sharing my new distress oxide ink storage solution on the Gypsy Soul Laser Cuts blog. I have been searching for a way to keep my inks organized and readily available while I am creating. Up to this point, they have been stacked along the back edge of my drafting table. This was a handy location, yet each time I wanted a specific color, I would have to unstack and re-stack all of the inks... needless to say, it was quite a task and, often resulted in a tumbling tower of ink pads. I noticed that Gypsy Soul Laser Cuts was making ink storage solutions for different brands of ink and mentioned the idea for Distress (square) ink pad storage. Wow, am I ever happy that I did!
The Gypsy Soul Laser Cuts Square Ink Pad Storage (12 inks) is sold in sets that accommodate 12 ink pads. Four of those sets can be combined to create a tower, and with the addition of the Square Ink Pad Storage Base and Bin Add-on, the tower is raised off the surface with a base and spinner and the top becomes a bin for additional storage. There is also a kit (Square Ink Pad Short Stacks) that will add four sections of three additional slots. This can be placed atop the 12 slot pieces and thus accommodate the full Distress Ink or Distress Oxide palette. For this project I have used four Square Ink Pad Storage units as well as the Add-on. I am looking forward to adding the additional set so that I am able to store my full ink pad collection all together. 
To begin, I first paint all of the pieces with black spray paint. I choose spray paint because of the large number of pieces and I also thought that it would give a nice finish for the ink pads to slide in and out of their slots. The sturdy chipboard does not require painting; I wanted it to match some of the elements in my studio.
Next, I set about constructing the four basic storage "towers". A quick dry glue works great for this step. I begin with the back piece (the one with all of the slots) flat on my table and apply a thin line of glue to the edges of each "shelf." I then slip the shelf piece into the corresponding slot.
 Every shelf is inserted before I attach a side. When the side is in place and all shelf tabs are locked in, I attach the opposite side. The pieces fit securely and I did not even need to use any clamps to hold it together. Once the back, sides and shelves have dried, I attach the top and bottom pieces to each "tower".
Repeat this process four times for each storage "tower." When all of the tall rectangular storage towers are assembled, they are placed side by side, rotating each a quarter turn to form a tall "cube". 
Once they are each facing the correct direction, you can use glue to secure the sides that are adjacent to each other. This will further stabilize the unit. The storage base and bin add-on contains a square chipboard piece that will be adhered to the bottom of the unit and this is also where the spinner is attached. I used a strong adhesive to attach the spinner to the center of the base and set it aside to dry completely before attaching the combined piece to the base of the "tower cube". 
Beside each column of ink storage is a blank space, I thought it would be fun to make pieces of art for each of these sections. I cut strips of Bristol paper and use inks, stamps and stencils to create panels that correspond to each side, yet coordinate to create a unified look. When I am creating, I want to be able to quickly find the ink colors I am searching for. To make it easier to know which colors are located on each side, I ink the background for that particular side with the colors that will be located in that column.  
For example, if I am looking for one of my green ink pads, I can spin the unit to the side that has a background consisting primarily of green and then I will easily be able to find the color green I am looking for. As you can see in the following photos, each artwork represents the ink colors that are located on that side of the cube. The spinner at the base makes it easy to turn the unit until I have located my desired color palette.
Next, I assemble the bin for the top of the unit. This is a simple task of inserting the tabs into their corresponding slots with adhesive. The bin pieces can be painted before or after it is assembled. I chose to paint it first. I also created a strip of inked paper to coordinate with the inks that I will store in the bin until the 4 smaller sections are available. I stamped and stenciled this strip in a similar style and design to the ones that are located on the cube. 
I am so excited to have my inks organized in an easy to use storage solution that can be altered in any way that suits my fancy. I love the look of the steampunk designs; however, if I ever want to change it up, all I need to do is create some more strips of art and adhere them over the steampunk ones. 
If you have been searching for a storage solution for those square ink pads that is economical and can match any decor, I hope you will consider the Gypsy Soul Laser Cuts Square Ink Pad Storage (12 Inks) 

Thank you so much for stopping by today!
I really appreciate you taking the time and love reading the comments and am happy to answer any questions if you have them.
Have a creative day!
~Ann


I am entering my steampunk spinner in the following challenges:
SanDee & amelies's April 2019 Steampunk Challenge - Anything Goes
Simon Says Stamp Wednesday Challenge - Anything Goes (Tim Holtz)


Supplies used:
Archival ink: black soot
Bristol paper
Distress collage medium: matte
Distress Oxide inks
Gypsy Soul Laser Cuts:
Square Ink Pad Storage Base and Bin Add-onSquare Ink Pad Storage (12 Inks),
(not shown in this post: for storage of the full distress oxide palette add: Square Ink Pad Short Stacks)
Ranger embossing powder: clear
Scotch 3M quick dry multi-purpose adhesive
Tim Holtz/Stampers Anonymous stamps:
curious possibility, ladies & gentlemen, ornate trims, seamless experience, the impossible
Tim Holtz/Stampers Anonymous stencils:
mini stencils set 01, mini stencils set 36, mini stencils set 40 (shifters)