Hi everyone, this year one of my goals is to tame the "creative chaos" by getting my studio space more organized. I spent some time at the beginning of the year cleaning, organizing, and quite honestly, simply putting things where they belong. It seems that the more creative I am, the more of a mess my studio space becomes and the harder it is to find things that I have set aside for a specific purpose. To that end, I need a place to keep all of my handmade cards. I seem to have quite a pile and yet when a birthday or holiday rolls around, I am always searching.
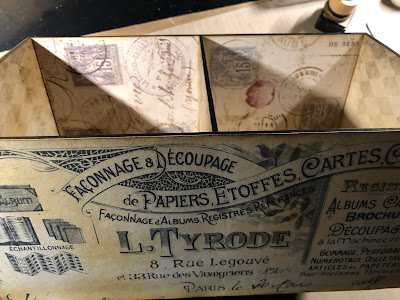
Today I am on the Gypsy Soul Laser Cuts blog sharing this card organizer with you. There are so many ways that it can be used. The trim organizer (as it is titled in the GSLC shop) is very generous in size. The base measures 11" by 5" and has a central divider creating two equal compartments. These compartments easily fit A2 cards, and even slightly larger. The organizer comes with 12 dividers. These are shaped like flat bobbins, so could technically be used to store ribbons or trim; however, I am using them as simple dividers between types of cards. The box arrives arrives flat (6 pieces) and requires assembly. The twelve bobbin cards can be used as bare chipboard or finished with paints or papers as I have.
I always find it easiest to test assemble the piece, this way I can better understand what areas will be visible as well as facilitate the order in which things should be glued. I sort through my paper stash and select a design that I think will work well for my purpose. The interior surfaces can be covered with smaller sized pieces; however, a 12x12 sheet will work best on the long exterior sides (one sheet will cover both the front and the back.)
Before I begin adhering my chosen papers, I paint all of the edges with black soot paint. This will create a finished appearance along the edges where the different papers meet as well as conceal any cuts that may be just a bit too short. Then I begin cutting the papers to size. Oftentimes, when there are multiple sized pieces and they are close in size, I turn them over and give them a designation (letter or number) then also write that onto the chipboard at the location it will be adhered. It helps to keep everything from getting mixed up when it is time to assemble.
I like to add may papers to the Chipboard pieces white they are flat. I find it easier to adhere the papers correctly and, when necessary, weigh them down until dry to keep the edges from curling. On this particular piece, I realized that it would work better to attach the two long exterior paper pieces after the box was assembled. There are no "right" and "wrong" ways to assemble the Gypsy Soul Laser Cut pieces, generally whatever works best for your project. The main piece of advice I always follow is: to ensure the tabs are able to connect easily, do not cover with paper, the added thickness generally does not allow for the tabs to insert into one another.
Once I have all of my paper pieces adhered to the interior surfaces of the box pieces, I begin to assemble. I spread clear, quick dry multi-purpose glue on the tabs and flat areas to be joined, then insert the tabs into the corresponding slots, beginning with the central divider. Next, I attach the front and back box sides and clamp together at the central divider until dry.
The final pieces I assemble are the two end pieces. I use clamps to secure these as well; however, it is not necessary.
With the box assembled, I add the final papers to the front and back exterior sides. (Note: I always ink the edges of any cut pieces so that the white does not show.)

I finally have a special place where I will be sorting and storing miscellaneous cards I have made. There will be no more searching amidst the piles, only flipping through my organizer to find the correct one.
I hope that you are finding time to get creative this year, I have found that even in organizing there are ways to exercise my creativity. Thanks so much for stopping by, I truly appreciate it.
~Ann
xx
Supplies:
3M quick dry tacky glue
Distress collage medium - matte
Distress ink- brushed corduroy
Distress Paint - black soot
Gypsy Soul Laser Cuts - trim organizer
Tim Holtz Ideaology -
worn wallpapers (original and halloween), french industrial paper stash
Before I begin adhering my chosen papers, I paint all of the edges with black soot paint. This will create a finished appearance along the edges where the different papers meet as well as conceal any cuts that may be just a bit too short. Then I begin cutting the papers to size. Oftentimes, when there are multiple sized pieces and they are close in size, I turn them over and give them a designation (letter or number) then also write that onto the chipboard at the location it will be adhered. It helps to keep everything from getting mixed up when it is time to assemble.
I like to add may papers to the Chipboard pieces white they are flat. I find it easier to adhere the papers correctly and, when necessary, weigh them down until dry to keep the edges from curling. On this particular piece, I realized that it would work better to attach the two long exterior paper pieces after the box was assembled. There are no "right" and "wrong" ways to assemble the Gypsy Soul Laser Cut pieces, generally whatever works best for your project. The main piece of advice I always follow is: to ensure the tabs are able to connect easily, do not cover with paper, the added thickness generally does not allow for the tabs to insert into one another.
Once I have all of my paper pieces adhered to the interior surfaces of the box pieces, I begin to assemble. I spread clear, quick dry multi-purpose glue on the tabs and flat areas to be joined, then insert the tabs into the corresponding slots, beginning with the central divider. Next, I attach the front and back box sides and clamp together at the central divider until dry.
The final pieces I assemble are the two end pieces. I use clamps to secure these as well; however, it is not necessary.
I consider adding feet to the base of the box for a more decorative look, but decide on adding a piece of crafting felt to the very bottom of the organizer. This will allow the box to be situated on a solid or wire shelf, as well as protect any surfaces that it will be set upon. Once assembly is complete, it is time to begin work on the bobbins.
My original thought was to divide by months of the year (there are 12 dividers/months), but I believe what would work best for me is to sort by occasion or theme. To this end, I keep the dividers simple. I have learned over the years that my storage solutions are often evolving and this will allow me to change things up easily (if necessary) at a later date. I select some of my favorite worn wallpapers, and paper stash designs for the bobbins. The edge of each bobbin is painted with black paint and allowed to dry. One side of the bobbin is coated with collage medium, I secure the desired paper in place, and weigh down until dry. Once dry, I trim the paper edges with an Exacto knife. All of the bobbin pieces are covered on both the front and back sides.
I hope that you are finding time to get creative this year, I have found that even in organizing there are ways to exercise my creativity. Thanks so much for stopping by, I truly appreciate it.
~Ann
xx
Supplies:
3M quick dry tacky glue
Distress collage medium - matte
Distress ink- brushed corduroy
Distress Paint - black soot
Gypsy Soul Laser Cuts - trim organizer
Tim Holtz Ideaology -
worn wallpapers (original and halloween), french industrial paper stash


