Wednesday, October 17, 2018

caravan to the catacombs

As October marches on, there is a shift, of sorts, in the atmosphere. The leaves begin to die; the days grow shorter; and we prepare ourselves for the long winter nights. It is with the fading of the bright and active autumnal days that I present to you "caravan to the catacombs."
The Gypsy Soul Laser Cuts funeral coach is truly a remarkable piece; one that I have been looking forward to working with. The sturdy chipboard funeral coach arrives in eighteen pieces, it includes all of the elements needed to complete the coach, including two axels and four wheels.
Whenever I begin a new project , I always find it helpful to initially construct the piece in its unaltered form. Figuring out the puzzle and understanding the basic construction helps me to determine the order in which I will need to complete the parts. It’s also helpful to get a clear vision of how it will look in it’s 3D form. 
 I paint all of the pieces with black soot distress paint on both sides, making sure to paint the edges of the interlocking tabs so that when assembled, it is completely colored. The pieces are set aside to dry. 
I cut 4 rectangles from acetate that has a spider web pattern printed on it. I love the papers included in the new Halloween paper stash from Tim Holtz. Each rectangle is approximately 1-5/8" x 3-1/4”. I also cut two 2-7/8” x 3-1/4” pieces of clear acetate for the central windows on each coach side panel. The clear panels are stamped with “The Undertaker“ stamp, and adorned at each corner with remnant rub decorative corners.
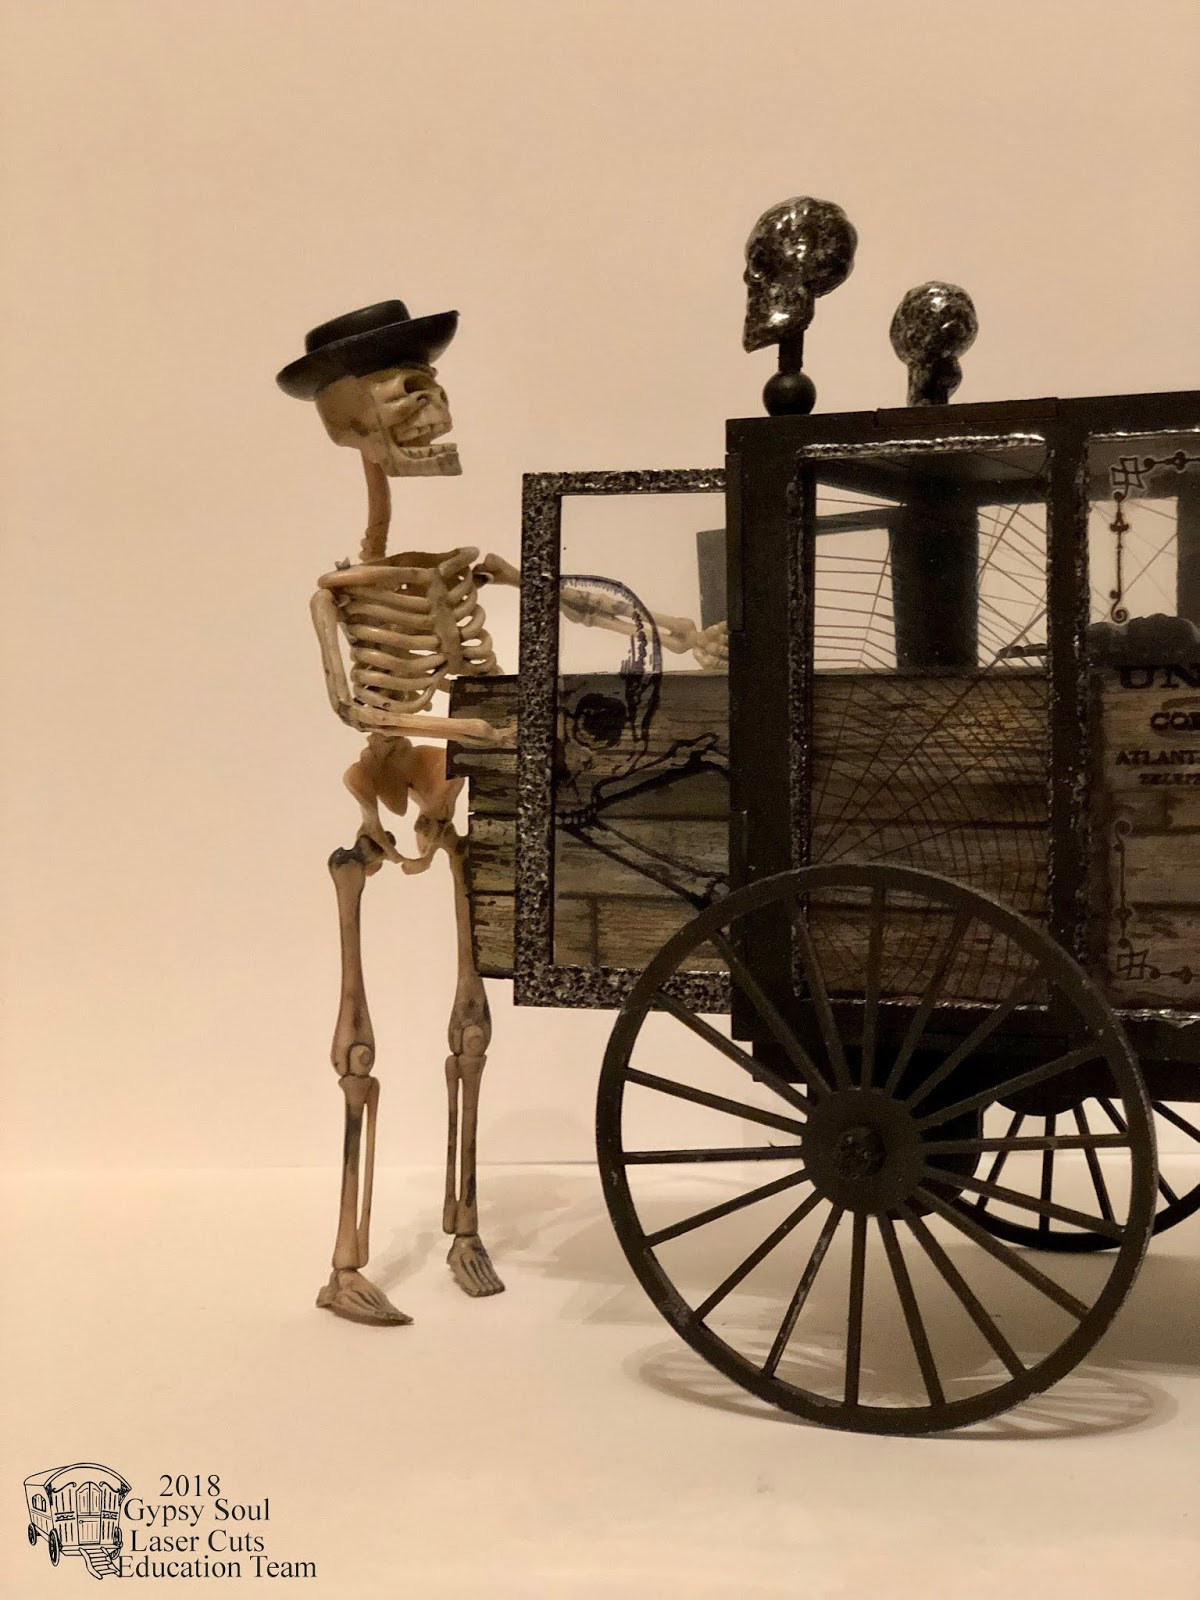
 Each of the openings in the side walls is edged with Versamark ink and heat embossed with Emerald Creek hammered metal embossing powder. This gives the window openings a spooky elegance. When the embossing has cooled, I flip the side panels over and adhere the acetate pieces in place with distress collage medium.  
With the side panels complete, I begin to construct the base of the coach. Both of the runners that will hold the axels are glued in place. Be sure to check that both runners are oriented in the same direction. The smaller hubs are where the larger wheels are located, and the larger hubs are where the smaller wheels will be. Next, I attach the side panels, as well as the wall that separates the driver from the coffin compartment. The interlocking tabs assure that everything is aligned correctly. 
The solid surfaces on the interior of the coffin compartments are lined with a burgundy cut velvet. I measure and cut two pieces of cardstock that fit the floor area and partition wall then adhere the velvet to the cardstock with collage medium. When dry, I trim the edges and adhere each piece to its respective panel in the coach. The rear doorframe is attached after these velvet pieces are secure. 
The rear door panels are embossed with hammered metal on their exterior sides. Pieces of stamped acetate are adhered to the openings in the same manner as they were on the sidewall openings. When everything is dry, the doors are hinged in the doorframe. 
I want the wheels to look as if they have somewhat worn, as if they have travelled many miles. To accomplish this, the four wheels are lightly painted with black soot distress paint on both sides. The outer edge of each wheel is colored using an brushed pewter distress crayon. Some areas of the wheel/spoke interior edges are also colored with the distress crayon, using a paintbrush and water to make the pigment more fluid. The paintbrush can easily access the tight areas between the spokes.
Decorative “metallic” skull elements are located at the four corners of the roof. The hammered metal look of the skulls is created by embossing, once again using the Emerald Creek powder. Be sure to use tweezers to hold the piece you are embossing and take care not to overheat as the skulls are plastic and can melt. Once the skulls are cool, I color any deep recesses with black sharpie marker. A wooden skewer is inserted into the hole at the bottom of the skull to create a post and a wooden bead forms the base.  The wooden parts are painted with black soot distress paint. These decorative skull elements are not attached to the roof until the assembly is complete, thus making less opportunity for the pieces to break off when the coach is being handled.
The compartment beneath the drivers seat is finished with cut velvet in the same fashion as the rear compartment. A metal Halloween vignette adornment is adhered to each side of the cab with collage medium.
 The coach would not be complete without a “vanity plate”, which is located on the front grill panel. A Halloween quote chip is adhered to the painted chipboard panel and hammered metal embossing powder creates the faux grill effect.
A Gypsy Soul Laser Cuts 6 inch coffin box fits perfectly inside the funeral coach. This piece is made from lighter weight chipboard and arrives in two flat pieces. Each piece has score lines at every fold location. I recommend using a bone folder to score along the lines prior to assembly.
I assemble and paint the coffin box with black soot distress paint. Using black soot archival ink, I stamp a wooden plank pattern onto a piece of mixed media heavy stock. I color the piece with  weathered wood, black soot, hickory smoke and gathered twigs distress inks to create the look of real wood. My patterned paper is cut to fit the top and bottom of the casket and planks are individually attached to the sides.  

When the coffin and lid have been completely covered, a jolly roger embellishment is adhered to the lid and a skeleton is nestled into his final resting place.
This coffin box slides right into the rear compartment of the funeral coach, allowing the doors to close fully. 
Once everything is intact, I attach the "metal" skull decorations at each roof corner with collage medium and allow them to dry overnight.
The funeral coach, complete with "passenger" is ready to for its caravan to the catacombs.
Thank you so much for taking the time to visit the blog.
If you still haven't had a chance to make something for this spooky season, I hope that you can find the time; its always a fun time of year to let your creativity take flight.
I hope that you are inspired to create something spooktacular!
~Ann


supplies list:
burgundy cut velvet
distress collage medium
distress crayon: brushed pewter
distress inks: black soot, gathered twigs, hickory smoke, weathered wood
distress paint: black soot
Emerald Creek hammered metal embossing powder
Gypsy Soul Laser Cuts products:
Funeral Coach6 inch Coffin Box
skeleton beads
Tim Holtz ideaology:
adornments jolly roger, gothic remnant rubs, halloween paper stash, vignette accents halloween, heirloom roses halloween, halloween quote chips,
Tim Holtz/Stampers Anonymous rubber stamps:
 craze and planks (CMS344), regions beyond (CMS274), undertaker, (CMS240)
Versamark embossing ink
wooden beads


Wednesday, October 3, 2018

a hallowed haunt

Welcome to Skelly's shed,
 a place to rest her weary head...
I can hardly believe that the hallowed month of October is upon us...this means that holiday preparations are in full swing. I love decorating for Halloween; the spookier, the better! I am really excited to share this project that I created for the Gypsy Soul Laser Cuts blog using the GSLC house shrine box. The chipboard shrine was the perfect base for this spooky haunt.
The house shrine box is made up of seven pieces. It arrives flat and requires assembly. 
I always like to test how the pieces fit together before adding any finishes to the chipboard. This way I know the correct direction for any patterned paper that I will be using, as well as which areas of the pieces will remain unseen. Viewing the piece in its 3D form also allows me to envision how I hope the finished project will look. 
Once I have a good idea of the direction the project will be taking, I invade my paper stash to find the perfect surface coverings. I paint all of the exposed chipboard edges with black soot distress paint and allow to dry before starting the assembly. By painting the edges, it allows for some margin of error and presents a finished appearance when I when I add papers.
The exterior of the shed is covered in a Tim Holtz wood plank patterned paper. Using the chipboard blanks as templates, I cut the paper into pieces that fit each of the exterior surfaces. I apply crackle paint to random planks on each section. When dry, this will create an aged wood look. Once the crackle has cured, I apply hickory smoke and black soot distress ink over the paper, paying special attention to the crackled areas. I then cut solid black cardstock pieces to match the shape of each patterned piece. The planks are cut apart all edges are inked, and then each plank is put back in its place onto the solid black card. Some planks have multiple layers of double sided adhesive to raise them sightly while others are glued directly to the card. This gives the exterior surfaces an authentic plank siding appearance. When I have completed this technique on each of the exterior templates, I set them aside and cut the papers for the interior. 
I use a halloween worn wallpaper for the interior surfaces. The wallpaper is distressed with ink and I do a test fit to ensure proper alignment. Collage medium is applied to the interior walls, and the papers are adhered and set aside to dry. Once dry, the box is constructed. I often use clamps to hold everything in place while the glue is drying. Depending on the project, sometimes I assemble the box and then apply paper; however, on this piece I attach all of the interior
surface papers prior to assembly. Either way that you prefer to work is fine.
The sloped roof pieces are covered with shingles cut from copper metallic kraft paper that has been die cut, sanded and inked. Each layer of shingles is attached to the roof slab beginning at the bottom edge and working up towards the peak so that the shingles layer on top of one another, like an actual roof shingle would be laid. 
After the roof is installed, I add the topmost row of shingles and then lift random pieces to give the roof even more dimension.  
When the exterior finishes have all been applied, I add embellishments to the shed. A die cut spiderweb is located at the internal roof apex, set away from the rear wall for added dimension. A lone spider dangles from his web awaiting its next prey. 
 Skelly holds her prized pumpkin, while a riotous raven stakes his claim on one of the castaways. 
The raven is a Gypsy Soul Laser Cut piece from the creepy critters set that has been embossed. 
 This set is fabulous for all of your spooky creations; it contains various critters, ranging from bats to cats, rats and birds. There are eight moderately sized critters on the sheet. I coat the piece with embossing ink, sprinkle on black embossing powder and melt it with a heat tool. After the first layer has cooled, I coat with a second layer of ink and sprinkle small amounts of Emerald Creek java embossing powder, then heat set. I cut a small wedge out of the pumpkin so that it fits snugly against the corner. The pumpkin is attached to the base/leg of the shed, and then the raven is secured to the pumpkin's stem with hot glue.
A skull and crossbones "jolly roger" adornment declares this is Skelly's shed. It has been painted with distress paint in areas to give it an aged look. 
Lastly, a quote token dangles from the roof:
 "here in the silence dark & deep, i offer you eternal sleep."


Wishing you a month full of halloween creativity. 
These holiday seasons allow an opportunity to bring new and different ideas to life. 
I hope you are inspired to create something spooktacular! 
~Ann 


Supplies used:
artificial butterfly wings
DecoArt one step crackle
dollar store skeleton
distress collage medium
distress ink: black soot, hickory smoke, ground expresso
Emerald Creek embossing powder: black, java
Gypsy Soul Laser Cuts: 
Tim Holtz idea-ology:
 adornments halloween, adornments jolly roger, adornments treasures, paper stash halloween, paper stash metallic kraft, quote tokens halloween, worn wallpaper halloween, jump rings, pumpkin pieces, 
Tim Holtz Sizzix alterations:
 mixed media halloween, village rooftops