Wednesday, August 21, 2019

madonna enshrined

Hi everyone, today I am on the Gypsy Soul Laser Cuts blog sharing "madonna enshrined." A small shrine I created to showcase a hand painted madonna. I love creating religious pieces and recently acquired a mold to make these small Mary statues. I was so excited when I realized that she fit perfectly in the GSLC ATC Shrine with Feet.  
I begin with a Gypsy Soul Laser Cuts ATC Shrine with Feet. I always like to lay out the pieces and see how they all fit together prior to adding any finishes. This helps me to understand what areas are visible, as well as lets me envision how I want the final piece to look.
I cover all of the chipboard pieces with a light coat of grey chalk paint. This piece is made from medium weight chipboard, so it's not really a problem, but it's always a good idea to stick to light coats of paint that dry quickly, adding more coats as needed instead of one heavy wet layer, it helps avoid warping. Once the base color has dried, I dry-brush some pickling finish onto all of the exterior surfaces, including the exposed edges. I want to give the shrine the look of weathered wood. 
When the finish is completely dry, I cut some marbled Momi paper, from my special paper stash, to cover the the interior surfaces. Since I will be attaching the statue to the bottom, I cover it with a piece of heavyweight charcoal gray paper. The papers are cut to fit just inside the assembled piece, this way they do not interfere with the interlocking tabs that hold the shrine together. 
 I use a quick drink adhesive along the edges of the chipboard pieces and assemble the shrine. If necessary, I clamp the pieces together until the glue has dried. Once the shrine is assembled, I attach the cut papers to the inside by running a slight glue line around the edges and laying the paper onto the surface.
The next step is adding an edge of Dresden trim along the top and bottom edges of the interior. I use one long piece and trim off the extra length to ensure the strip extends the full distance. I use a small rope Dresden to frame the opening of the shrine where the madonna will be located.
Next, I paint the resin figure to be included, and add silver detailing. I add a die cut 3D radiant piece to her head to create a halo. I also add silver die cut stars onto the back panel. The madonna statue is attached to the base with collage medium and set aside to dry overnight. 
Such a beautiful but simple shrine to display my madonna. This ATC shrine with feet would be a perfect way to display any of your special items. I hope that you create one of your own, I'd love to see how you would use this piece.
Thank you so much for stopping by today, I truly appreciate it.
Hope your day is a creative one.
~Ann
 xxx


Gypsy Soul Laser Cuts:
ATC Shrine with Feet

other products:
Distress collage medium: matte
Dresden trims
Folk Art: chalk paint, pickling finish
Mullberry Paper: marbled Momi
Paper Artsy fresco paints
Retro Cafe Art silicone mold
Resin Madonna
Tim Holtz / Sizzix Alterations dies: 3D radiant, shape strips 

Thursday, August 8, 2019

high hopes journal

Hi everyone, this month the theme for the Emerald Creek Dares Challenge is High Hopes.
It is based on the song by Panic! At The Disco, and this month anything goes.
I hope you will be able to join us!
 I really enjoyed listening to the song, it was one I was familiar with, and really left me feeling upbeat. I have created a journal for noting hopes and dreams.
Before I get into my high hopes journal project, I want to share a little backstory. I think it's important to understand that when we are creating, things don't always turn out the way we plan.
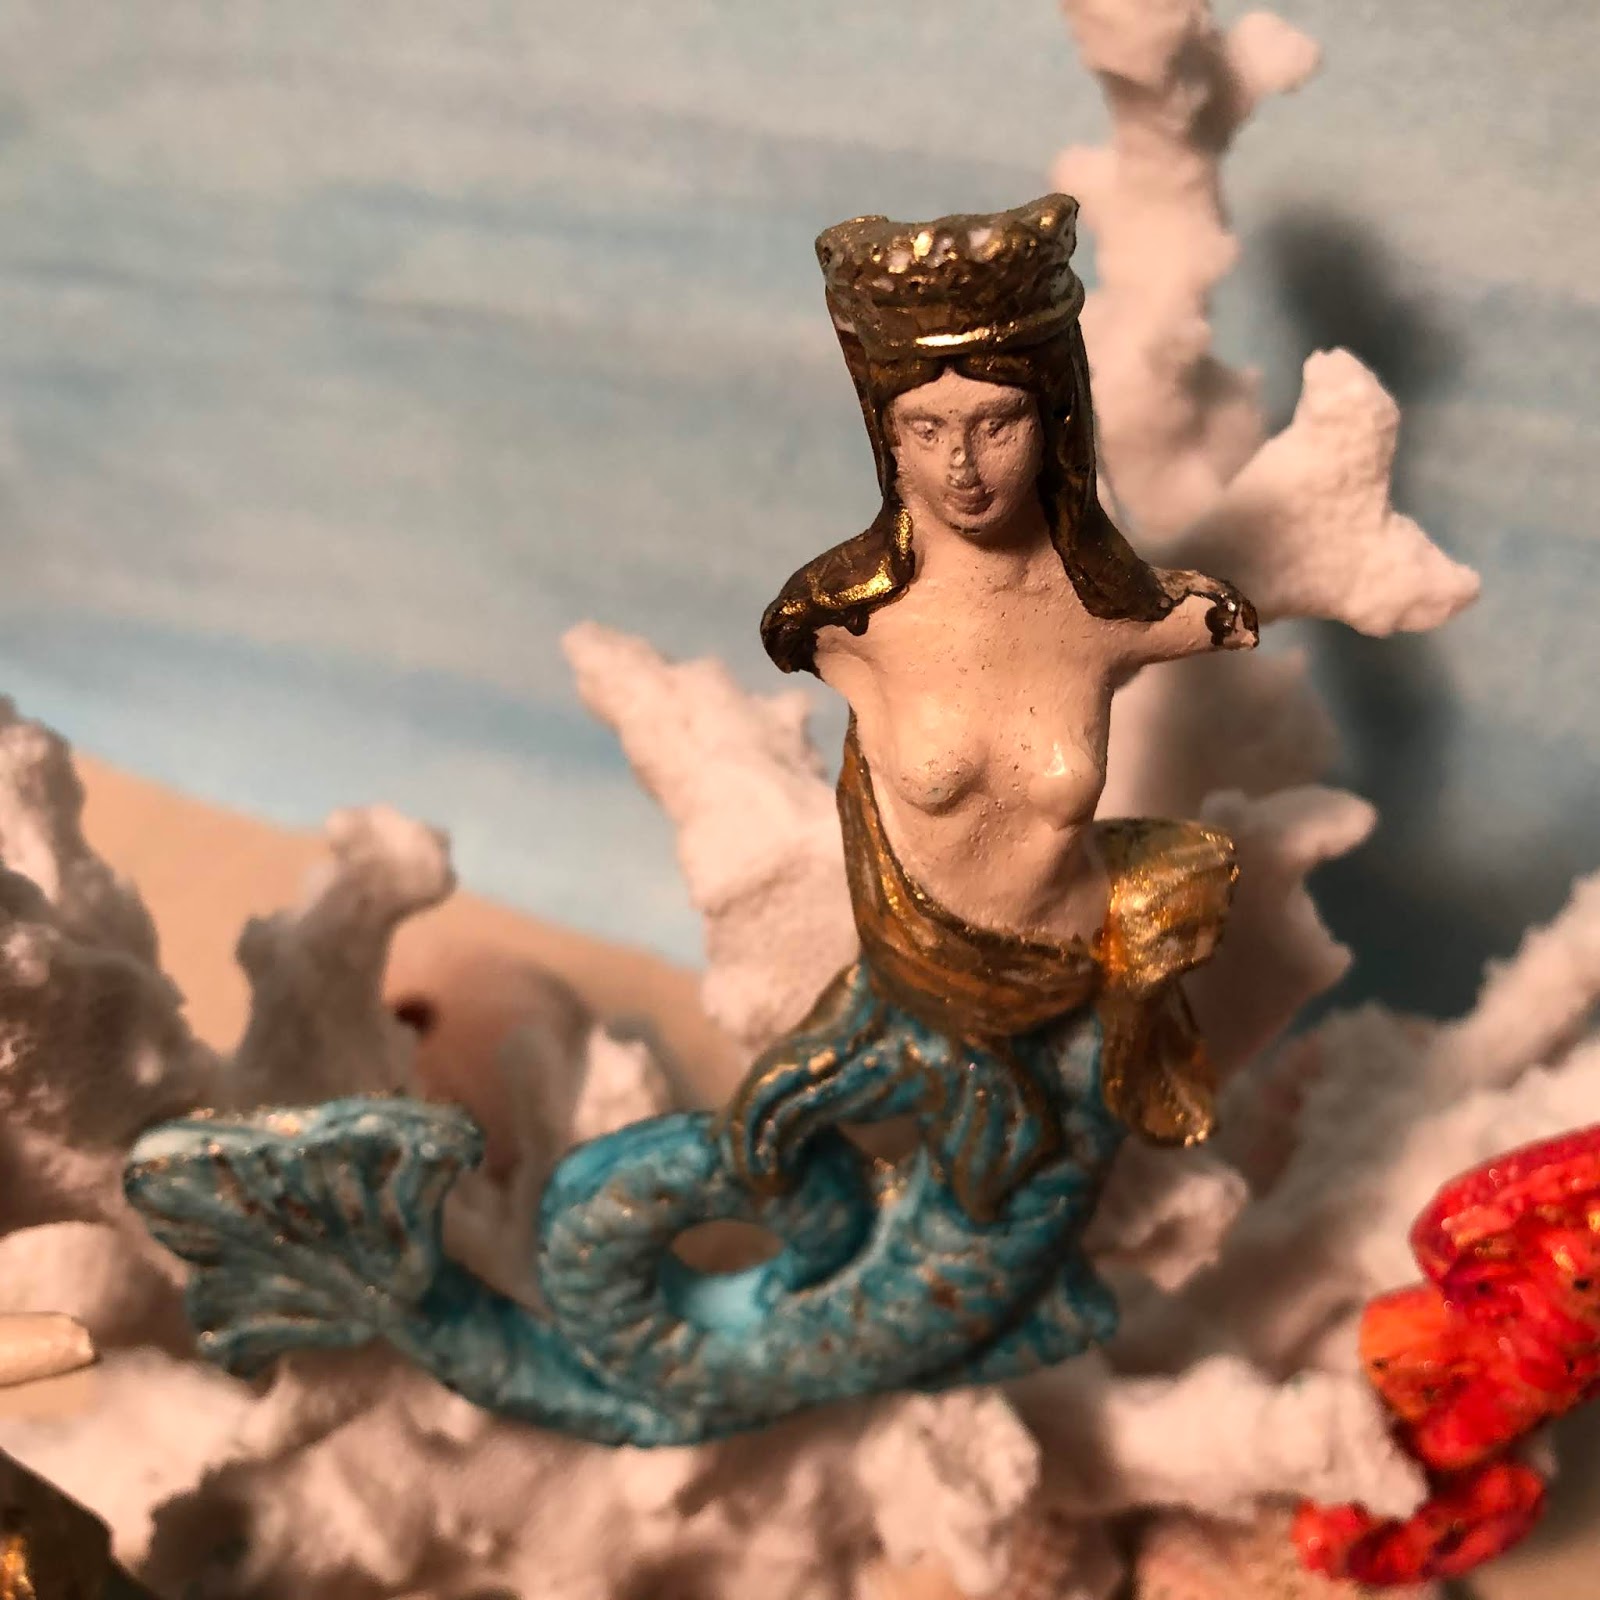
Where I live, August tends to be a month that most people are enjoying vacations and cooling off at the beach; therefore, I wanted to create something centered around the ocean. I set out to make a handful of ATC's using a few of the Emerald Creek Stamps, including one from the new Mermaid Tears collection, I really have "high hopes" for these incredible designs, they are funky and richly detailed. These are the Artist Trading Cards I started making...Steampunk Sea Adaline has high hopes to one day find a sunken treasure and move into the sandcastle of her dreams.
Once I began working on the artist trading cards, my creative muse took over and my project for the month completely changed direction. Whenever this happens (this is not the first time, nor will it be the last), I tend to allow my creativity take me wherever it wants to go; thus far I have never been disappointed with the outcome.

So now, on to my project.
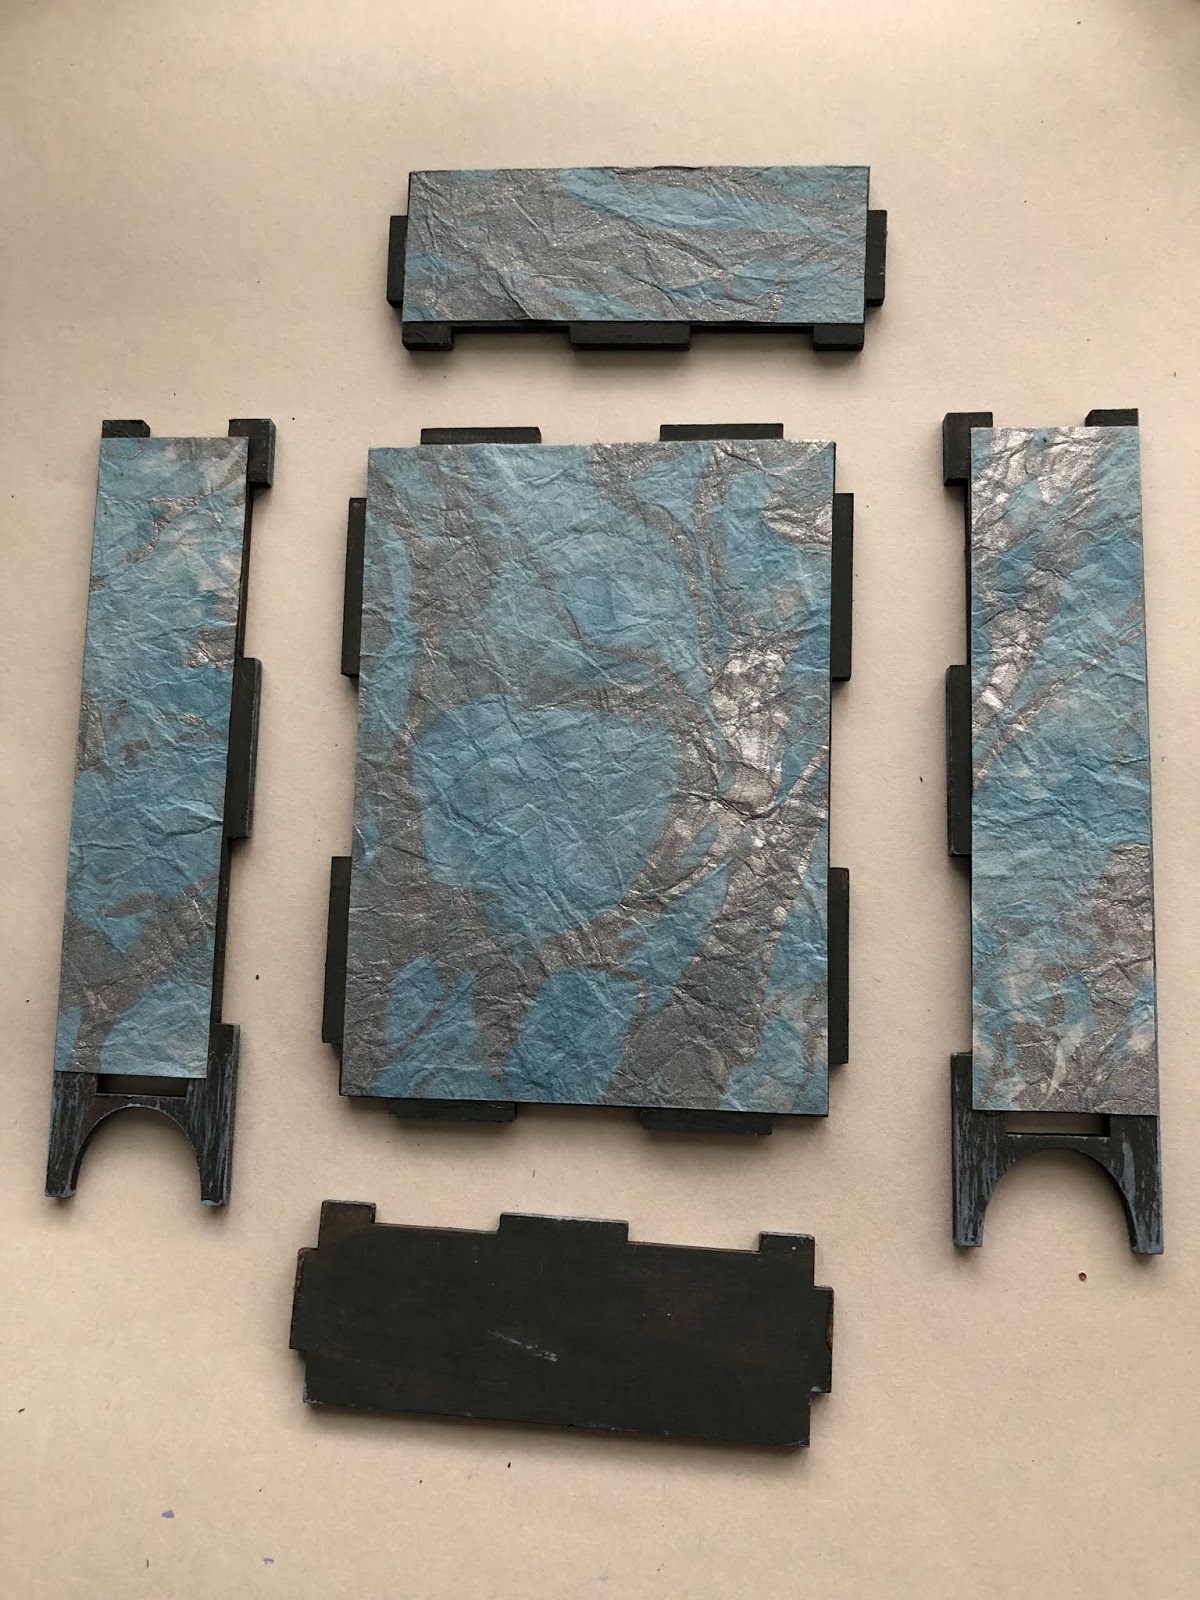
I begin with plain mat board die cuts for an Eileen Hull XL Journal. Thinking about the ebb and flow of the oceans, I draw lines across the cover, simulating the currents. I then pull out a few of my favorite embossing powders to use on the cover. Since I am drawing inspiration from the ocean, I select the ones that best fit into that color scheme: deep sea and dirty sand baked textures, aegean sea baked velvet, and fractured ice allure powder. I also grab my all time favorite allure powder, charred gold. I think this combination will be visually appealing.
Next, I pour some of the embossing ink from my dauber into a welled palette. I use a paintbrush to "paint" the ink onto one section at a time. After the area is filled with a light coat of ink, I cover it with a layer of embossing powder and then heat set it. Some of the powders are best if you begin heating them from the underside, once the melting begins, it can be heated from above. This ensures that the powder will stay where you want it to be and reduce the "fly away."
Continue coating one area at a time, varying the colors that you use, so that the bordering sections are distinguishable from one another. On the areas where I use Aegean Sea Baked Velvet, I lightly coat the area initially, then added more powder randomly to give a varying depth of color. I love the way these sections turned out.
Once the cover is complete, I chose a coordinating color heavyweight paper for the inside. The paper is die cut and then put through my Xyron Creative Station Lite to add a layer of adhesive to one side. The papers are then attached to the inside covers. Using a paint marker, I color the edges of the journal. I love the way the spice gold edges accentuate the charred gold sections on the cover.
The two journal covers are attached at the spine and then a piece of leather is used to cover the outside back and spine. I find it easiest to use Distress collage medium to adhere the leather piece. I first coat the spine and attach the leather piece to the spine. I use clamps to hold it in place until the glue has dried completely. I then coat the back cover with collage medium and attach the leather to it. I clamp the leather into place along the edges and allow it to dry completely. Once dry, I trim the edges where the leather is overlapping. (Note: I do not use the die to cut my leather because I will not be utilizing the central hole in the spine. Cutting the leather myself, allows the hole to be concealed.)
I add eyelets to the holes in the spine that will be used for the binding. Sinew will hold the journal's signatures in place. Once strung, I tie the sinew off and slip the two signatures inside, completing the journal.
This will be a wonderful place to note all my hopes and dreams.
Do you have a special journal to jot down your inspirations? Perhaps I have inspired you to create one, or maybe just given you an idea to create something of you own. We would love to have you join the challenge, if you dare...
Thanks so much for taking the time to visit the blog today,
I really appreciate it.
Hope your day is a creative one!
~Ann


I am entering this High Hopes Journal in the following:
 Funkie JunkieBoutique Challenge: Marvellous Metallics 
(metallic embossing powders used on the cover)

Emerald Creek Products used:
Allure Powders: Charred Gold, Fractured Ice
Seth Apter Baked Texture embossing powders: Deep Sea, Dirty Sand
Seth Apter Baked Velvet embossing powder: Aegean Sea
Emerald Creek Stamps used for ATCs: Dream Home, Steampunk Sea Adaline, See Chest, Take 2

other products used:
colored scrapbook paper
Eileen Hull / Sizzix Scoreboards XL Journal die
Ranger Embossing Ink dauber: Emboss It
Real Leather:
Sizzix Mat Board: white
Wagner Studio Precision Heat Gun
Xyron Creative Station Lite
Zig Painty oil based paint marker: gold spice


Wednesday, August 7, 2019

tag book trio

Hi everyone, it seems as though the dog days of summer are upon us; I was glad to spend some time in the studio creating this trio of tag books. Gypsy Soul Laser Cuts makes this set of three, extra large heavyweight chipboard tags that were perfect for my project.
Today I am on the Gypsy Soul Laser Cuts Blog sharing this tag book trio.
As I mentioned earlier, the set is comprised of three chipboard decorative tags x-large. Each tag has a distinct shape to the top, which makes each tag book unique.
 
I want to use the hole as part of my closure for each book. I measure from the end of the tag to where I want the base to meet and divide that in half to find my crease point. (Note: since all three tags are a little bit different, it is best to measure each one.)
When I find that center, I use a bone folder and straight edge to score the tag at the crease line. I score both sides and then fold the tag. Next, I select some papers from my stash and cut then to fit the width of the tags, adding a little extra to the length to accommodate the folds. Be sure to cut two pieces for each tag book, one that will serve as the exterior cover, and a second for the inside.
Once all of my papers are cut, I add a strip of linen hinging tape along the outside fold edge. I then ink all of the edges with distress ink. I have used black soot as well as gathered twigs, select inks that coordinate with your decorative papers.
Before I begin attaching my papers, I decide on closures. Each of my tag books utilizes a little different method. Understanding how the books will be closed allows you to add pieces under the cover paper if necessary. Any ties can be glued to the raw tag and this will strengthen the bond.
 Once the closure is settled on, the next step is to attach the interior paper to the tag. I like to use distress collage medium for this. It dries quickly and is not overly wet, so there is not warping of the paper or the tag. Allow the interior decorative paper to dry and trim the decorative edge and hole with an Exacto knife. 
Next, create the internal signatures for your tag book. Each of my tag books has six pages inside. I cut a piece of paper 3 1/8" x 6" and fold at the center of the rectangle. stack the three folded pieces inside one another. Measure an equal distance in from the edges at the fold and pierce through the stacked pages. Align the stacked pages with the interior fold of the tag book. Pierce the cover directly through the existing holes so that the signature will be aligned with the book cover. 

Using a needle and some sort of binding thread (I used fine jute) sew the pages together through the cover and tie together at the outside. It is also a good idea to add the signature to the inside of the tag book prior to the external cover paper. This allows you to hide the binding threads. If that is not important to you, then you can add the signature after the outside cover paper.
With the signature and closure method secure, I add the decorative cover paper to the exterior and allow the adhesive to dry. The edges are trimmed around the decorative edge and the tag book is complete.  I just love the size of these tag books, they are just large enough to stick into a pocket and take with you easily. I made three different tag books with the set of GSLC tags. By simply using different papers, you can achieve very different looks.  
 
 
I just love this trio of tag books and look forward to using them! I think they would also be a lot of fun to create in holiday themes to send to friends. I hope that you are inspired to try some for yourself.
Thank you so much for taking the time to stop by today, 
I truly appreciate it.
Be creative every day.
~Ann


Gypsy Soul Laser Cuts used:
Chipboard Decorative Tags X-Large

other products used:
Distress collage medium: matte
Distress Ink: black soot, gathered twigs
Exacto knife
Lineco: linen hinging tape
MayArts ribbon: string burlap ribbon black
Neenah: creative cardstock naturals
Tim Holtz Ideaology paper stash: dapper, memorabilia, wallflower
Tim Holtz Ideaology trimmings: crinkle ribbon, naturals black and cream
Tim Holtz Ideaology design tape

Thursday, August 1, 2019

regal residence


In the depths,
 under the sea,
reside the Queen and her King.
Long forgotten relics of what once was supreme,
they are lulled by the tides,
 at rest and now free.

Sometimes I look at a piece and am struck by an idea; the vision so clear that it is simply a matter of bringing it to life. When Sandra released the Relics & Artifacts Mermaid Set, I was fascinated by the intricate detailing and various pieces, and I was bombarded with creative ideas.
Today I am sharing the first of these inspirations, a regal residence.
I chose the coral piece as the foundation because of the stability of coral formations and the way that they stand as a protective force for the shores. A resilient residence for the Queen and her King.
The Mermaid Queen and Merman King are painted with acrylic paints with ink washes for their tails. Golden accents are added with oil based paints and iridescent inks.
Seahorses have always been a source of fascination for me,
 their myriad of colors and adaptation skills are amazing.
I wanted to create realistic looking specimens with intense color hues.
 These pieces are finished with acryic paints and various inks, then splattered with gesso. The two seahorses stand guard against intruders.
The seashell, caught within the coral tentacles,
 is inked to mimic something that may wash up on the shore.
Perhaps it hides a secret inside.
The starfish details are highlighted in gold,
reflecting whatever light finds its way to the sandy shores.


I have truly been inspired by the new Relics & Artifacts mermaid set; I look forward to creating another project with these incredible pieces.
I hope that perhaps you are drawn to create something of your own.
Thank you for spending time with me today,  I really appreciate it.
I hope you have a creative day,
~Ann
  xxx


This post was originally published on Sandra Evertson's Muse blog.

Relics & Artifacts Mermaid Kit