Thursday, May 16, 2019

sacred shrine


Today on Sandra Evertson's Muse Blog, I am sharing a sacred shrine,
my interpretation of the Relics & Artifacts Folk Art Retablo.
This is such an incredible laser cut piece with beautiful details and so many possibilities.
I hope that you can stop by to see the shrine and all of the special pieces contained within. You can get to the Muse Blog by clicking here.

My faith stands at the forefront in my life; it guides me, inspires me, and heals me.
When Relics & Artifacts introduced the Folk Art Retablo, I knew that I wanted to create a shrine to honor the Madonna, Holy Mary; and to do it in a way that would reflect the origins of the retablo and respect the style of its design....


materials:
Relics & Artifacts Folk Art Retablo
Relics & Artifacts Milagro I
Relics and Artifacts Mini Ex Voto
Relics and Artifacts Crosse Icons
Sandra Evertson Portugal Art Stamp
acrylic paints
brass nails
collage medium
crackle medium
crystal rhinestones
glass beads
jewelry findings
religious devotional items
wood glue
wood stain


Wednesday, May 15, 2019

gathering ideas

Hi everyone, it seems like the closer we get to the summer months, the busier it is; and the more difficult it becomes keeping track of everything, especially creative ideas.
Today I am on the Gypsy Soul Laser Cuts blog, sharing an "idea" journal I created to help me keep track of things. I thought it would be fun to make the journal in a steampunk style. In my mind, steampunk and innovation go hand in hand. Gypsy Soul Laser Cuts has some wonderful steampunk shapes and pieces that are perfect for incorporating into journals.
I begin with an Eileen Hull passport journal die cut from medium weight chipboard. The base journal is covered with papers I created with Distress Oxide sprays in Vintage Photo, Walnut Stain and Cracked Pistachio. I also added some Distress spray stain in Spiced Marmalade. I love the results achieved from the combination of colors and inks. My Xyron Creative Station Lite makes easy work of adhering the papers to the journal. 
The Gypsy Soul Laser Cuts Steampunk Lightbulb Set has so many great pieces to choose from. Since my journal only uses a few, I look forward to using this set for multiple projects.
I use Tim Holtz Worn Text stamps to create the word "Ideas." This is stamped with Versamark ink then heat embossed with Oil Rubbed Bronze embossing powder, in the bottom right hand corner of the cover. I also emboss the small simple lightbulb shape from the Steampunk Lightbulb Set with the same powder.
 
The final cover is a combination of creative ideas, I use the lightbulb as the central focus of the cover, layered above a Tim Holtz Gearhead die cut and adorned with embossed pieces from the Steampunk Shape Set.
Inside the journal are three inserts.
The first is a Gypsy Soul Laser Cuts ATC folder. It has been covered with another piece from the papers I created with Distress Oxide sprays. I have added a few embossed cogs and gear pieces from the Steampunk Shape Set to complete the outside.
The interior of the folder has two pockets to store miscellaneous findings. I have edged each pocket with strips of the inked paper.
The second insert is a mini lined composition notebook. The notebook has been covered with colored card stock and adorning this cover is a section from the GSLC Collage Border Steampunk. Using snips, I simply cut the length I want and then emboss the section with Seth Apter's Patina Oxide Baked Texture embossing powder.
 I love the way the embossing color plays off the inks I have used throughout the journal. I adhere the embossed piece to the covered notebook and also add some stenciling.
The final insert is completely hand made, using the Oxide spray paper as a cover and containing watercolor papers for filler. Using a pointing hand piece from the Steampunk Lightbulb Set, I first heat emboss one side with oil rubbed bronze embossing powder, and when it is cool, I glue a paper clip to the back side to use as a planner clip. The clip will help me to hold the page I am working on and make it readily available after the book is closed. I love the way this turned out, and will definitely be making a few more clips to use in different journal inserts. It's a simple way to use up those small extra pieces that you have laying around, and super helpful for keeping organized.
Sometimes it's the embellishments that have the most impact on a project. I believe that by adding the Gypsy Soul Laser Cut steampunk pieces to this simple journal, I was able to give it the style I was looking for without a lot of added work. The perfect solution to busy days and staying organized, all the while gathering ideas.
Thanks so much for stopping by the blog today, 
I really appreciate you taking the time.
~Ann
xxx

I am entering this project into the following challenges:

SanDee & amelie's Steampunk Challenges:
May 2019 - Anything Goes Steampunk/Industrial
Mini Album Makers Challenge: May 2019
 A Vintage Journey:
 Book it! May Challenge


list of supplies:
Distress Collage medium: matte
Distress ink: walnut stain
Distress Oxide ink: cracked pistachio
Distress Oxide sprays: cracked pistachio, vintage photo, walnut stain
Distress Spray Stain: spiced marmalade
Emerald Creek embossing powders: oil rubbed bronze, patina oxide
Gypsy Soul Laser Cuts:
ATC folder, Collage Border SteampunkSteampunk Lightbulb SetSteampunk Shape Set
paper clips
Tim Holtz/Stampers Anonymous: mini stencils set 01, worn text cling mount stamps
Tim Holtz/Sizzix Alterations: Gearhead thinlits
VersaMark ink
Wagner Studio Precision Heat Gun
Xyron Creative Station Lite


Please Note: some of the direct links above are affiliate links. I am an affiliate with Emerald Creek. The links for Emerald Creek products will take you to their store. If you purchase something from this link, I receive a small percentage, at NO additional cost to you.This helps me to defray the cost of this blog and the ideas and tutorials I post here. I greatly appreciate any assistance. Thank you.

Thursday, May 9, 2019

a rose for all occasions

Hi everyone, this month on the Emerald Creek Dares Challenge, our theme is "flowers on the wall."
 I hope that you are able to join us as we are inspired by the Statler Brothers song and feature flowers in our work. Today I am sharing handmade cards featuring roses. Cards that are suitable for all occasions, including the upcoming Mother's Day.
I like to keep a few handmade cards at the ready, just incase an unexpected need comes up. These cards are typically general in design, allowing me the flexibility to add just the right sentiment. For my project this month, I have created five varying base cards incorporating Emerald Creek's gorgeous, freshly picked rose stamp, along with Emerald Creek's mirror platinum embossing powder.
I start by cutting panels (4 1/4" x 5 1/2") from Bristol paper. I like having a heavyweight base card stock because I will be using water and ink to add color to the images. I want to be make each base card a little different, while only using the one stamp. This is achieved by rotating the image and creating different patterns with the stamping, as well as using different colored inks to watercolor the embossed images.
Using VersaMark ink, I stamp the rose onto the panels in various patterns. You will notice my embossing ink pad is labeled as "clean", I do a lot of mixed media projects that incorporate embossing. It is easier for me to keep a clean pad for special work where I don't want any contamination. The pad I use for my mixed media work is covered with inks and even different bits of powder that have somehow worked their way in. Since I am using a fine, light colored embossing powder on these cards, I want to ensure a crisp clean stamp impression.
Once I have stamped and coated each card with embossing powder, I heat set all the cards. I have found it easiest to emboss multiple cards at the same time, that way my heat gun stays at optimal heat and I do not have to warm it up for each separate card. I love the look of this embossing powder when melted. I think these cards would look wonderful done in any of the fine metallic powders Emerald creek offers: mirror gold, silver dollar, kettle copper, or rose gold.
When the embossing has cooled, it is time to begin "watercoloring." I chose to use a different color for each base, to add variety. I prefer the look of having all the roses on a single card done in the same color-way. This is not necessary. The sky is the limit when it comes to embellishing the images, let your imagination take you where it may!
Once all of my roses and leaves are colored and have dried, I add a wash of watery blue surrounding them. I like the way it grounds everything; although again, not necessary. once dry, some of the card bases are left as is and slipped into my card organizer to be finalized whenever the need arises; others have been completed with die cut or stamped sentiments. I look forward to sending these beautiful cards to their recipients.
I hope that you are inspired to create something with flowers to join in our challenge this month.
 Thank you so much for stopping by, I truly appreciate it!
~Ann

I am entering this project into these challenges:
Simon Says Stamp Monday Challenge: Add Something Metallic
(I used mirror platinum embossing powder)


Emerald Creek Supplies used:
Emerald Creek Art Stamp: freshly picked rose
Emerald Creek Embossing Powder: mirror platinum

Other Supplies used:
Bristol paper
Colored Cardstock
Distress Inks:
aged mahogany, broken china, mustard seed, peeled paint, salty ocean,
spiced marmalade, spun sugar, tumbled glass, worn lipstick,
Sookwang tape
Tim Holtz/Sizzix Alterations: Stitched Ovals dies
VersaMark Embossing Ink
Wagner Heat Tool
Waterbrush

Wednesday, May 1, 2019

may day basket

Happy May Day!
 When I learned that my first Gypsy Soul Laser Cuts blog post for this month was on May 1st, the thoughts that came to mind were centered around May Day Celebrations. Memories from my childhood of dancing around the Maypole and crowning the May queen; as well as the tradition of hanging May baskets, are the inspiration behind todays project.
I begin with a Gypsy Soul Laser Cuts Bagatelle Box 1.5 x 4. There are many size options available for this box. I choose this size to accommodate a basket handle that would be able to hang from a door knob (as is tradition) when complete. I paint the top and bottom edges of the pieces with antique linen Distress paint and allow to dry. The interior faces of the box sides are then covered with decorative paper to mimic a pretty spring lining for the "basket." I prefer to adhere the decorative papers prior to constructing the box. When this method is selected, be sure to keep the interlocking tabs free from paper. The photograph below shows how I have covered some of the surfaces.
Once adhesive for the lining pieces is dry, I glue the box together and set aside. 
Next, I ink pieces of Distress woodgrain cardstock with Distress Oxide ink in scattered straw and fossilized amber. Drying the inks with a heat tool between layers. When I am satisfied with the coloration, I then use Distress Ink in brushed corduroy and walnut stain to give the cardstock the look of real wood by accentuating the wood graining.
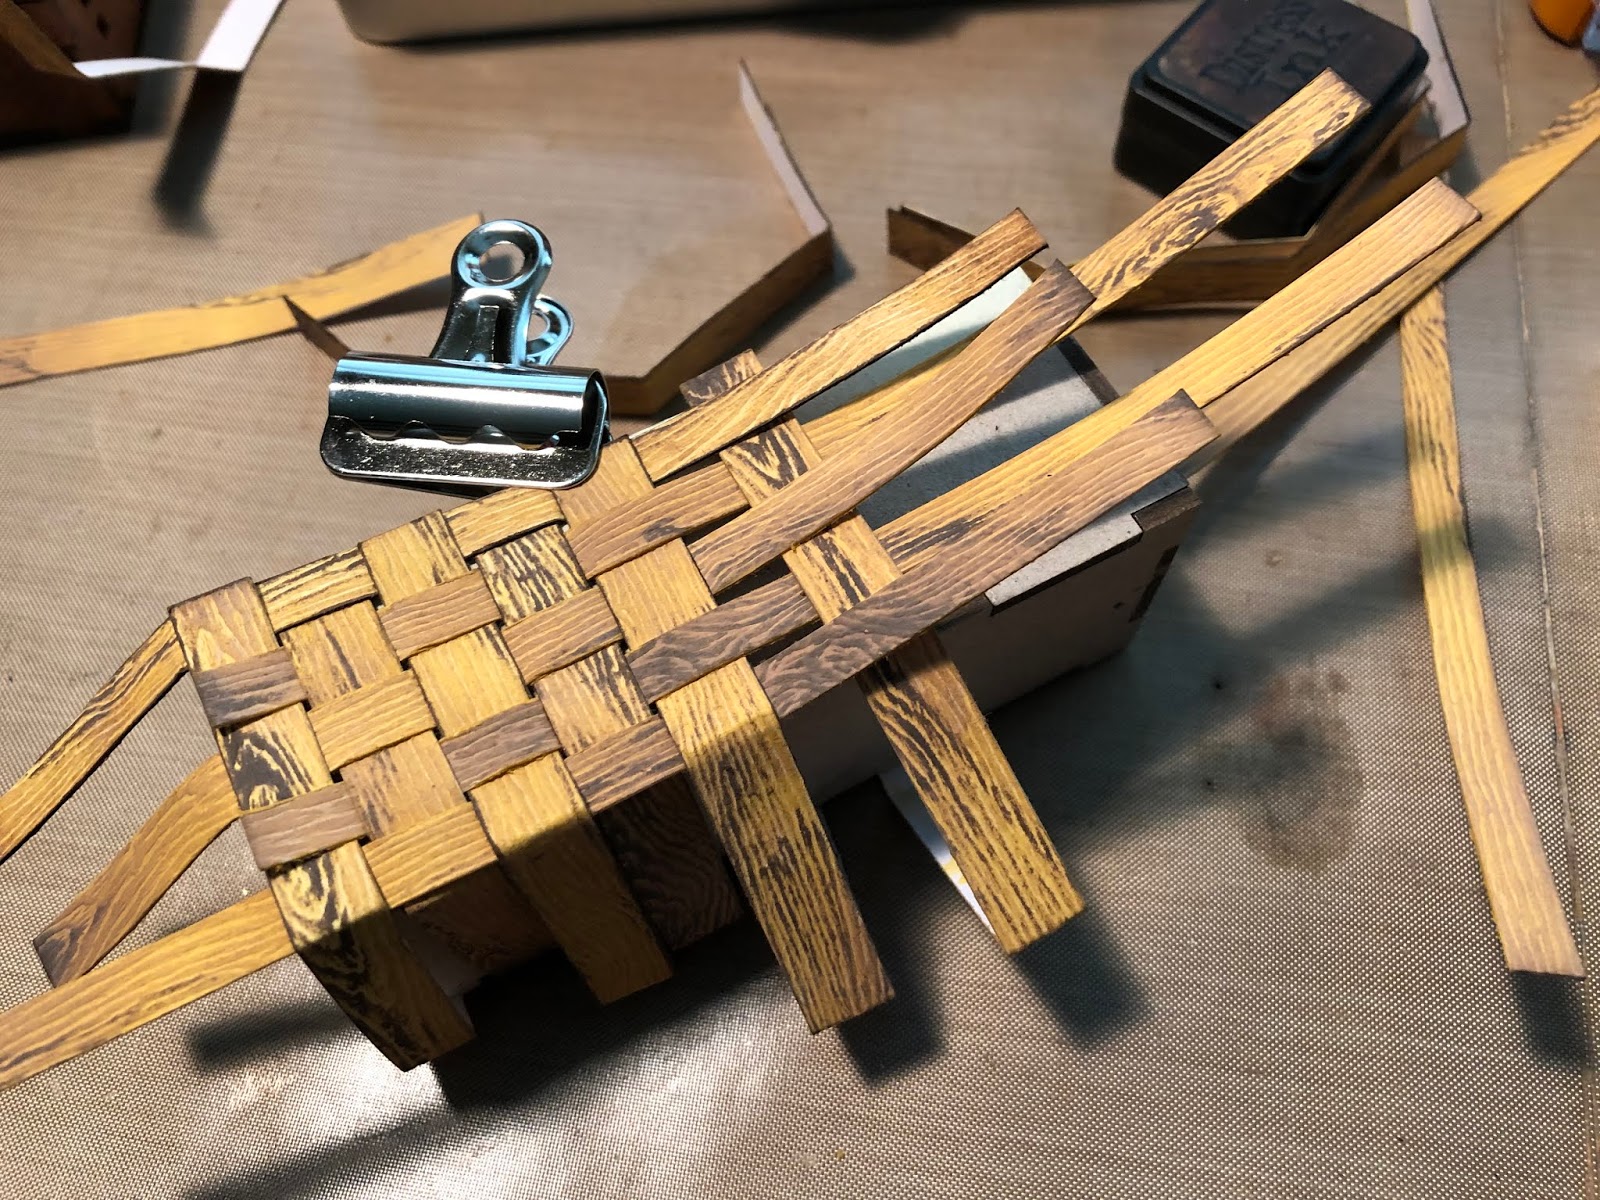
These pieces are cut into strips that will be woven together to create the "basket."
The edges of each strip are inked with coordinating inks to hide the white core that is exposed when the strips are cut, then I begin to weave the pieces together, using the bagatelle box sides as guides.
I continue the weaving to completely surround the box base. 
I then cover the top edges of the bagatelle box with 1/8" strips of the inked woodgrain cardstock. With the basket portion complete, it is time to begin filling it with flowers. Tradition has it that May baskets are filled with the blooms gathered at the end of April's showers. To start, I use the fringing method to cut a piece of peeled paint colored card stock, creating a serpentine of "grass" that will assist in filling the basket. I add a thin line of quick dry glue along the bottom edge of the grass piece and secure it into place.
With the grass in place, I begin arranging the flower pieces that have been colored with Distress inks in shaded lilac, wilted violet, and bundled sage, and the stems painted with peeled paint Distress paint I also add some leafy stem diecuts that have been painted with Distress paint in peeled paint color. All of the various pieces are glued into place. 
The final step is attaching the basket handle. Due to the length of the basket base, as well as wanting the basket to be able to hang from a door knob, as is tradition, I cut two strips of the same width from the remaining inked piece of woodgrain cardstock. (Note: I have inked both sides of one of the pieces of woodgrain cardstock so that when the underside of the handle looks the same as the top. This is important since the handle bends and slips into the sides between the box and the woven paper.) These two pieces are overlapped and glued together at the top. I add a stamped and colored butterfly to the handle to complete the project. 
I am off to deliver this May Day Basket to its special recipient, and carry on this wonderful tradition.
I hope that the coming days are filled with May flowers and perhaps they inspire you to create something beautiful. 
Thank you so much for stopping by, I truly appreciate it.
~Ann
 xxx   


supplies
Distress Archival ink: black soot
Distress inks:
black soot, blueprint sketch, brushed corduroy, bundled sage, dusty concord,
shaded lilac, walnut stain, wilted violet
Distress Oxide inks:
brushed corduroy, fossilized amber, scattered straw
Distress paint:
antique linen, peeled paint
Gypsy Soul Laser Cuts: Bagatelle Box 1.5 x 4
Tim Holtz Ideaology: bouquet
Tim Holtz/Sizzix thinlits dies: flutter, garden greens
Tim Holtz/Stampers Anonymous stamps: flutter (CMS294)