Showing posts with label steampunk shape set. Show all posts

Wednesday, June 5, 2019

wings of time

Hi everyone, today I am on the Gypsy Soul Laser Cuts Blog sharing an ATC shrine I call "wings of time." From the moment I set eyes on the GSLC ATC Shrine-Time, I envisioned a Fornasetti face within the circular clock area of the door, but I was unsure where I would take it from there. I put off working on the project for a while and finally decided that it would be best to simply start and see where it would lead... I apologize for the lack of process photos in this post, it seems once I started working, I was so intent on creating that I forgot to stop and capture all the steps. My hope is that my description is easily understandable.
I begin by painting all the pieces of the ATC Shrine-Time black. Then I locate the image that I intend to place within the clock face. I trace the outermost edge of the circle (clock) shape onto the graphic and fussy cut. A piece of black cardstock is adhered to the reverse side of the image so that when the door to the shrine is open, it will appear as a solid plane. Before adhering the face piece, I emboss the clock hands on the shrine door. This is easily accomplished with a VersaMark pen and gun metal embossing powder. I heat set the powder on the exterior surface and then complete the same process on the inside. I let the embossing cool and then adhere the image that has been cut to size in place.  Once the iconic image is set in place, the project seems to direct itself.
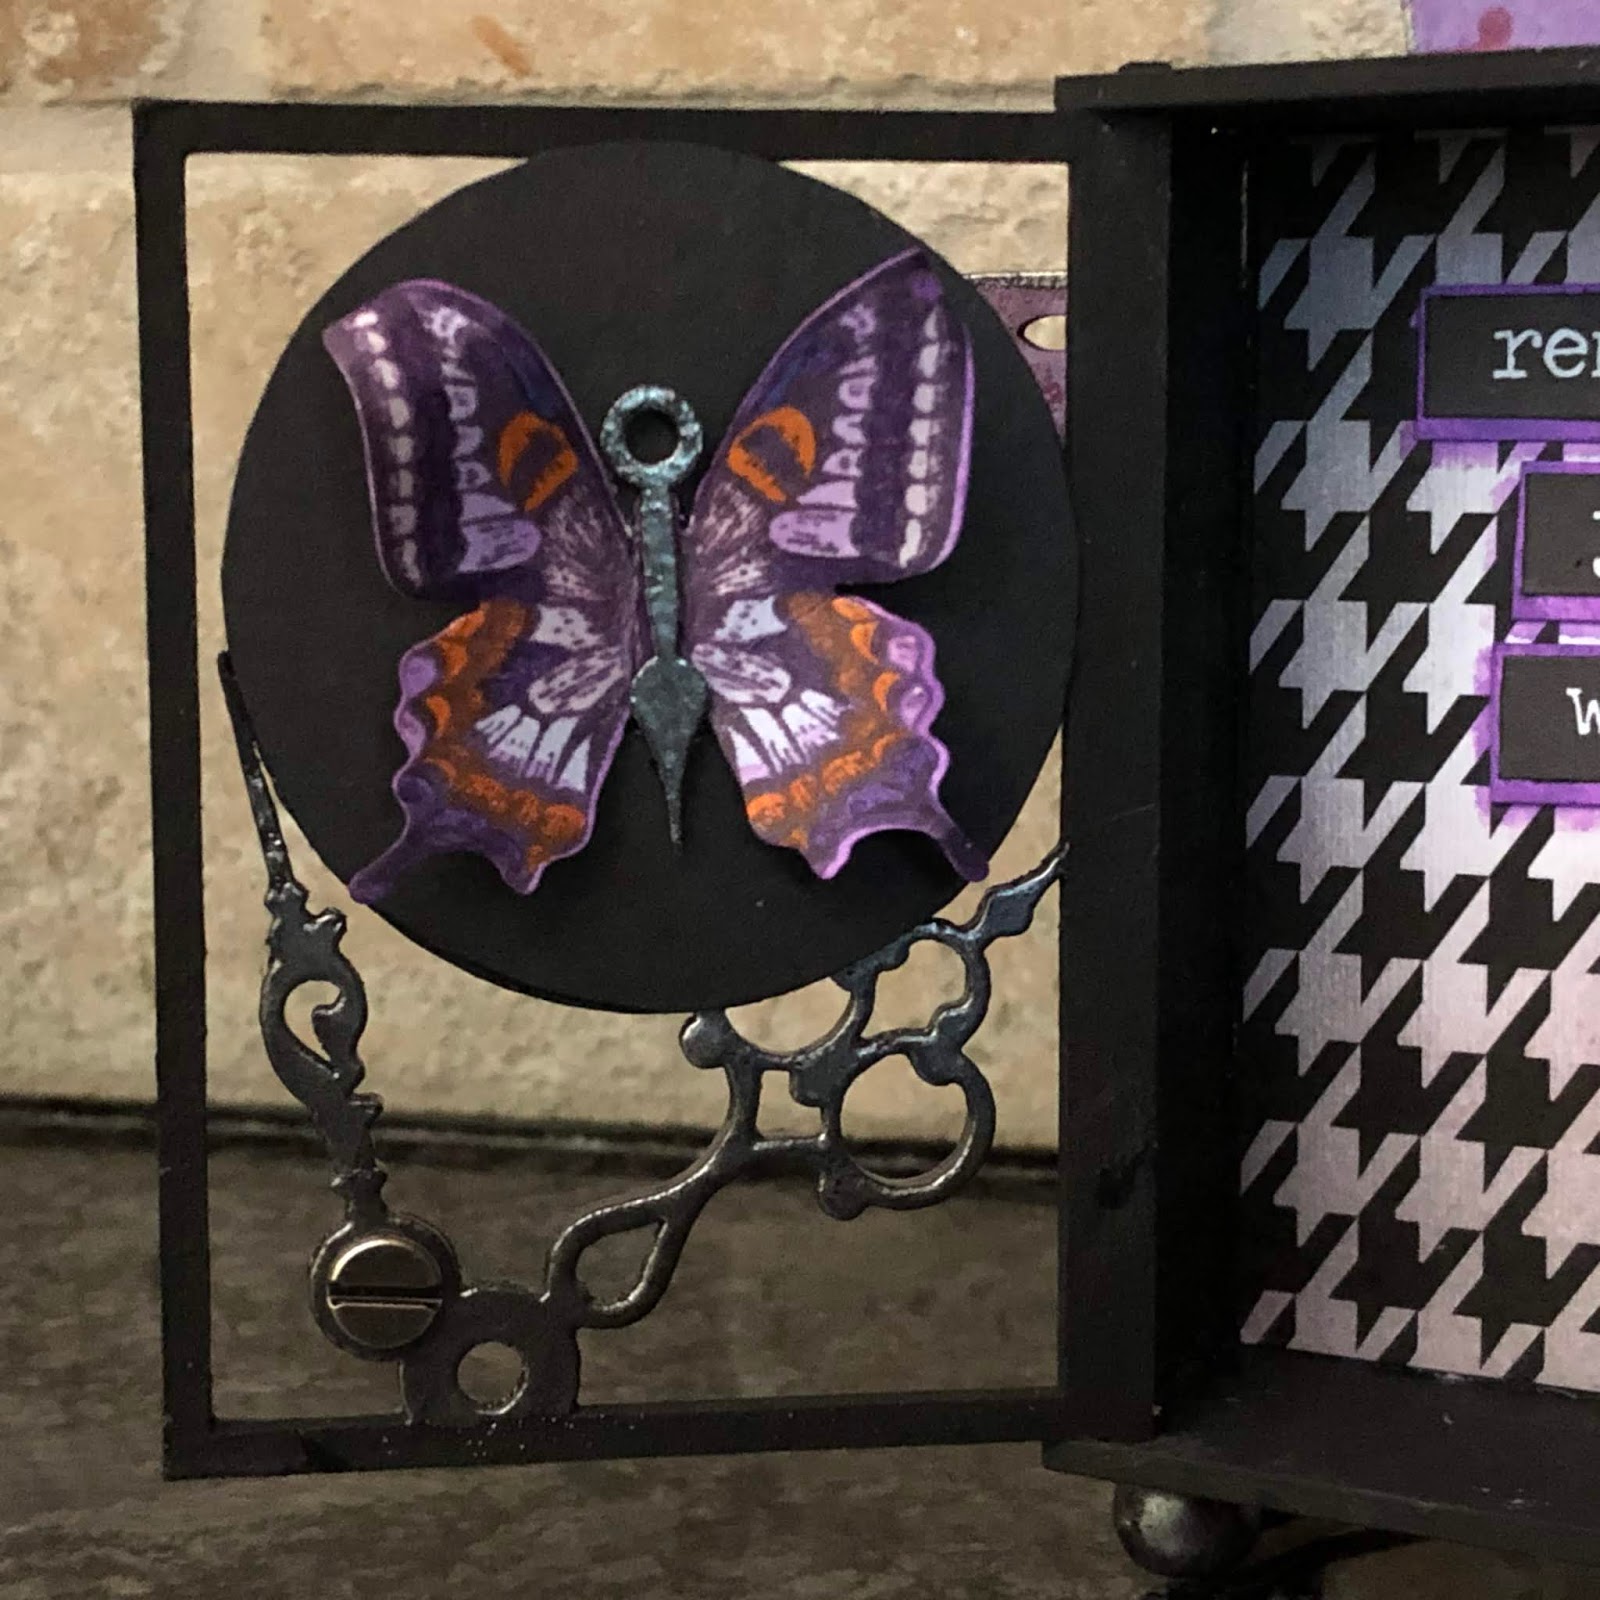
I know that at some point I would like the shrine to be functional, a place to store artist trading cards. For this reason, the interior of the shrine is not embellished with protruding objects. Everything inside is kept fairly flat. The rear panel of the shrine is covered with a piece of black and white tweed pattern paper. I ink the paper with hickory smoke and milled lavender distress ink to coordinate with the Fornasetti image. A sentiment is layered onto wilted violet oxide-inked cardstock and attached to the back panel reading "REMEMBER YOUR WINGS."
A stamped and colored butterfly is attached to the solid black circle on the inside of the shrine door. The butterfly's body is an embossed clock hand from the GSLC Steampunk Shape Set.
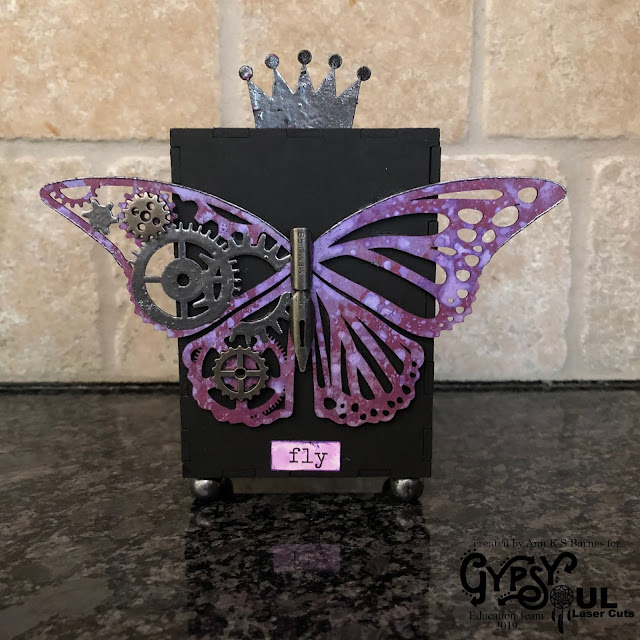
The Rear of the shrine contains a Gypsy Soul Laser Cuts Butterfly of Gears. I love this chipboard piece. It is sold as a set of two identical butterflies, I am only using one for this piece, but I already have a plan for the second butterfly.
The butterfly has been painted with seedless preserves distress paint and then dipped in wilted violet oxide ink to create a beautiful finish. Some of the steampunk cogs and gears are embossed, as well as the body, and tips of the wings. I use the same method that was used for the shrine's clock hands, a VersaMark pen and gun metal embossing powder. When the embossing has cooled, Ideaology metal embellishments are adhered to the butterfly with collage medium. Once the collage medium is dry, the butterfly is attached to the rear panel with collage medium and set aside.  A big chat "FLY" sticker is inked with wilted violet oxide ink and then attached below the butterfly.
I secure a ball hitch through the circular opening on one of the clock hands of the shrine door. This becomes a knob that allows easy access to the shrine's interior. I also emboss four wooden beads and attach these to the base of the shrine to raise it up off the surface it stands on. The crown atop the shrine is another piece from the Steampunk Shape Set. This set has so many pieces, I find myself reaching for it often to use on my projects. The crown has been colored with wilted violet distress oxide and then splattered with seedless preserves paint. The tops and back side of the crown has been embossed with gun metal embossing powder.
I really like the way that this ATC shrine turned out. The Gypsy Soul laser cuts store has many different ATC Shrine styles from nautical, to steampunk, and everything in between. It's definitely worth checking out! I hope that you are inspired to create something of your own, perhaps something that you have put off because you are unsure of how it will turn out. You will never know if you don't start somewhere.

Thanks so much for stopping by the blog today,
 I really appreciate you taking the time.
~Ann


supplies used:
DecoArt acrylic paint: black licorice
Distress Archival ink: dusty concord
Distress collage medium: matte
Distress ink:
 dusty concord, hickory smoke, milled lavender, seedless preserves, wilted violet
Distress oxide ink: wilted violet
Distress paint: wilted violet
Emerald Creek embossing powder: gun metal
Gypsy Soul Laser Cuts:
ATC Shrine - TimeButterfly of GearsSteampunk Shape Set
Tim Holtz Ideaology: ball hitch, big chat stickers, gears, pen nibs
Tim Holtz/Stampers Anonymous Stamps: Flutter (CMS294)
VersaMark embossing Pen
Wagner Studio Precision Heat Gun

Wednesday, August 1, 2018

ladies and gents hold the phone

Hello everyone, it's hard to believe that August is here already. I know that during these summer months it can be very busy, so today I am on the Gypsy Soul Laser Cuts Blog sharing a fairly simple project that makes a big impact. I have been meaning to make up one of these tablet/iPad/phone holders since I received it in my DT box. I often put my phone down while I am working and when it is time to snap a quick progress photo, it is buried beneath all of my supplies. I hope to alleviate this issue with this steampunk inspired phone holder. Since I have two of these in my stash, I thought it would be fun to create a his and hers version.
The sturdy chipboard tablet/iPad/phone holder arrives flat in three separate pieces.
I want the finished pieces to have a steampunk/industrial look, and since I will be making a his and hers version, I think the Steampunk Lady and Steampunk Gentleman will be the perfect addition to each holder. Both of these GSLC pieces are fabulous. Each comes in a pack of two, this project only uses one so I will put the second lady and the second gentleman away for another day.
 I paint the side of the heads that will be showing on the front of the holder with distress paint in walnut stain and allow to dry. Once dry, the back side of each head is painted with black soot distress paint and set aside. I select some pattern papers from the French Industrial paper Stash that coordinate with my theme. I choose to combine different patterns for each of the planes of the holder. This could also be made with a large sheet of single pattern paper if you prefer. I like the interest of having different patterns, yet keeping them all within the same color family. I measure the pieces to be covered and cut the paper to size. It is alright if the paper overhangs a bit when you adhere it to the chipboard, this can easily be cut off with a craft knife. The most important thing to remember is not to adhere paper to the tabs of the pieces that will be secured into the base. The papers are adhered to the chipboard with collage medium. I add a layer of grunge to the surfaces as well as the edges with distress inks.
Since the front stop pieces are now complete, I go ahead and secure these into the base with a multi-purpose adhesive. These are set aside to dry while I complete the uprights for each holder.

To give the heads a more vintage feel, I add a layer of black soot distress paint on the walnut stain colored side and gently wipe it off before it dries. Knowing that the holders will be serving a function, I want to ensure that the embellishments I add are not too invasive, thus keeping things clean and simple. I decide to add a few additional cogs and gears to adorn the lady and gentleman. Using one of my favorite GSLC sets, the Steampunk Shape Set, I select a few pieces for each head that work well with the scale. I also select two clock hands to add under my titles on each holder. I emboss all of these pieces with charred gold embossing powder and secure them in place.
Each holder has a title. The words "LADIES" and "GENTS" are made with alpha parts. Beneath each title I adhered and embossed clock hand.
Once each upright was completely dry, I secured it into place by adding multi-purpose adhesive to the bottom edge of the pieces and the tabs, then inserting them into the respective slots in the base. The lady and gent are standing tall and the phone holder is ready to be put to use.
I hope that during these busy days you are able to make some time to get creative. Perhaps this simple steampunk project has got your gears moving and inspired you.
Thank you so much for taking the time to stop by.
~Ann  

I am entering this project in:
 SanDee & Amelie's Steampunk Challenge: Summer Special
Simon Says Stamp Wednesday Challenge: Anything Goes


Materials Used:
Emerald Creek Craft Supplies: charred gold embossing powder
Gypsy Soul Laser Cuts:
Tablet/iPad/Phone Holder, Steampunk Gentleman, Steampunk LadySteampunk Shape Set
Ranger Distress collage medium: matte
Ranger Distress Inks: black soot, walnut stain
Ranger Distress Paint: black soot, walnut stain
Tim Holtz Ideaology: alpha parts-signmaker
Tim Holtz Paper Stash: French Industrial
Versamark embossing ink

Wednesday, February 21, 2018

her industrious soul

Hi everyone, I am on the Gypsy Soul Laser Cuts Blog today, sharing something a little different.
From the moment I saw this Gypsy Soul Laser Cuts art doll form, I had envisioned her in an industrial/steampunk fashion. What I was thinking was very different from my usual style, but I generally tend to go with an idea once I am inspired and modify, as needed, along the way...


I begin by removing pieces from the Gypsy Soul Laser Cuts Art Doll Female - small card. Next, I cover each body part with collage medium and adhere Little Women text paper to one side. I find that positioning the pieces as a complete shape helps ensure that the paper is adhered to the correct side.
After the collage medium has dried, I use an exacto knife to trim the excess paper from the doll form pieces. I then coat the back side of each piece with embossing ink and cover with charred gold embossing powder. The powder is melted with a heat gun. 
While I have the embossing supplies out, I also heat emboss some pieces from the GSLC Steampunk Shape Set in charred gold, hammered metal, and vintage platinum embossing powders. I am considering using these pieces on the finished doll.
Once all the pieces are embossed, I begin to work on a background. I want to create something that resembles rusty or oxidized patina. In order to achieve this, I use Distress Oxide inks in walnut stain, cracked pistachio and spiced marmalade. The inks are smooched onto my craft mat, spritzed with water and then heavyweight paper is inked and heat set repeatedly. When I have achieved the desired finish, I splatter the page with distress ink in walnut stain. Lastly, I spritz the page with Tattered Angels Glimmer Mist in patina.
This paper will be centered in a large Idea-ology vignette tray, above a piece of "riveted metal" textured paper that I created using a Tim Holtz Sizzix embossing folder on copper colored Kraftcore cardstock. Once the paper is embossed, I add a layer of grunge with Distress paint in black soot.
 When I begin to layout the pieces on the background, I decide that I would like the industrious soul to have a petticoat beneath her cage crinoline framework. After consideration over materials, I decide to add a lacy feminine touch with a doily, die cut from a piece of sage parchment paper, that has been inked with Distress inks in walnut stain and ground expresso.
Once I have settled on all of the pieces I will be using, I begin to adhere everything into place with a strong glue. Since the pieces are arranged in a layered fashion, the process requires patience while each layer dries prior to adding the next. Everything is glued into place on the patina paper. 
  I trim the lace petticoat to fit beneath the cage crinoline. The cage is held in place with an Idea-ology word band. The band has been bent with a pair of wire shaping nylon jay pliers, and each side is secured with a piece of hemp cord that has been colored with walnut stain ink. The ties secure at the back side of the panel, accessed via 1/8" eyelets.
Once the cage is securely in place, the entire piece is attached to the "riveted metal" background that has been adhered inside the vignette tray.
Some Idea-ology industrious stickers as well as metal hex head fasteners to the top left and bottom right corners of the vignette tray complete the piece.


Thanks for taking time to check out all the details of my industrious soul.
Hope you find time to create something.
~Ann


I am entering this in:
SanDee & amelie's Steampunk Challenge - Anything Goes-Steampunk/Industrial
Simon Says Stamp Monday Challenge - Grunge It Up
A Vintage Journey February Challenge - Melt It
  

Wednesday, January 3, 2018

wish keeper

The new year brings new blessings.
I am really happy to share that this year I am a member of the Gypsy Soul Laser Cuts Design Team. This is such a fabulous opportunity, I am inspired by the other members of the team and am able to work with such amazing products. I am very thankful to be a part of this amazing group of talented designers.


 Today I am sharing my very first post for the Gypsy Soul Lase Cuts Blog with you.


Each year as my children grow older I notice that the innocence and dreams of childhood become more and more distant. In an effort to find a special place to tuck away these hopes and dreams, or "wishes" as I like to call them, before they blow away in the wind, I created a "Wish Keeper" box for my daughter to store her precious thoughts. 


I started with the Gypsy Soul Laser Cuts ATC Sized Faux Book Box (BD12T), and searched my Tim Holtz paper stash for the perfect papers to complement my vision. The  book box arrives flat, so I laid out all the pieces and temporarily created the box portion to get an idea for paper sizes and orientation.

Once I selected the papers to use, I went ahead and adhered the floral paper to the base so that I could locate the main design within the interior of the box. I used my exacto knife to cut out the areas where the sides fit into the base so that they would insert freely. I then glued the sides of the box into place on top of the covered base.


I adhered an Idea-ology design tape along the top edges of the box sides, cutting into the corners so that it would wrap around the edges and lay flat.


I then selected a coordinating piece of solid Distress Cardstock and cut a long strip the height of the interior "walls." I cut this strip into the exact lengths for each side of the box interior. Using distress ink in walnut stain, I inked around all of the edges and let dry before gluing these pieces onto the interior box "walls."


I then cut another long strip of the solid cardstock, the same height, for the outside of the box "walls" and inked the edges along the top and bottom. I left this piece as a strip and fitted it around the outside of the box, creasing it at each corner. Once wrapped, my strip did not meet end to end, and therefore, had a slight gap. I thought this was the perfect opportunity to use some more of the decorative tape.


While I set the entire base aside to dry, I began to plan out the cover. I love the look of frozen charlottes, they are so reminiscent of childhood days gone by, and wanted to incorporate this into the design. Using a Tim Holtz Idea-ology Salvaged Doll, I dabbed mushroom alcohol ink on it to give it an overall aged look, then colored her dress and other details with Copic markers. I embossed a pair of wings from the Gypsy Soul Laser Cut Steampunk Shape Set (D33A) with Emerald Creek's Charred Gold embossing powder on both sides.


These wings were then wired onto the doll body with bronze jewelry wire. I created a large paper rosette with a die and added details on the rosette with Stickles. When the details were dry, I used a hot glue gun to adhere the winged, salvaged doll onto the rosette and set it aside.


Using a Sizzix die, I cut the word WISHES three times from thin chipboard. I layered these on top of each other for dimension and then heat embossed the word with the same Charred Gold embossing powder I used on the GSLC wings. I selected a piece of patterned paper and cut strips of the floral base image to incorporate on the cover.


Now it was time to begin working on the spine, and hinging the book base and cover so that it could all be put together. I used masking tape to create the hinge where the front and back covers meet the spine. The outside taped edges will be covered with paper. On the interior, when the book is open, the hinge gaps can be seen. I covered these gaps with more of the decorative tape. I like the way that this tied all of the areas together in a subtle way. 


I measured and cut pieces of the solid cardstock to cover the inside face of the spine as well as the inside face of the cover. These pieces were inked along the edges and adhered with glue. 


I decided that I wanted to be able to latch the wish box to keep the wishes secure inside. Without getting into adding chunky hardware, I thought a great way to keep the box closed would be with a piece of ribbon. I tied the ribbon around the box before adhering the exterior coverings, thus concealing it, as well as ensuring that it will remain intact.


I wanted the spine to give a glimpse of what was to come inside, so I cut a piece of the floral pattern 1/2" wider than the spine chipboard piece itself. This will allow it to cover the hinge area on each side. I scored the piece at each extension so that it could easily bend when the book box was opened and closed. I glued this piece to the flat plane of the spine and let it dry. You will notice that the ribbon closure is in place prior to adhering the spine cover, hiding it and securing it in place. 


I found an interesting piece of cardstock that contained a vintage image I thought would be perfect for the bottom of the base. I cut the piece 1/8" wider than the base piece to allow overlap onto the spine hinge area. I inked the edges of the piece and adhered it to the bottom. I placed a heavy weight along the spine and base hinge line, making sure that the seam was completely flat. I allowed this to dry completely before continuing. 


Similar to the bottom, I cut the Top cover piece wider than  the measured laser cut so that it would overlap my spine/hinge paper. I inked the edges and glued the soil cardstock to the laser cut, concealing the ribbon closure and creating a flat seam along the hinge. Using an embossing ink dabber, I ran it along the edges of base and dipped them into charred gold powder and heat embossed. I did this for each edge of the book.


 Once the embossing was cool, I adhered the final layer of details onto the cover. 


The "Wish Keeper" has harnessed her wings and is ready to soar to any of the places the heart desires when reminiscing through hopes and dreams once tucked away.


Wishing you a year filled with promise! 
~ Ann