Thursday, July 11, 2019

rhinestone cowboy

Hi everyone, the July Emerald Creek Dares Challenge is inspired by the song Rhinestone Cowboy. This month kicks off rodeo season in Calgary and the team at Emerald Creek is hoping you bring the western bling, paisley, country, anything!
I have created three cards to celebrate the rodeo and showcase one of my favorite Emerald Creek embossing powders, oil rubbed bronze. All of the backgrounds were created using distress oxide inks blended to create the look of gorgeous summer sunsets.
I used color palettes recommended by Kristina Werner Design.
The first card is fairly simple. When thinking about rodeo cowboys, I know that the season usually means traveling from venue to venue competing and showing off their skills. This seems perfectly suited to the "not all who wander are lost" chipboard compass piece from my stash. I started with a blended distress oxide background using chipped sapphire, peacock feathers and carved pumpkin inks. Once the background is complete, I coat the chipboard laser cut piece with embossing ink and cover it with a layer of oil rubbed bronze embossing powder. The powder is heat set and allowed to cool. I repeat the embossing process a second time to give an even coverage. When the embossing has cooled completely, I attach the piece to the card front.
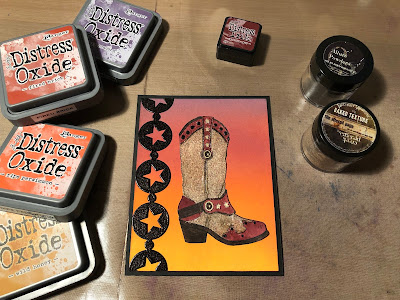
The second card I have made uses a printable image of a fancy cowboy boot. I create another blended distress oxide background, this time using dusty concord, fired brick, ripe persimmon, and wild honey. A star in circle laser cut border piece is embossed with oil rubbed bronze embossing powder and is attached along the left side of the card front. Next, I print the boot image onto a piece of heavyweight card stock and then fussy cut it out. Using a VersaMark marker, I color one of the main interior sections of the boot and then coat that section with ancient amber baked texture embossing powder. I heat set the powder and then repeat the process for the other portions of the boot that are this color.
I color the trim and sole of the boot with marker, and then, using a water brush, I color the other areas of the boot with aged mahogany distress ink. The studs are embossed with oil rubbed bronze. When the boot is complete, it is attached to the card front with double sided adhesive tape.
The third and final card uses an Emerald Creek Horse Head stamp. I begin by creating a blended distress oxide background with blueprint sketch, wilted violet, picked raspberry, and squeezed lemonade. While I have the inks out, I stamp the horse head using the same colors, layering them as I did for the background. I use my heat tool to dry the stamped images and then cut them out with scissors. The horse head stamp is approximately one inch (1") square. I want the horse heads to mimic the background but also stand out. To achieve this, I cut nine, 1-1/4" squares. I emboss the edges of the squares with oil rubbed bronze, leaving the central area blank. The horse head squares are attached to the embossed edge squares using foam tape. Leaving the central area void of embossing makes it easier for the foam squares to adhere to the card stock. The layered squares are attached to the background in a grid pattern.
I hope that my trio of cards has inspired you to create something and join us in this month's challenge. We would love to see your rhinestone cowboy shine; enter the challenge if you dare!
 You can find all the details to link your project here.
As always, thank you so much for taking the time to stop by,
 I truly appreciate it!
~Ann
  xxx


Emerald Creek supplies used:
oil rubbed bronze embossing powder
ancient amber embossing powder
horse head art stamp

other supplies used:
Distress Ink: aged mahogany
Distress Oxide inks:
chipped sapphire, peacock feathers, carved pumpkin, dusty concord, fired brick, ripe persimmon, and wild honey, blueprint sketch, wilted violet, picked raspberry, squeezed lemonade
Gypsy Soul Laser Cuts chipboard pieces:
Banner Border Strips, Wander Title
Sookwang double sided adhesive
VersaMark embossing ink
VersaMark embossing marker
Wagner Studio Precision heat tool

Wednesday, July 3, 2019

yankee doodle daisy

The fourth of July is such an important day for this country. We gather together to celebrate the United States of America's independence as a nation. Today I am on the Gypsy Soul Laser Cuts Blog sharing a patriotic piece that I created for the holiday. I love the Blue Daisy Character Constructions stamps from Catherine Moore. They have a wonderful American vibe that works so well with red, white and blue. Transforming them into my patriotic art doll nicho girls was so much fun!
I begin with two Gypsy Soul Laser Cuts art doll nichos. Each arrives in three pieces, the body, the niche (which requires a simple assembly), and a circle head piece. Whenever I create a project, I like to ensure that both the front and back are finished. For this project the backs of the art doll nichos will be painted black. The first step is to crease and fold the tabs of the niche, then add a dab of glue on each flap and secure to create the 3D form. I paint the back sides of the body forms, heads, and assembled niches with black paint and set aside to dry.
While the paint is drying, I select the stamps to use for the girl's clothing. The art doll body is slightly wider than the dress stamp I will be using. To accommodate the extra width, I stamp a blank piece of cardstock, cut out the image, and then slice it down the middle. I use these two sides to determine the extra width I will need to fit, then use this as a template for the dresses.
I trace my template onto the patterned paper and fussy cut the dress. When the extra-wide dress is cut out, I ink up one half of the stamp and cover the opposite side of the dress with a mask, then stamp the left side of the patterned dress. I allow the ink to dry and then repeat the process on the right side of the dress. The middle collar section is stamped by masking each edge and only inking the horizontal trim section of the stamp.
When the dress stamping is complete, I add trims and embellishments with glue, then set aside to dry. I cut coordinating patterned papers to fit inside the niche. These papers are adhered with Scor-tape.
The next step is stamping and coloring the dolls heads, arms and legs. I use a variety of markers, including Copics, Distress, Sharpies, and Gelly Roll pens. I then add a red rhinestone brad from  Emerald Creek to each girl's hat. Before attaching all of the pieces together, I want to complete the niche interiors. It is much easier to work this compartment before it has been secured to the body.
I die cut a mini paper rosette for each niche with coordinating papers. Each rosette is hung from a piece of craft thread. I poke a hole into the top flat portion of the niche, pass the thread through the hole, and tie a knot on the outside. Small die cut stars are scattered and glued to the niche walls and back. Once each niche is complete, it is attached to the back side of the body form. The appendages and clothing are then attached to the front of the body. The stamped and colored head is attached to the circular chipboard head piece and then attached to the front side of the neck portion of the body.
Each Daisy is waving a flag and holding the end of a banner strung between them which reads INDEPENDENCE to commemorate the fourth of July holiday.
 I have so may ideas for these art doll nichos. They can be used with doll stamps, as I have, with collage papers and paper cuts; or even with images found in magazines.
If you like to play with dolls, the art doll nicho is a great base to start with.
Thank you so much for stopping by, I really appreciate it.
 Wishing you a happy Independence Day.
God Bless America
~Ann
xxx


supplies used:
Catherine Moore Character Constructions Doll stamps:
Blue Daisy 4, Blue Daisy 5, Blue Daisy 6, French Laundry 14
Copic markers
Decorative papers: Anna Griffin, Bazzill, The Paper Studio
Distress Collage Medium: matte
Distress Markers
Dresden trim
Emerald Creek Craft Supplies: silver red rhinestone brads
Gina K amalgam ink: black
Gelly Roll pens
Gypsy Soul Laser Cuts: Art Doll Nicho
Tim Holtz Ideaology:
paper string airmail, trimmings lace,
Tim Holtz / Sizzix Alterations: label letters thinlits, mini paper rosettes strip die
Tim Holtz / Stampers Anonymous stamps: crazy things (flag)
Trimmings 

Wednesday, June 19, 2019

red, white, and true blue

Hi everyone, as the month of June speeds along and we near Independence Day, July 4th, I thought it would be fun to create an Americana themed project.
Today, I am on the Gypsy Soul Laser Cuts blog, sharing my "red, white, and true blue" little houses matchbox book. I am so excited to share all the details with you!
It all starts with a GSLC little houses matchbox book. Don't let the name fool you, this accordion fold house book extends to over 14 inches long unfolded. When folded, the book fits inside its own 3 inch by 4 inch matchbox. I thought the five, double sided panels would provide many opportunities to embellish with some of my favorite supplies. The first step is creating the matchbox.
The outside chipboard sleeve is pre-scored which makes it easily converted into a 3D shape. Before creasing and folding, I paint one side of the piece with red acrylic paint. When the sleeve piece is folded, this red will be the interior. A small dab of glue along the flap secures the piece into shape. I use clips to hold the flap until the glue has dried.
I cut a strip of some of my favorite papers to match the height of the sleeve. The paper wraps the entire outside of the sleeve piece. I ink all the exposed paper edges. Using the Xyron Creative Station Lite, adhesive is added to the back side of the paper and then it is secured in place onto the chipboard. I add a strip of red metallic embossed lattice along one side, and wrap the sleeve with paper twine. The twine is secured in place with sealing wax. While the wax is still hot, I push a star embellishment into it and allow it all to cool.
Next, the interior matchbox is created. This chipboard is also pre-scored; a bit of quick dry glue along each of the tabs, secured with a clamp until dry, is all it takes for the box to form. I paint the exterior of the matchbox with red acrylic paint and allow to dry. The interior of this matchbox is covered with patterned paper. I also cut strips of a coordinating paper to wrap the sides of the box. The bottom (underside) of the box is not covered with paper. I want to allow the matchbox to slide freely in and out of its sleeve.
The accordion fold house book is so much fun to create. The long chipboard piece is pre-scored, allowing it to be easily folded. Since I envision this book being opened and closed many times, I add strips of linen hinging tape along the "mountain" folds before I begin adding any paper coverings or embellishments. This will add an extra layer of durability to the folds. Next I select some coordinating red, white and blue patterned appears for backgrounds. All of the edges of the chipboard are inked with distress ink. I trace the house shape onto the different papers and fussy cut pieces to fit each of the panels.
All of these pieces are run through the Xyron machine to add an adhesive backing. When considering embellishments for each panel I find it best to work on one side at a time and always keeping the reverse side in my mind, that way anything that penetrates the chipboard will have an opportunity to be covered on the opposite side. I like to pull out a lot of different papers, stamps, embellishments and pieces that may or may not be used in the piece. This way I have a better idea of things that could potentially be arranged together or adjacent to one another.
It makes for a chaotic desk but allows me to design freely without  having to stop and seek too often. This is possibly the reason I do not have many process photos for the accordion book,
 I got too caught up in the design.
I will share some pictures of the completed panels with descriptions.
 
The front flap contains a patriotic paper doll colored with distress crayons. A metal ribbon adornment is attached to the roof peak and a small ephemera piece completes the opening page.
 
German dresden trim is secured with star fasteners to create the decorative bands that hold special tickets from days past.
A blueprint stamp in cobalt archival ink is the focal point of this panel.
This panel is covered with an embossed piece of colored Kraft core, sanded to highlight the design.
 Another paper doll adorns the last panel on this side of the accordion fold book. He is colored with distress crayons and appears to be holding the booklet open. A small clipping of banner border strip creates the patriotic pennants strung across the top.
The reverse side of the booklet begins with a freedom banner, created with punched and stamped pieces, and strung on bakers twine.
One of my favorite panels in the booklet, the metallic kraft contains layers of paper dolls, representing diversity.
Grungeboard USA letters are painted with acrylic paint and surrounded by wooden laser cut stars.
A blueprint stamp is colored with distress crayons and ink, then fussy cut and attached to a "flagpole."
An old dictionary page is torn and inked giving definition to the patriotic terms.
On the final panel, quote chips display a powerful message.
Once all of the panels of the book are complete, I allow all the adhesive to dry overnight before folding it up and setting it into the matchbox. The box and book slip easily into the sleeve. I am so pleased with how this project turned out. I typically decorate my house in red, white, and blue from Memorial Day throughout the summer. I love displaying Americana themed pieces and projects.
I hope that you have enjoyed seeing my "red, white, and true blue" piece come together.
Perhaps you are inspired to create a piece of your own to proudly display.
Thank you for taking the time to stop by,
I truly appreciate it!
~Ann
  xxx


supplies:
Deco Art Americana acrylic paint: Tuscan Red
Distress crayons:
 blueprint sketch, candied apple, chipped sapphire, fired brick
Distress Collage Medium: matte
Distress Ink:
 blueprint sketch, chipped sapphire, faded jeans, fired brick, gathered twigs
German Dresden trims
Gypsy Soul Laser Cuts:
 Little Houses Matchbox Book, Banner Border Strips
Sealing wax
Tim Holtz Ideaology:
adornments ribbons, adornments stars, chitchat seasonal, ephemera: snippets,
ephemera tickets, grungeblocks (retired), paper dolls, paper stash correspondence,
paper stash metallic jewel kraft, paper string airmail, pocket cards, quote chips,
 remnant rubs: botanical, remnant rubs: life quotes, star fasteners
Tim Holtz / Sizzix impresslits: 3D lattice trim
Tim Holtz / Sizzix texture trades: playing games (retired)
Tim Holtz / Stampers Anonymous stamps: Americana blueprint
Xyron Creative Station Lite


Thursday, June 13, 2019

liberty

Hi everyone, this month the Emerald Creek Dares Challenge is an "anything goes" theme based on the summer, and the song Summer In The City. Today I am on the blog, sharing "liberty."
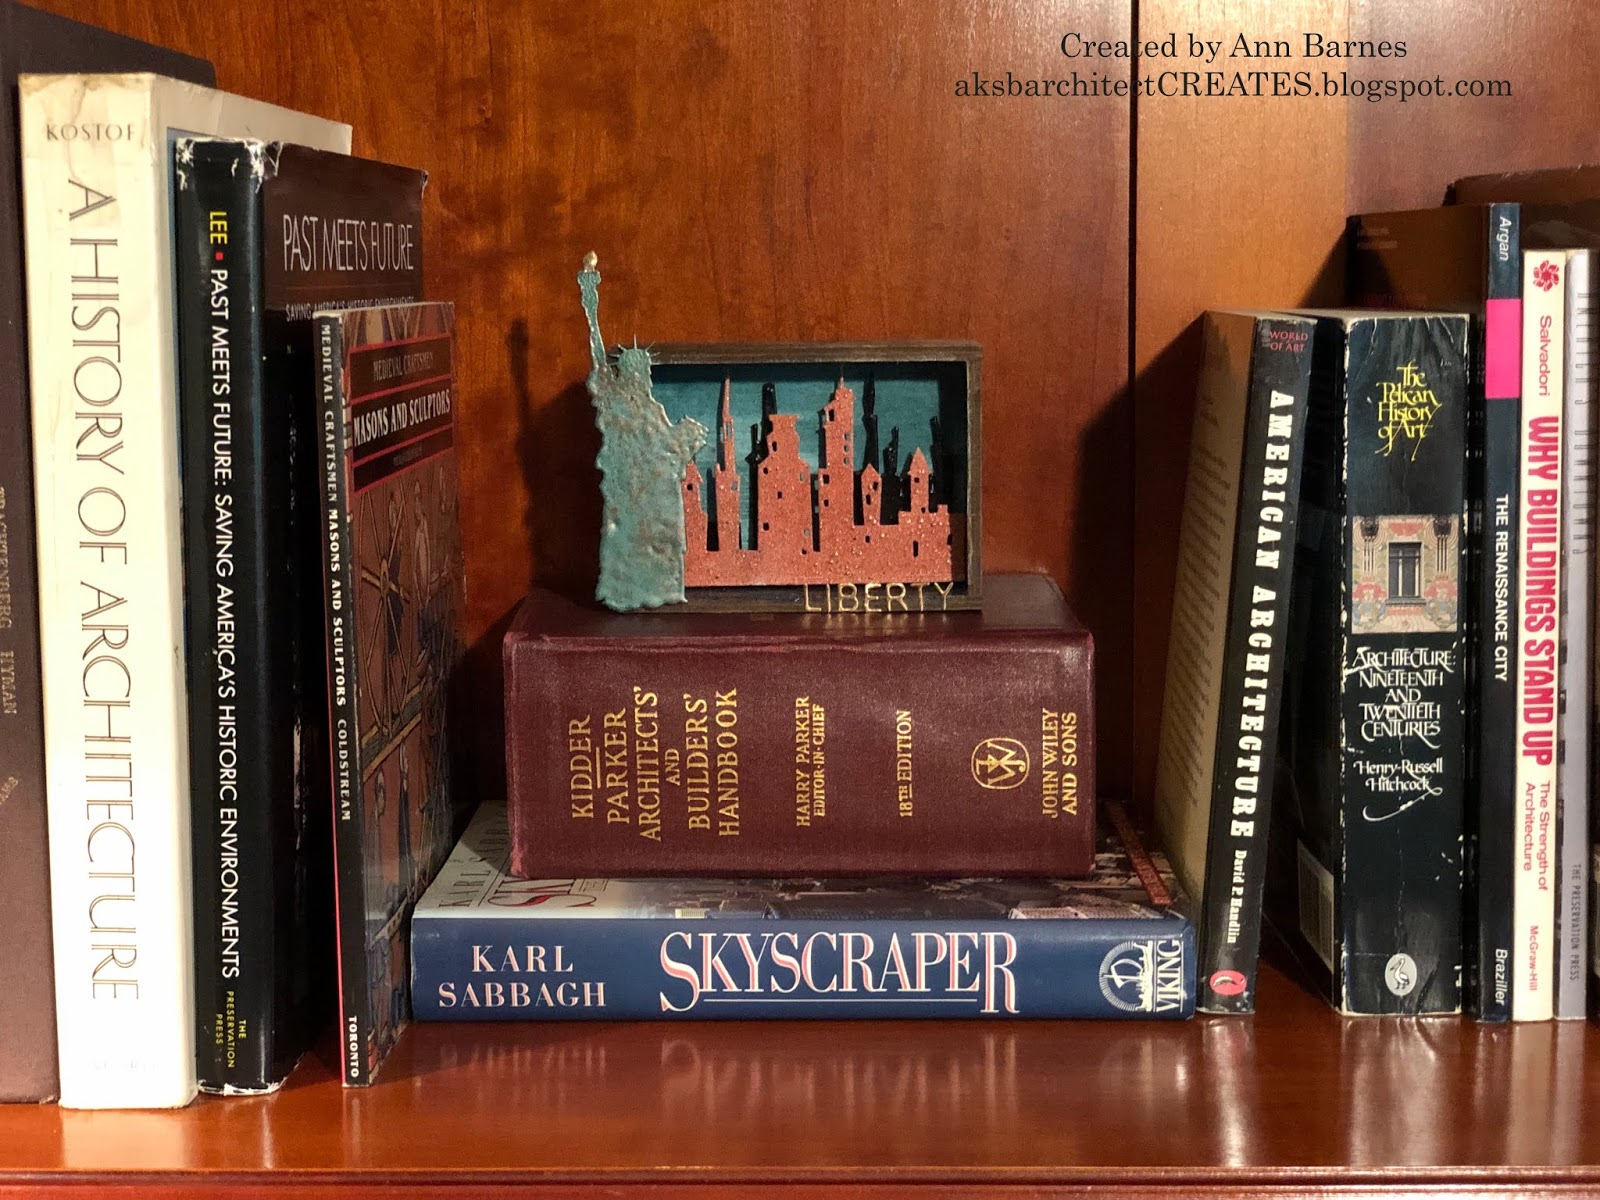
I wanted to make something directly related to the inspiration "Summer in the City." I have created a small vignette of New York City, a wonderful place to visit any time of year, and most especially, the Statue of Liberty, which is an incredible summer tour destination.
I begin with a wooden vignette box. The inside is covered with a layer of white gesso and allowed to dry. I know that I will be using the translucent Baked Velvet powder in Agean Sea to create the sky, and want a clean base to best display the color. I begin with one layer of embossing powder on the back panel as well as the interior top and sides. The powder is heat set and then cooled. Once cool, I brush on random areas of embossing ink and add another coat of Agean Sea powder. These areas are heat set, manifesting a deeper color, adding interest and also perhaps representing wispy clouds.
The interior base of the vignette box is coated with embossing ink and covered with Deep Sea Baked Texture embossing powder. This powder is also translucent but a much darker shade of blue/green. I thought this would be perfect for the waters that surround Ellis Island and NYC.
Once the backgrounds are complete, I begin work on the city skylines. I know I want to have at least a couple rows of buildings to give the vignette depth. Using pieces of skyline die-cut, I determine which sections will be in the foreground and which will set into the background. The pieces are cut to fit inside the vignette box. The background skyline is coated with VersaMark embossing ink; covered with Seth Apter's Eclipse Baked Velvet embossing powder, then heat set.
The foreground skyline is covered with Seth Apter's Chunky Rust Baked Texture embossing powder and heat set. Once cool, the pieces are set into the vignette box. I use a piece of wood dowel along the bottom edge of the first skyline to create a gap behind the piece. The second skyline also has a wood spacer to set it a distance in front of the first.
I like the shadow lines this creates as well as providing plenty of visual depth.
The Statue of Liberty chipboard shape is coated with embossing ink and covered with Patina Oxide Baked Texture, one of my favorites of Seth Apter's original release. The flame is first covered with Mirror Platinum then a layer of Ancient Amber Baked Texture is added to give the flame an authentic look. Lady Liberty is secured to the edge of the vignette box with a strong adhesive and set aside to cure.
The label letters forming the title "LIBERTY" are die-cut from Metallic Kraft Stock and adhered to the bottom rail of the vignette box with collage medium. I think this will be a fun piece to display and evoke memories of a wonderful experience.
I hope that you are inspired to play along with the Emerald Creek Dares challenge this month, we'd love to see what you've been creating with a summer theme. Be sure to add your link, if you dare.  When posting on any of the social media sites, use the hashteg #ECJUNE2019.
Thanks so much for stopping by today.
~Ann  


Project Supply List

Emerald Creek Embossing Powders:
Baked Texture: Ancient Amber, Chunky Rust, Deep Sea, Patina Oxide
Baked Velvet: Agean Sea, Eclipse
Classic: Mirror Platinum
other supplies:
Dina Wakely white gesso
Distress Collage Medium: matte
Gypsy Soul Laser Cuts: Landmarks
Ranger Embossing Dauber
Tim Holtz Ideaology vignette box
Tim Holtz/Sizzix Alterations dies: skyline, label letters
VersaMark embossing ink pad
Wagner Studio Precision Heat Tool
wood spacers


Wednesday, June 5, 2019

wings of time

Hi everyone, today I am on the Gypsy Soul Laser Cuts Blog sharing an ATC shrine I call "wings of time." From the moment I set eyes on the GSLC ATC Shrine-Time, I envisioned a Fornasetti face within the circular clock area of the door, but I was unsure where I would take it from there. I put off working on the project for a while and finally decided that it would be best to simply start and see where it would lead... I apologize for the lack of process photos in this post, it seems once I started working, I was so intent on creating that I forgot to stop and capture all the steps. My hope is that my description is easily understandable.
I begin by painting all the pieces of the ATC Shrine-Time black. Then I locate the image that I intend to place within the clock face. I trace the outermost edge of the circle (clock) shape onto the graphic and fussy cut. A piece of black cardstock is adhered to the reverse side of the image so that when the door to the shrine is open, it will appear as a solid plane. Before adhering the face piece, I emboss the clock hands on the shrine door. This is easily accomplished with a VersaMark pen and gun metal embossing powder. I heat set the powder on the exterior surface and then complete the same process on the inside. I let the embossing cool and then adhere the image that has been cut to size in place.  Once the iconic image is set in place, the project seems to direct itself.
I know that at some point I would like the shrine to be functional, a place to store artist trading cards. For this reason, the interior of the shrine is not embellished with protruding objects. Everything inside is kept fairly flat. The rear panel of the shrine is covered with a piece of black and white tweed pattern paper. I ink the paper with hickory smoke and milled lavender distress ink to coordinate with the Fornasetti image. A sentiment is layered onto wilted violet oxide-inked cardstock and attached to the back panel reading "REMEMBER YOUR WINGS."
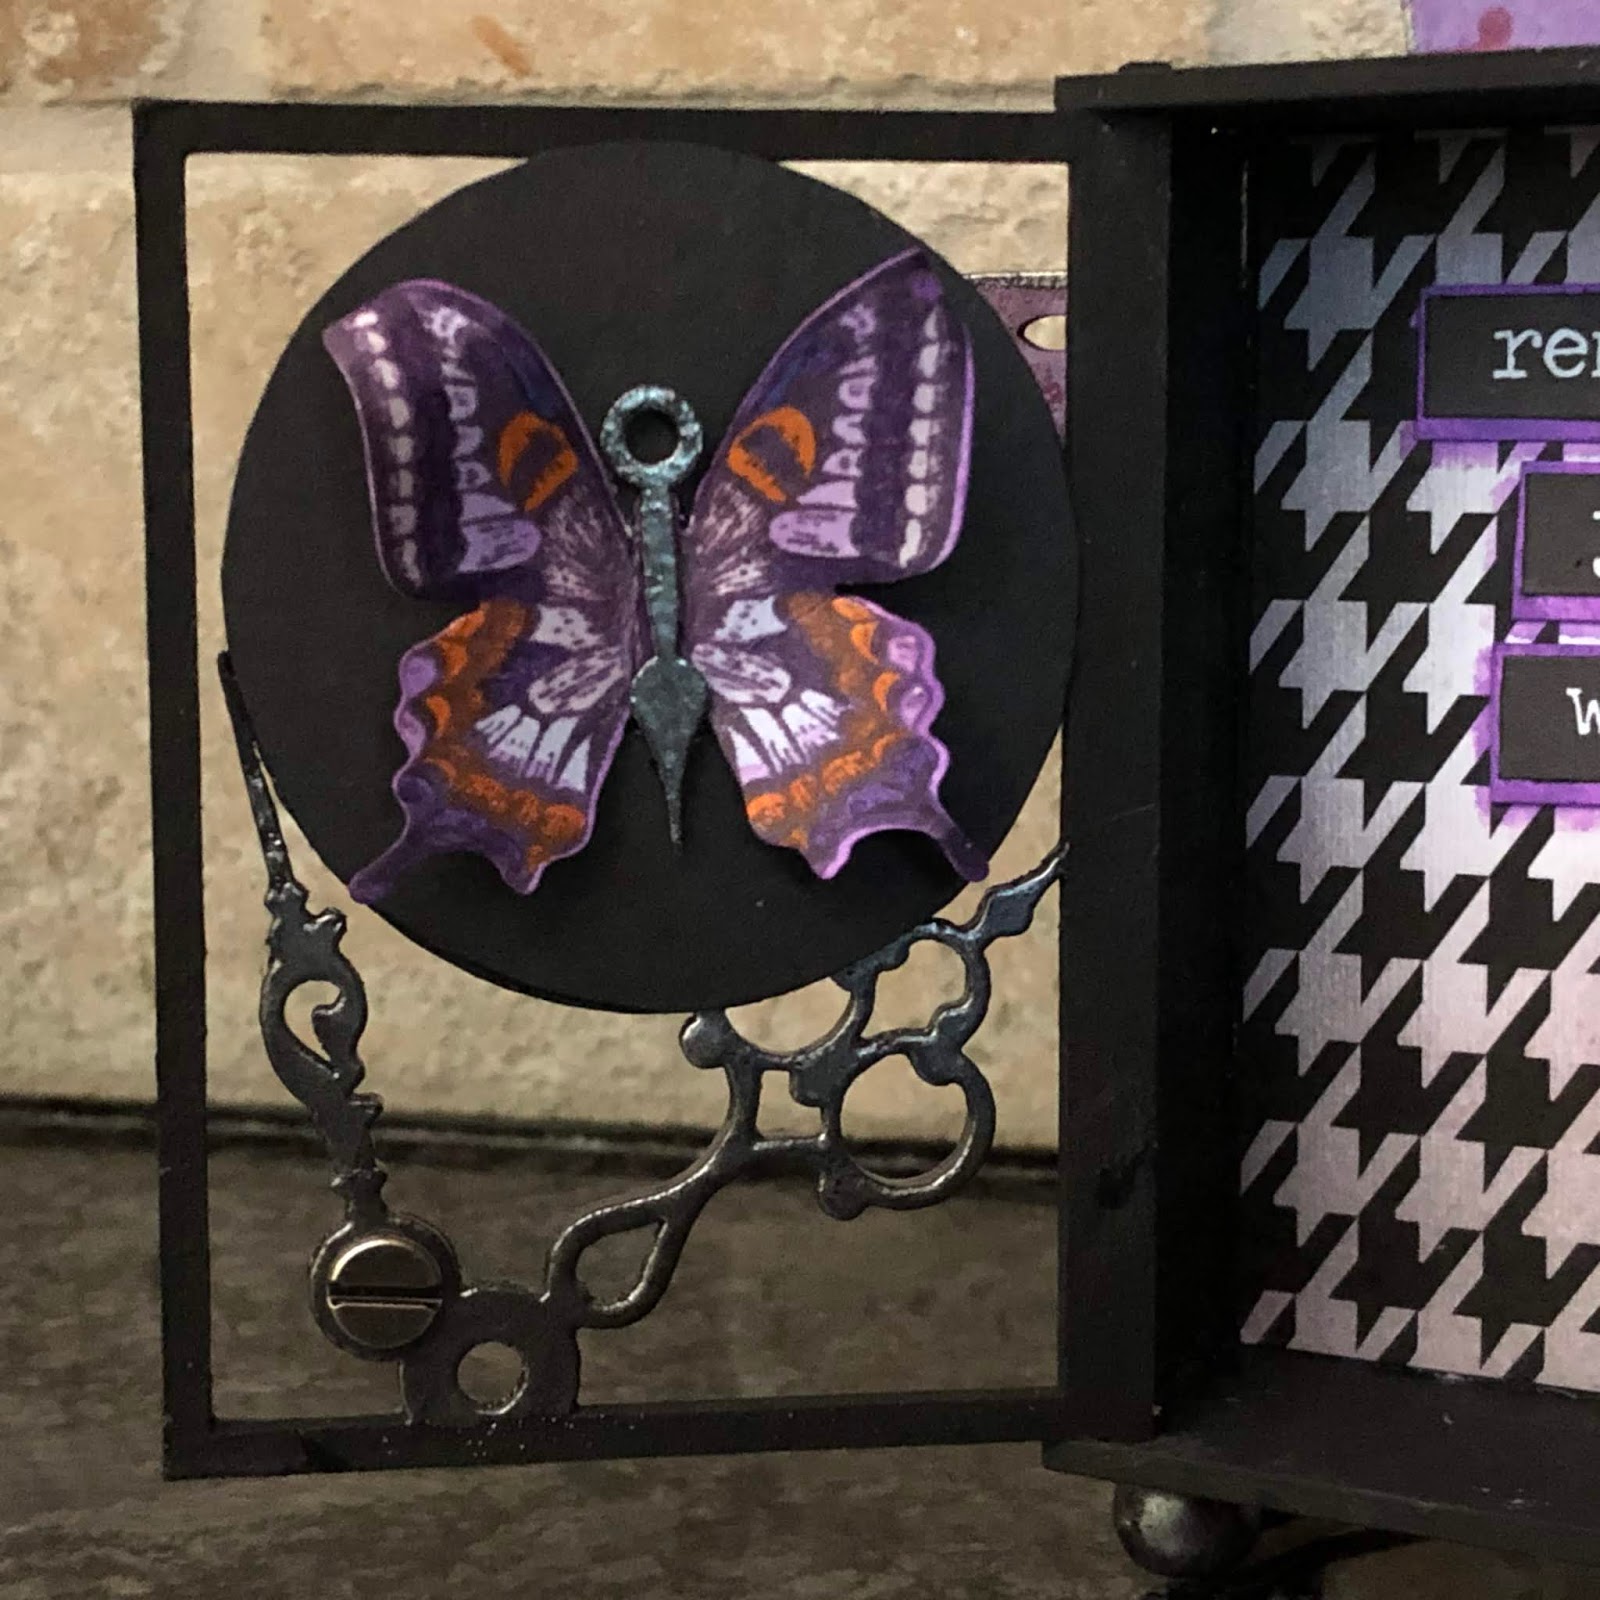
A stamped and colored butterfly is attached to the solid black circle on the inside of the shrine door. The butterfly's body is an embossed clock hand from the GSLC Steampunk Shape Set.
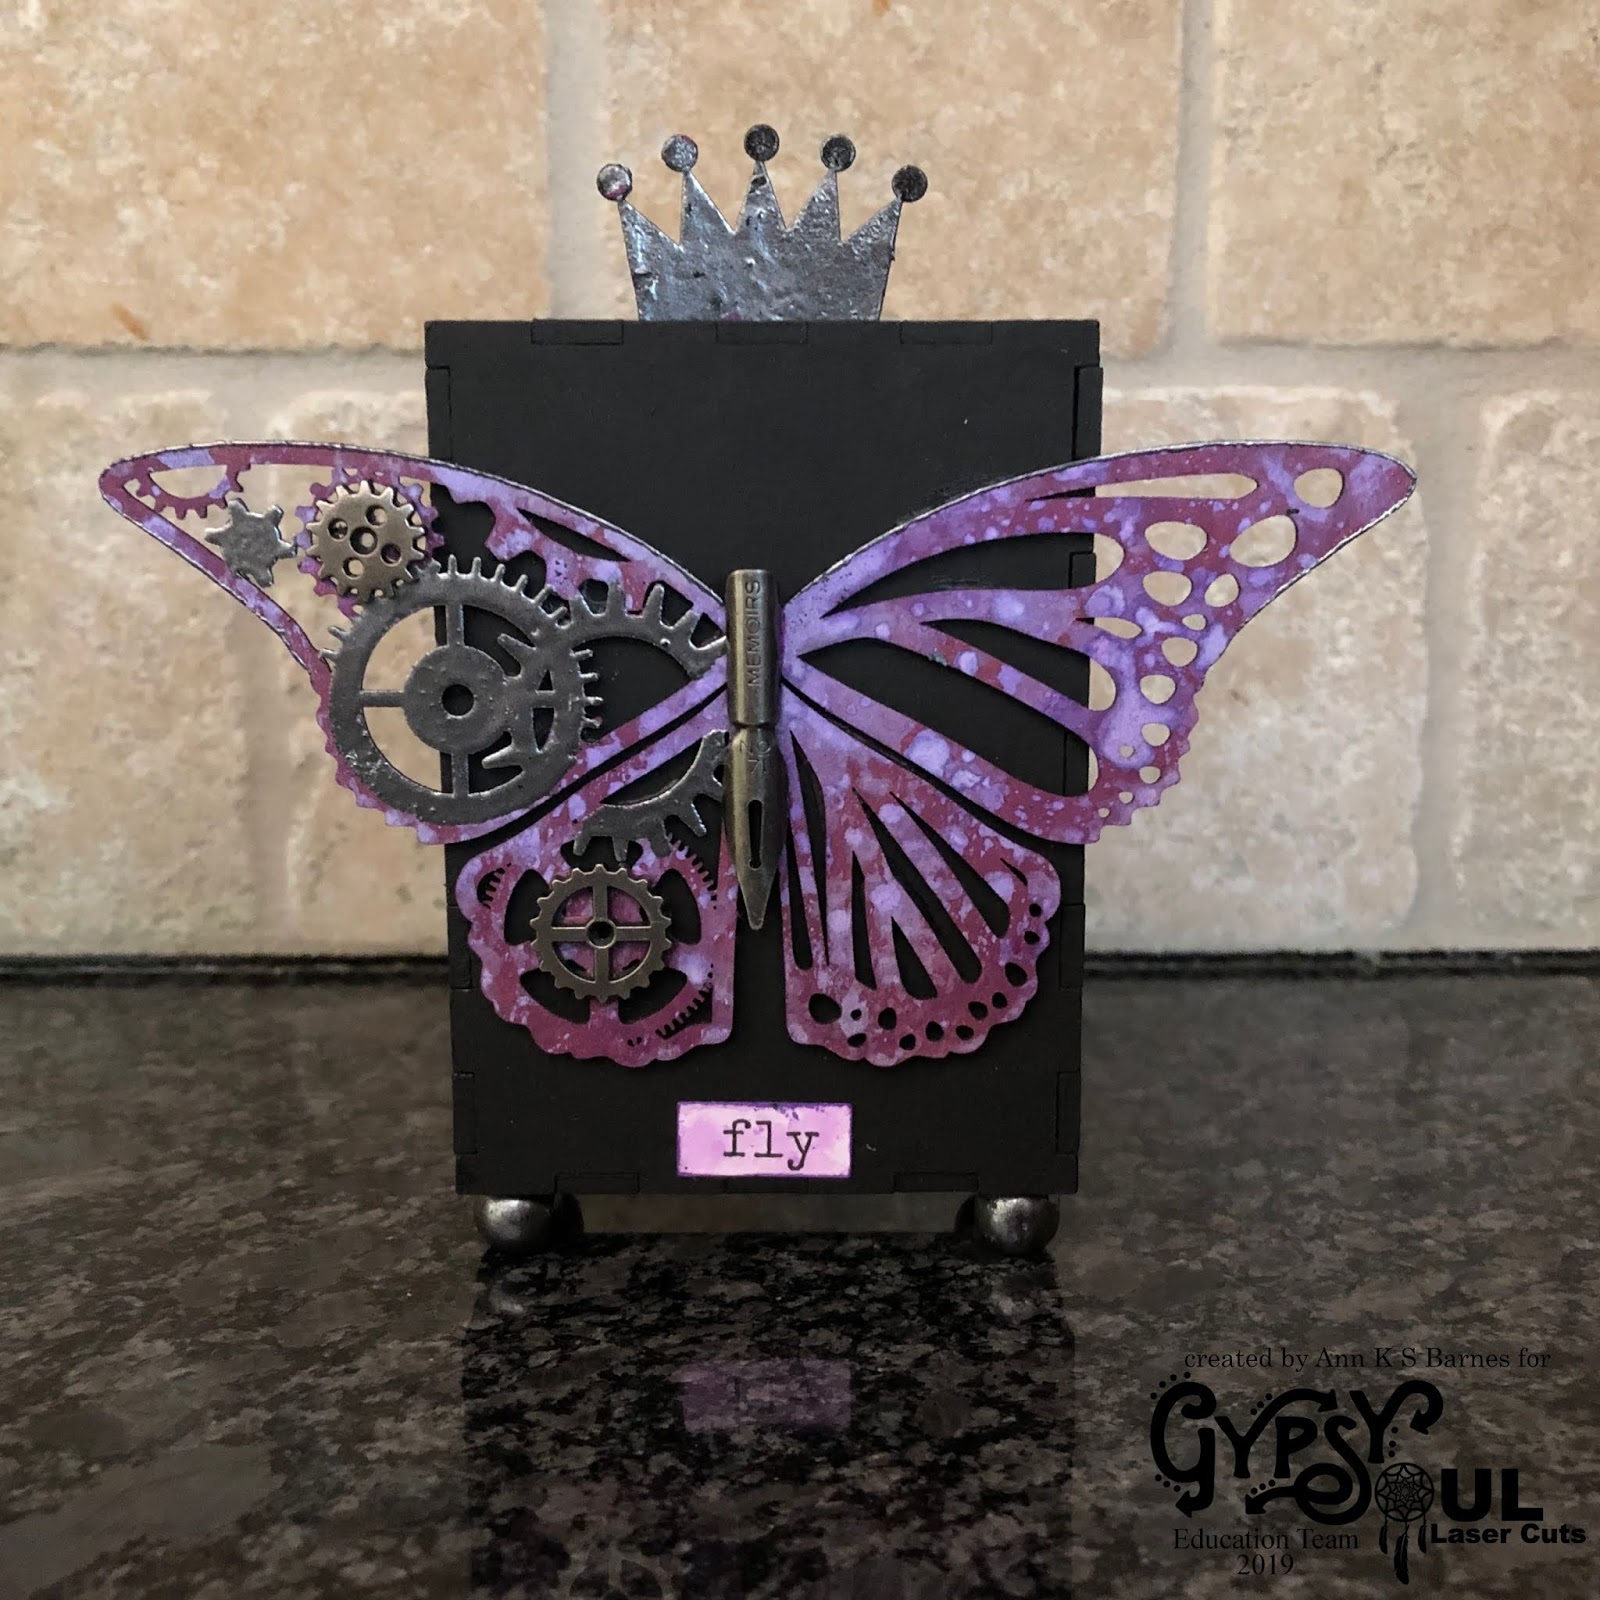
The Rear of the shrine contains a Gypsy Soul Laser Cuts Butterfly of Gears. I love this chipboard piece. It is sold as a set of two identical butterflies, I am only using one for this piece, but I already have a plan for the second butterfly.
The butterfly has been painted with seedless preserves distress paint and then dipped in wilted violet oxide ink to create a beautiful finish. Some of the steampunk cogs and gears are embossed, as well as the body, and tips of the wings. I use the same method that was used for the shrine's clock hands, a VersaMark pen and gun metal embossing powder. When the embossing has cooled, Ideaology metal embellishments are adhered to the butterfly with collage medium. Once the collage medium is dry, the butterfly is attached to the rear panel with collage medium and set aside.  A big chat "FLY" sticker is inked with wilted violet oxide ink and then attached below the butterfly.
I secure a ball hitch through the circular opening on one of the clock hands of the shrine door. This becomes a knob that allows easy access to the shrine's interior. I also emboss four wooden beads and attach these to the base of the shrine to raise it up off the surface it stands on. The crown atop the shrine is another piece from the Steampunk Shape Set. This set has so many pieces, I find myself reaching for it often to use on my projects. The crown has been colored with wilted violet distress oxide and then splattered with seedless preserves paint. The tops and back side of the crown has been embossed with gun metal embossing powder.
I really like the way that this ATC shrine turned out. The Gypsy Soul laser cuts store has many different ATC Shrine styles from nautical, to steampunk, and everything in between. It's definitely worth checking out! I hope that you are inspired to create something of your own, perhaps something that you have put off because you are unsure of how it will turn out. You will never know if you don't start somewhere.

Thanks so much for stopping by the blog today,
 I really appreciate you taking the time.
~Ann


supplies used:
DecoArt acrylic paint: black licorice
Distress Archival ink: dusty concord
Distress collage medium: matte
Distress ink:
 dusty concord, hickory smoke, milled lavender, seedless preserves, wilted violet
Distress oxide ink: wilted violet
Distress paint: wilted violet
Emerald Creek embossing powder: gun metal
Gypsy Soul Laser Cuts:
ATC Shrine - Time, Butterfly of Gears, Steampunk Shape Set
Tim Holtz Ideaology: ball hitch, big chat stickers, gears, pen nibs
Tim Holtz/Stampers Anonymous Stamps: Flutter (CMS294)
VersaMark embossing Pen
Wagner Studio Precision Heat Gun