In this day and age, with electronics so prevalent, the art of journaling and capturing moments to be remembered or reflected upon, is becoming ever so popular. There are many options available, even albeit, electronic ones; however, when I saw this mini trifold, I thought right away, what a perfect opportunity to create something that could catalogue an experience in a truly special way, something that could be treasured for a very long time.
This wonderful
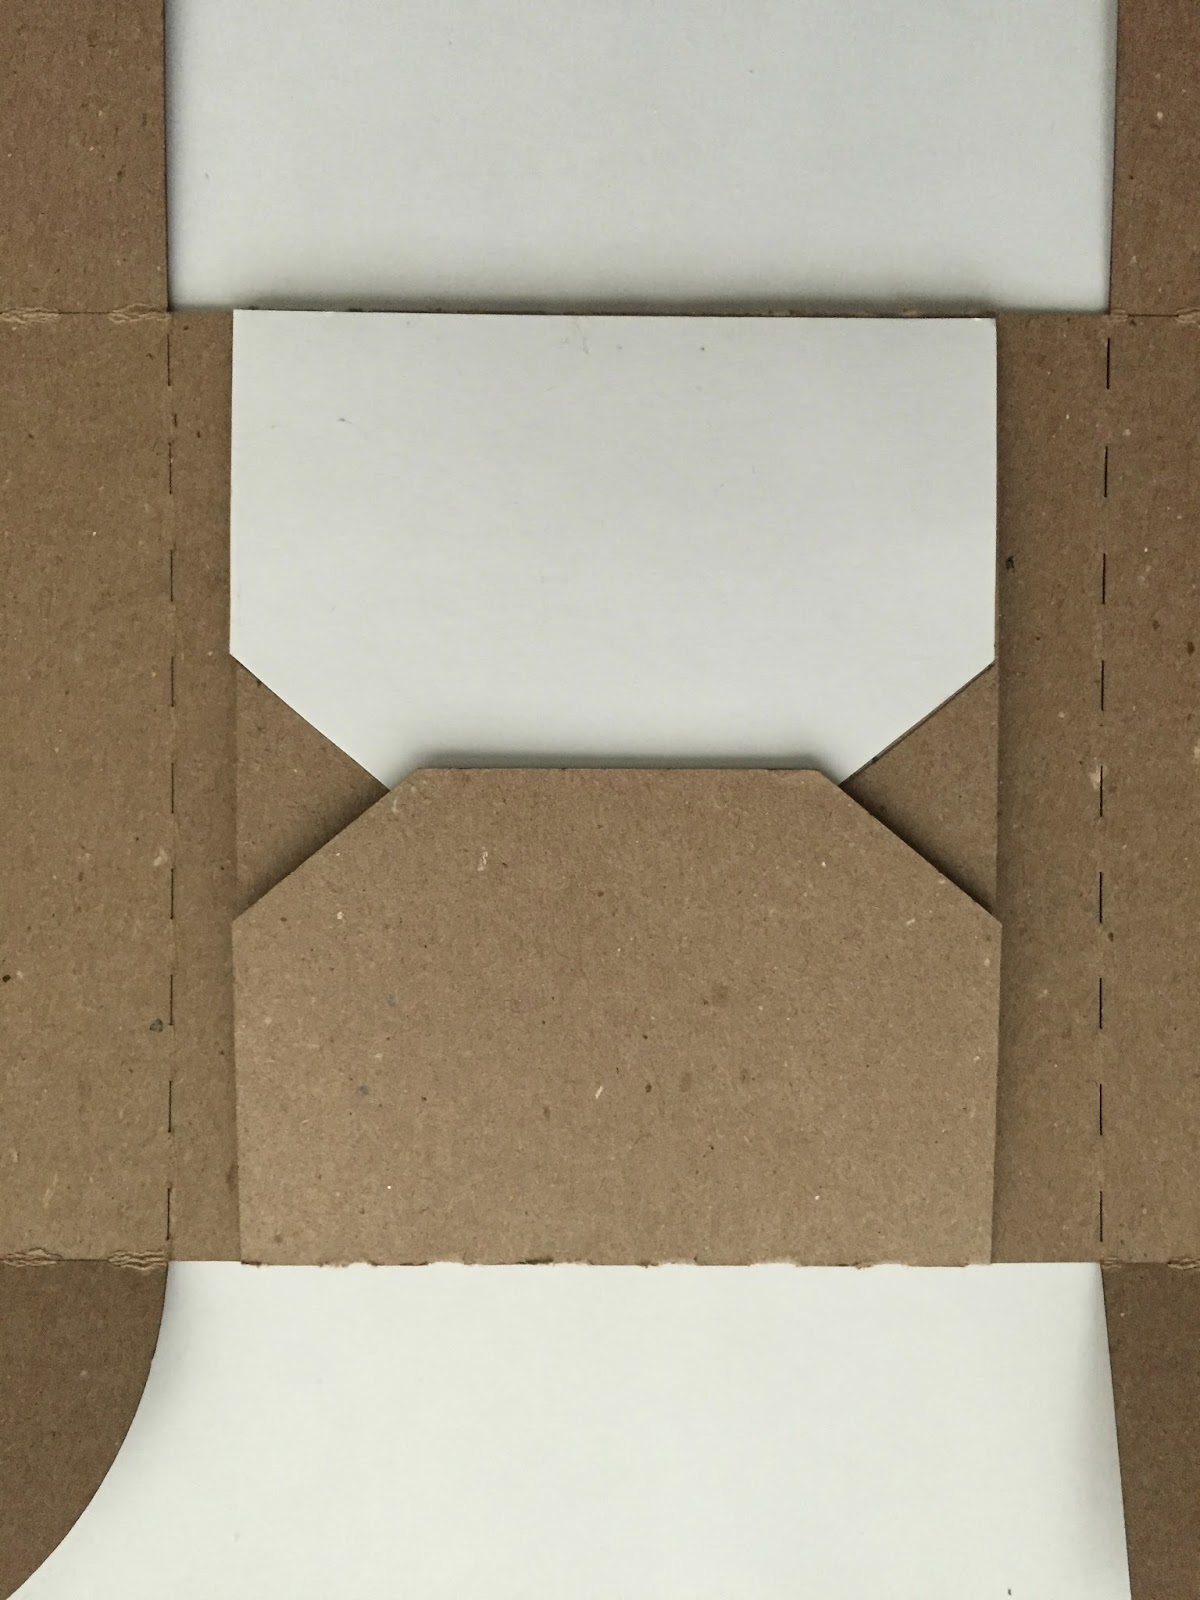
trifold pocket mini from Gypsy Soul Laser Cuts is a great size to manipulate. It arrives flat with score lines already in place for easy assembly. I crease along the pre-scored lines and fold the bare journal into shape so that I can get an idea for the surfaces that I will be working on. This makes it easier to envision which planes are internal vs. external, as well as adjacent and opposite, which allows me to generate ideas and envision how I hope the journal will look completed.

With a concept in mind, I search through my stash of papers and select a variety of pieces that work well together. Ultimately, I choose a patterned paper from the Memorabilia Paper Stash by Tim Holtz to be the main motif and set the color scheme. I gather coordinating inks and create some of my own handmade background papers to join the mix.
The trifold has three distinct interior sections with flaps. It is a very versatile piece; the flaps can be made into pockets, or used with some sort of closure to create tabs that lift and open. You can also remove or modify a flap for even different results. You will notice that I modified the flaps in varying ways. I altered the middle section flaps to create two mirrored pieces. To do this I trace the chamfered flap to create a template, which I then trace onto the larger flap and then cut into shape with scissors. The exterior face of these flaps are covered with the main paper pattern. A circular disk of the handmade background paper is secured to each flap with an eyelet. These discs are the basis of a string closure for this middle section.


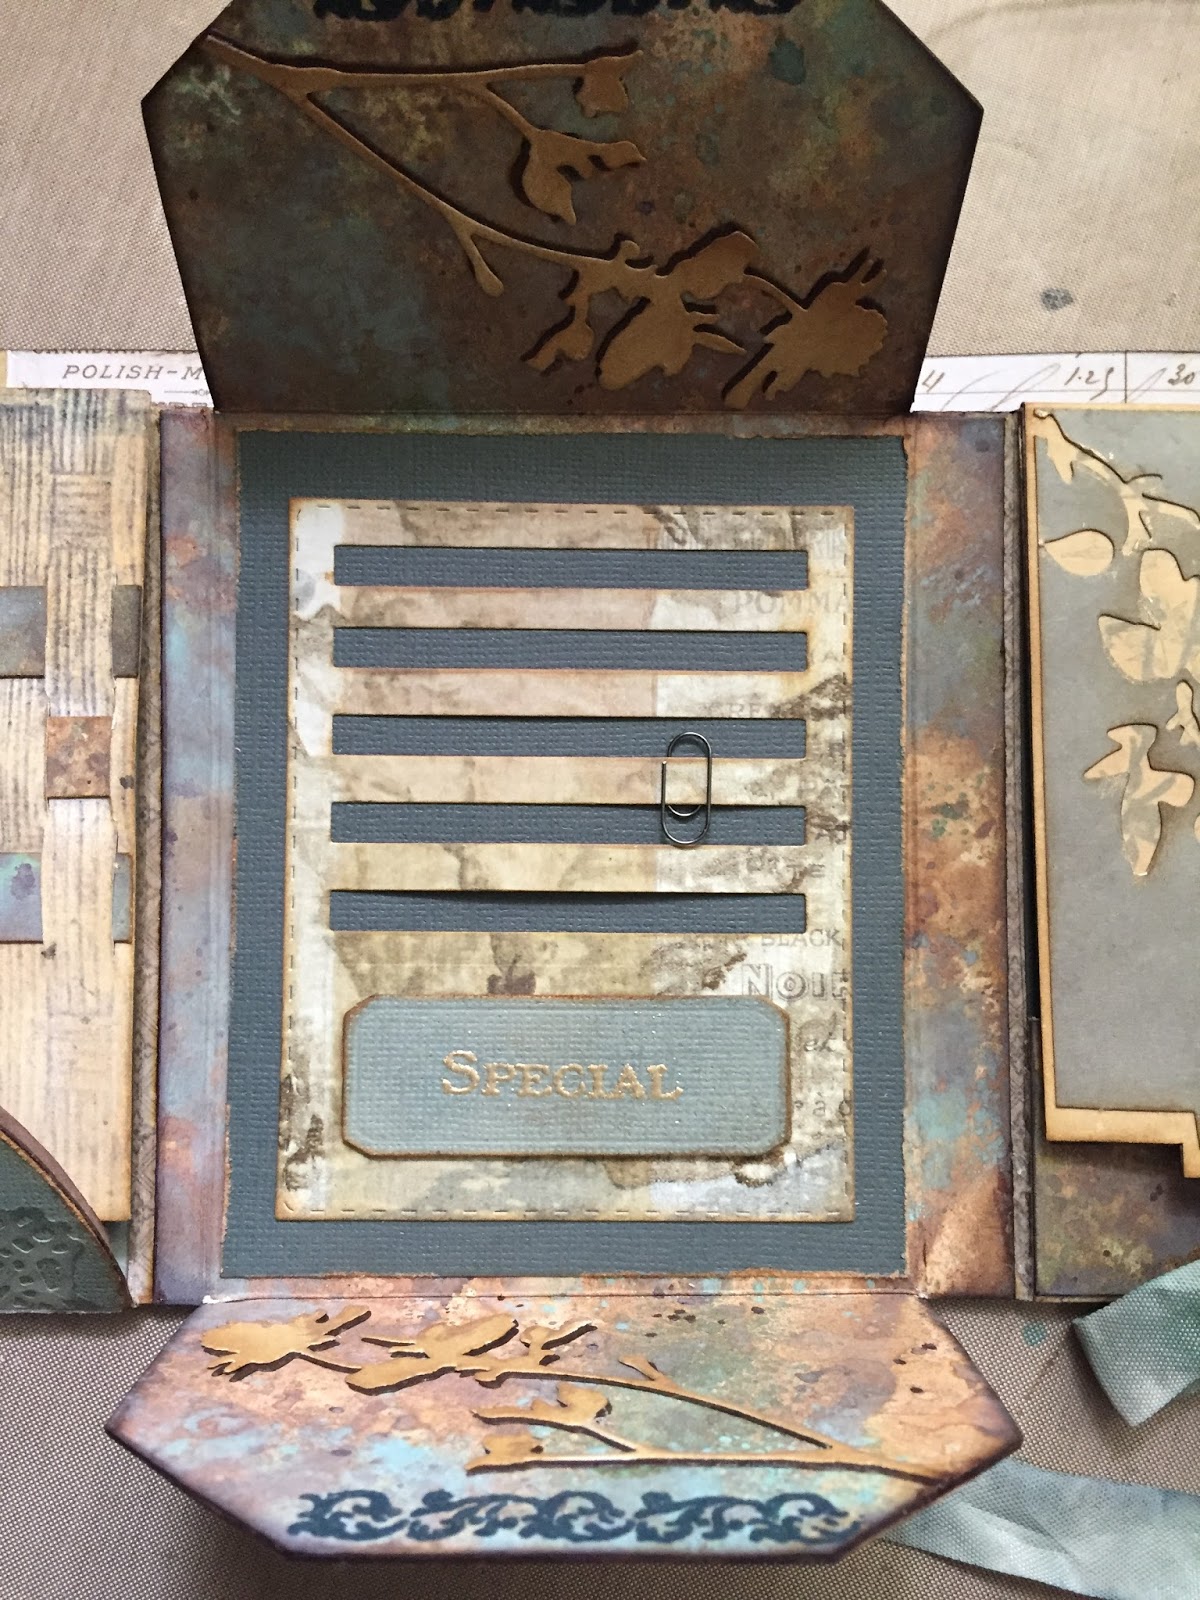
I know that regardless of the layout, whenever the trifold is open flat, this middle panel will be the focus. As such, I want this panel to showcase a stitched slots die. This die cut offers "slots" that pieces of memorabilia and ephemera can be slipped into. This works so well for a folio that will store treasured memories. I cut this piece from the main patterned paper and layer it over a solid paper and then layer this onto one of my handmade, oxide ink backgrounds. This background piece extends along the interior of both flaps, as well as along the interior fold seams. The edges of both inside flaps are stamped and embossed. A flower die cut piece is adhered to each interior flap. It is important to note that as I am creating the pieces for my trifold, I do not attach any papers or pieces until I have completely resolved the layout.

The next sections that I focus my attention on, are the side panels. I want to play off the floral design in the main paper. To do this, I chose a flower design that I have matching stamps, stencils and dies of, knowing that I will be repeating the pattern throughout the project. This offers many different possibilities, while maintaining a common design/theme. I love using this technique in projects, I feel that it creates a very diverse yet unified design, and adds a lot of interest. I generally tend to retain a common color scheme as well, whether I use paints, papers or inks, it is carried throughout a project. This really keeps everything cohesive.
Using a stencil, I apply crazing medium through the openings with a palette knife. This is set aside to air dry. While it dries, I work on the flap that will cover this panel when closed.

The first thing I do is cut a decorative edge on the flap. To create the edge, I trace the along a die that is the shape I am looking for. I feel that this makes the flap coordinate better with the half circle of the first panel and the chamfered edges of the central portion. Once the pattern is drawn onto the chipboard, it is easily cut with a pair of scissors. I use a floral mixed media die to cut an opening in a piece of coordinating paper. I then chose a different paper to layer under the open areas. This "under" paper is stamped with matching floral stamps in iced spruce Distress Oxide. I also randomly stamp some script text on the paper with the same ink. Before combining the layers, the word "cherish" is die cut from the top paper and adhered in a "shadow" fashion. I use gold to highlight and accent both the open cut shapes as well as the word. When the trifold is complete, this flap will be secured in place with a ribbon closure. I color seam binding ribbon with the iced spruce oxide ink to coordinate, and secure this ribbon to the flap prior to attaching any layers onto the flap, thus making it more secure as well as concealing the end.

The underside of this flap is covered with a piece of the main patterned paper. The paper is cut to shape and then inked around the edges. An ideaology ring fastener is attached at the top center of the piece before it is adhered to the chipboard. This ring fastener will be used to secure some tags created with both of the "flap" papers.


When the crazing on the background panel has completely dried, I re-place the stencil and rub distress ink into the crackled areas. I also rub some metallic distress crayon into areas of the flowers to create highlights. This is allowed to dry and then some of the brown inks that were rubbed into the cracks (brushed corduroy and walnut stain) are flicked onto the panel. The metallic distress crayon is mixed wth a bit of water and flicked onto the background as well. I layer this composition with another piece of paper, in a darker hue, that I have die cut using a stitched rectangle die. For this section, I decide to use the bottom flap as a pocket. The entire layout is adhered to the panel prior to securing the sides of the pocket. Please note that in order for a larger area of the crackled design piece to show, I cut down the pocket height. The pocket sides are attached using a hot glue gun. The exposed face of the pocket is covered with more of my handmade, oxide inked paper. A second piece of colored ribbon is attached to the back of the main panel (prior to adhering the trifold's cover paper) so that it is concealed. The two pieces of ribbon can be tied into a bow to secure the panel in the closed position.


The second side panel utilizes a magnetic closure method. The bottom, rounded flap contains a concealed magnet that is attracted to another concealed magnet in the flap. The outermost portion of this flap is covered with the lighter hued solid paper that is stamped with the script text stamp in iced spruce oxide ink and clear embossed. This is partially covered by a section of a doily, die cut from green parchment paper, that is inked and stamped with the script text stamp in iced spruce. The inner portion of the rounded flap is also covered with a piece of the lighter hue paper which is stamped with a sentiment that I feel perfectly fits the concept of my trifold: "Always be on the lookout for the presence of wonder."


The exterior of the top flap on this side, is covered with a patterned paper that depicts a woven pattern. I cut strips of my handmade, oxide inked paper, the same width of the weave pattern and slice the paper at the intersecting areas to allow the inked strips to be woven through. I weave the steps through and cut any protruding edges. I love how this adds interest to the flap panel and also helps carry the inked background paper throughout the trifold. This complete woven panel is inked around the edge and adhered to the flap with dimensional foam tape allowing the magnet piece under it to be concealed completely.

The interior side of the top flap is covered with the darker hue paper that is stamped and embossed with the script text. Along each side a trim stamp is embossed in gold. The center of this panel contains a die cut of the lighter paper secured atop the remaining sections of the doily. Before securing in place, an index clip is located along the edge to hold a ticket strip cut from the main paper. A coordinating flower die cut is also attached.
The central interior panel of this side is covered with the main paper. a small woven packet, created in the same manner as the outside flap, is centrally located. It holds a strip of journaling tickets that have been stamped and embossed to coordinate. A story stick is adhered onto the bottom corner to complete the panel.
Once everything is assembled and adhered, I cut a strip of the main paper to fit the outside of the trifold. The paper is 12" long and when it is wrapped around the outside surfaces, I notice that it is a bit shy in length to cover the entire length. I chose a piece of coordinating solid paper and cut it with the stitched die. I then add this decorative-edged paper to the end sections where the main paper is a bit short. The main paper is also edged with the stitched pattern and adhered.
The inside view when it is unfolded, but each section is securely closed:
Some close up views of secured and unsecured sections:


I want a way to secure the trifold when it is completed and tucked away, but don't want to have it be overly fancy, especially since I may want to place it onto a bookshelf. I consider many options, and ultimately decide to dye a length of 3/4" elastic with Distress Ink in brushed corduroy. When it is dry, I cut the length to overlap when wrapped around the folded journal. I sew both ends of the elastic in place. Using a cabinet card from my stash, I remove the back panel and fussy cut around the design that surrounds the opening. Using a piece of the darker hued paper from the project, I die cut another flower; remove the die cut and replaced it with one that is cut and inked from a different paper (also used in the project). I add gold highlights, and mount this within the opening. Another paper slips through the overlapping area of elastic and is secured to the back of the cabinet card, securing it in place. This creates a fairly plat piece that slips on and off the trifold when not in use. It finishes off the journal exactly as I hope.


I really love the way this trifold came together, The colors and the patterns are gorgeous together. I think it will present the perfect opportunity to store some treasures and special memories.
I hope that you are inspired to create your own mini album, they take a lot of planning and design, but I believe they are absolutely worth the effort!
Thanks so much for stopping by today.
~Ann
Materials List:
Gypsy Soul Laser Cuts
TriFold Pocket Mini
Distress Collage Medium: crazing, matte
Distress Crayons: tarnished brass
Distress Inks: brushed corduroy, iced spruce, walnut stain, ground expresso
Distres Oxide Inks: iced spruce, cracked pistachio, walnut stain, spiced marmalade
Ranger: princess gold embossing powder
Seth Apter/Emerald Creek Baked Texture: deep sea
Tim Holtz Alterations Dies by Sizzix:
doily 2, handwritten love, labels, mixed media 2, stacked archway, stitched ovals,
stitched rectangles, stitched slots, tag collection, ticket strip, wildflowers
Tim Holtz Ideaology: cabinet cards, journaling tickets, story stick, mini paper clip, index clip
Tim Holtz Paper Stash: memorabilia, kraftcore nostalgia
Tim Holtz Stamps by Stampers Anonymous:
classics #9, correspondence, mini bouquet, ornate trims, wildflowers
Tim Holtz Mini Stencil 035 (set 10) by Stampers Anonymous
I am entering this project in:
Mini Album Makers Challenge:
May 2018
Blank Page Muse Challenge:
Embossing, Any Sort of way


59 comments:
This is just magnificent! I love every single thing about this! You are so clever and so creative. A great source of inspiration my friend, that is what you are.
What a wonderful thing for you to say Freddie, that just made my day! I am so glad that you liked the album, thank you so much for taking time to visit the blog. Hugs to you ~Ann xx
It 'really a beautiful creation, I love how you paired with cards and I really like that woven pocket. Thank you for inspiration.
Sorry for my english.
Oh my gosh Anne, how I have enjoyed reading and seeing this amazing little wonder. The colors are truly right up my alley and I adore the variations you achieved, all with perfect harmony. Never have I ever seen the wildflower dies look so good! And the elastic closure is the coolest thing EVER! Oh my gosh am I ever going to CASE that idea! :) You're so creative my friend and I only wish I could be there with you making one of these. GSLC are the best! I'm going to have to order some of these! We're thrilled that you made time to play with us at Mini Album Makers. Big hugs, Autumn
Thank you so much, for your wonderful comment, so very appreciated! I am really glad that you liked it. Thanks for visiting my blog. hugs ~Ann
I understood it completely, absolutely no apology needed. I am so grateful that you left a comment xx
So many thanks Autumn! I am thrilled that you liked it, I was so happy with the colors and patterns and how well they all blended together. Glad you liked my inventive closure too, I wanted something that could expand as I filled this little treasure trove and I thought that might do the trick. Thank you so much for taking the time to visit my blog and for leaving such a lovely comment, it means a lot to me! Hugs ~Ann xx
Ann this is packed full of beautiful details!! I’m going to have to read it a couple more times to soak in all the little things that make it so unique. The colors are gorgeous and those oxides make me swoon!!
Wow! This is stunning! Each and every detail is amazing!
Just gorgeous! Each part is beautiful and the whole piece is magical
Ann, this is really superb! Thank you for sharing your whole design process. It is really nice to see how others put designs together. I especially like your handmade papers that you used throughout. Such a wonderfully detailed piece and so masterfully constructed! ~Heather
Wow Ann!! So many incredible techniques and textures in this gorgeous project! I love the idea of weaving the paper in the woven pattern. I can see this was so much fun to put in all of the details. It’s marvelous!
Oh wow Ann, how fabulous is this!! It was a real joy to read all your thoughts and ideas in bringing this beautiful little album together. I just love the papers, the die cuts, the wonderful weaving, absolutely everything - this is totally superb!
Thanks so much for joining in with us this month at Mini Album Makers! Hugs, Anne xx
Oh my goodness Ann, what an amazing project!!! I love everything about it, the whole design is so super clever and the combination of the Tim papers and your own inked ones looks just wonderful! And wow, those woven pockets, - so, so clever! And of course thanks for adding it to our challenge at Mini Album Makers!
This is as gorgeous on the inside as it is on the outside. So elegantly decorated!
Jennalee, thanks so much for stopping by and checking out the post, and for your super kind comment! It means so much to me. hugs you ~Ann xx
Thanks so much Katie, I am so glad you like it!, I really appreciate you taking the time to check it out. ~Ann xx
Thank you Linda, I truly loved the process of putting this project together. Thanks for stopping by! ~Ann xx
wow, thank you very much for that wonderful comment. I really enjoy inking my own papers to combine with others for projects. I love that I get to play a bit with color combinations of inks and that it adds something unique to the mix, each and every time. Thanks so much for stopping by, it means a lot to me. ~Ann xx
Tami, I am thrilled you stopped by to see a bit more! This project was actually more involved than I anticipated, and yet, in the end, I wouldn't have it be any different, all of the planning and creating was so rewarding when it was complete. I loved getting caught up in all the details. Thank you for stopping by! ~Ann xx
Anne, I was so happy I got it finished in time to join the challenge this month! I really couldn't believe just how many different surfaces this little album would provide and allow for design opportunities! The weaving was totally inspired by a woven paper heart I saw, it was something I have always wanted to do but never really been bold enough to try, but boy was I glad I did. It worked fabulously. Thanks for stopping by, hugs to you. ~Ann xx
Thank you Astrid, your words mean so much to me! I really love adding my own inked papers to projects and being able to carry it through this album in so many different ways, was the icing on the cake. Thank you for visiting the blog. hugs. ~Ann xx
Thank you so very much for stopping by, and for your wonderful words! I am so glad you enjoyed it. Hugs, Ann xx
this is so beautiful :) I like it
Thank you so very much, I am really glad that you like it. ~Ann xx
What a stunning flip fold wallet album - with such attention to detail, beautiful colour palette and so much for the eyes and the fingertips to enjoy. I love all the interactivity and inventive fastenings. Simply brilliant! Thanks so much for playing along with us at Mini Album Makers.
Alison x
The inside is a treasure! LOVE all the ways this can be used, and love the elegant quality of it. So fun too!!!
This is just gorgeous. Thanks for sharing your process.
I really love this keepsake, so beautiful. So much wonderful color and lots of gorgeous textures. Thanks so much for sharing your treasure with us and for playing along with our challenge at Blank Page Muse.
Kim
This is so lovely. It was work all of the hard work I know you put into it! Thanks for joining us us at Blank Page Muse!!
Fabulous "folder" - love the colours and olde feel - so much work and detail in this! Thanks so much for playing at our "embossing" challenge at the Blank Page Muse Blog - we hope to see you back for our new challenge!!!!
Thank you for joining the Blank Page Muse challenge. This is awesome. Thanks for sharing how you made it.
What a glorious creation! So much fun stuff to look at! Thanks for joining us at the Blank Page Muse blog!
Thank you so much, this was such a joy to make and your comment means a lot to me. I sincerely appreciate you taking the time to visit my blog. ~Ann xx
Oh my goodness Anita, thank you so very much! This was definitely a special project for me. Hugs to you ~Ann xx
Gorgeous mini album. Love the different tag shapes and thank you for joining us at The Blank Page Muse Stamps.
I love your papers and the design of this. I have had this album style on my list for awhile but have not tried it yet. You have inspired me! Your gold accents make the album perfect. It is so very lovely! Thanks for sharing with us at Mini Album Makers Challenge!
Love this! Thanks for the awesome tutorial and for playing at the Blank Page Muse Stamps challenge! Hope to see you again next time too!
Thank you so much for stopping by, I really appreciate it. xx
Thank you Jess, it was much more work that I imagined, but definitely worth every bit. Thank you so much. xx
Thank you Kim, I loved the colors, which made it extra special to work with. xx
Thank you Sharon, I enjoy the challenges and really appreciate you stopping by! xx
Thanks so much Cathy! xx
Thanks Katie, this was a new type of project for me, so it was fun to see it all come together. xx
Thank you so much, I really appreciate it! xx
I was thrilled to have a completed album in time to join your challenge. Thank you so much for stopping by and for your lovely comment. xx
Thank you Jenn, I always try to join the BPM challenge. I appreciate you stopping by! xx
So beautiful!!!
Thank you! xx
Omgosh!! Ann!! I think you are going to just have to come play another weekend and teach me what you know! Holy cow is this ever gorgeous! You are so right about the whole electronic thing- this is a treasured piece to hold in your hands and feel the textures and just love every flap and page!Truly amazing and incredible!! Lucky is the receiver!
Jackie xo
ps..does Gypsy know how beautifully you represent them??? Just saying...
Thank you ever so much my lovely friend! Your comments always bring a smile to me! I am absolutely in for having a weekend of creativity with you, what a wonderful sharing experience it would be, to see your creativity in action! Thank you so much, truly warms my heart. Hugs ~Ann xx
Wow, Ann! I am so sorry to be late to this party, but so happy to get to see this amazing flip fold journal you have created!Altering the midsection is a stroke of genius, but every single detail has wowed me! Oh, Ann, I could go on and on here--so many fabulous details! You have completely sold me on that trifold pocket mini! But it's those details you've so perfectly and thoughtfully added that make this so incredible! Going back for another look! Thank you so much for your inspiration! Sending big hugs and much gratitude!
Sara Emily, I always love reading your comments, sometimes they even cause me to go back and have another look, which I think is one of my favorite parts, I am so happy that this has sparked some sort of inspiration for you, and I look forward to seeing what you create, although I have no doubt that it will be wonderful! Thanks so much my friend! hugs~Ann xx
This is beyond gorgeous. Every little detail is just perfect.
Your comment made my day! Many thanks for visiting the blog Seth, totally appreciated and means so much to me. ~Ann xx
Biggest congrats on your win at Blank Page Muse (and Mini Album Makers of course!!!) I really enjoyed this album. Hugs, Autumn
Thanks Autumn, I am so grateful for all of the love and wonderful comments about this piece. And I feel very fortunate to have been picked by both mini album makers and blank page muse challenges. Thanks so much! ~Ann xx
Such a stunning creation, so beautiful Ann , and congratulations on winning both challenges .
Dorthe xx
Post a Comment