Wednesday, November 20, 2019

the gift of a holiday view

 Creating the perfect holiday cards takes time; I know many people who like to get a head start mid- summer, I am not one of those people. However, I do know that the holiday card making must begin before the month of December when all the decorating and celebrations happen, and there is never enough time to get everything done, let alone card making.
Today I am on the Gypsy Soul Laser Cuts Blog sharing a fairly quick, holiday shaker window card with a detachable ornament.
I think that these cards will be perfect for friends you may want to give a little something extra to, without all of the expectations that come with giving a gift.
 Let's begin.
Pull out your favorite holiday papers and some solid color card bases, along with the Gypsy Soul Laser Cuts Christmas Baubles 1 set and a 2" circle die. The baubles come in a set of four. Carefully remove each ornament shape from the surround. I prefer to use an Exacto knife to cut the tiny areas where the shape is still attached to the surround.
Pair up each shape with a patterned paper and then find a coordinating color card base. Since I am making Christmas cards, I am using red, green and kraft colored card bases. Each base is a folded 4 1/4" x 5 1/2" (A2 size) card. I cut a piece of patterned paper for each card front. These patterned pieces measure 3 3/4" x 5". I also add a layer of solid "fancy" paper between the card and the patterned piece. These pieces are cut to measure 4" x 5 1/4".
Next, I decide what color I want my ornaments to be. I use a paint pen to color both sides of the ornament. You can choose whatever colors you would like. I use silver and gold. I always love adding a touch of fancy. While the paint is drying, I return to the cards.
When complete, the ornament will be located in front of a shaker window. To create this window, use a 2" circle die. Layer all of the papers onto the flattened card front, secure the papers temporarily so they do not shift while die cutting, and place the die in the bottom half of the card. This serves two purposes, it allows for space at the top of the card to "hang" the ornament from, as well as gives an area at the top of the inside to include a sentiment, thus not obstructing the window.
Cut two 3" x 3" acetate squares for each card. (I am making 4 cards, so I cut a total of 8 squares.) These squares are easily cut from recycled plastic packaging. I love the idea of repurposing and especially with plastics. Attach the first acetate square on the card base front, covering the opening. (Try not to get any adhesive within the area that will be within the circular opening.) Next, attach the solid "fancy" layer to the card front, making sure that there is adhesive completely surrounding the circular opening. (This is to ensure that none of the fillers will have anywhere to escape from.) I use a Tombow permanent adhesive tape runner for these cards. It is easy to run the adhesive right around the circles without stopping.
The next layer is created with a 3 1/2" x 4 1/2" piece of fun foam. Center this piece on the patterned paper, flip over, and trace the circular opening. Die cut the circle from the fun foam. Using the tape runner, apply adhesive on one side of the foam piece. Be sure to completely surround the circular opening, as well as along the top and bottom edges. Attach the foam piece to the fancy layer, making sure that it is aligned with the circular opening and straight. Rub all the edges to ensure contact.
Now it is time to add the filler. You can use a variety of items for the shaker contents. I have used some festive red and green glass seed beads as well as some decorative sequins. Each card was filled with things I believed were complementary to the patterned paper as well as the respective ornament.
Add the second acetate square to the reverse side of the patterned paper, again trying to keep the adhesive to the edges so it will not be seen from the window. Apply adhesive to the exposed side of the fun foam and pay special attention to the edges of the circular opening. Align the top patterned piece of paper over the layers and secure in place. The shaker window portion of the card is complete.
I cut a length of metallic floss and tie the two ends together, This looped end is fed through the hole in the ornament and the knotted end slips through the loop created. This creates the hanger for the ornament. I glue pieces of inked die cut greens onto the ornaments to embellish.
When the glue is dry,  add two dots of removable adhesive to the reverse side of the ornament. (If you put the adhesive along the edge and behind the ornament top section, it will not be seen from the inside of the card when open.) The extra length of the floss hanger can be secured on the inside of the card with a small piece of holiday washi tape. Lastly, stamp and emboss a holiday sentiment on the inside of each card.
I hope that you have enjoyed these festive cards that give a little bit more. I look forward to making more holiday cards to share with loved ones and friends.
Best wishes on all the season's preparations, whichever holiday you celebrate.
Thank you for stopping by today, I truly appreciate it.
~Ann
 xxx

supplies used:
circle die: 2"
Deco Color Premium Paint pens: silver and gold
Distress ink:
 black soot, crushed olive, evergreen bough, forest moss, peeled paint, pine needles
DMC embroidery floss: red metallic
Emerald Creek / Quietfire Designs modern gilding powder: burnished silver
Exacto knife
glass seed beads
Gypsy Soul Laser Cuts: Christmas Baubles 1
plastic packaging or acetate sheets
sequins
Stickles: mercury glass
Tim Holtz Ideaology paper stash: christmas, blackout kraft
Tim Holtz / Sizzix: festive greens, funky festive, holiday greens, holiday greens mini
Tombow permanent adhesive
Tim Holtz / Stampers Anonymous: Christmastime (CMS352)
VersaMark embossing ink


I am entering these ornament shaker window cards into the following challenges:
Simon Says Stamp Monday Challenge: Recycle

Thursday, November 14, 2019

aspenglow

This month the theme at Emerald Creek Dares is "aspenglow." We would like to see anything you create with a snowy, wintery feel, perhaps inspired by the John Denver song with this title. As the weather has suddenly turned cold here, and we've even seen a few snowflakes in the air, I thought I would create a piece that could be put out with my winter decorations. Emerald Creek has quite a few embossing powders that could work their magic in the snow department; I have chosen to use blizzard, one of Seth Apter's baked textures, for the snowy accents.
I begin with a mini Etcetera thickboard tag. I first add a coat of white gesso to each side and, when dry, a layer of weathered wood distress paint is sponged onto the surface and allowed to dry. To create the look of falling snow on the tag, I use texture paste through a stencil. When the stencil is lifted, I sprinkle a layer of the blizzard powder onto the wet paste and set aside. (Note: it is important that you allow the texture paste to completely dry before heating the powder. If you heat too soon, the paste becomes puffy.) Once the paste is completely dry, heat set the powder.
With the background complete, it is time to move on to the snowy evergreen trees.
The trees begin as different sized chipboard laser cut shapes. They are painted green with forest moss and peeled paint distress paints. I add the color with a sponge to give the look of texture. Using a foam  sponge, I add Versamark embossing ink on the surface of the trees. This is then coated with a layer of forest foliage textured embossing powder. Since I hope to keep a textured appearance, I rub some of the areas with my finger to give varied coverage. I then heat set the powder.
This process is completed on all three trees.  Now it is time to add the snowy accents. Using my Ranger emboss it dabber ink and a paintbrush, I add embossing ink along the tops of the branches. as if the falling snow has been caught. I also paint some lines of ink within the central tree section to give a dimensional effect. The blizzard embossing powder is poured down from the top and sticks to the areas where the ink has been added. The snowy areas are heat set, then set aside to cool.
The back side of each of the trees is reinforced with a painted skewer stick, this allows them to be attached at varying distances away from the background (tag) white still retaining their rigidity.
Using Etcetera ledges, I create a base for the tag. The base is painted and then covered with texture paste and embossed with the blizzard powder, similar to the snowy background process. I die cut three chipboard deer and create a dimensional animal to stand tall in front of the forest of evergreens.
When everything is secured in place, I add flecks of watered down gesso to the entire piece.
Here are some close ups of the piece:
I hope that maybe you are inspired to create something snowy for the Emerald Creek Dares Challenge this month, after all, it's always better when we can play in the snow without the extra work of shoveling.
Thank you so much for taking the time to stop by the blog,
I truly appreciate it.
~Ann
 xxx


supplies used:
chipboard
Distress collage medium
Distress Paint:
antique linen, forest moss, ground expresso, peeled paint, picket fence,
vintage photo, walnut stain, weathered wood
Emerald Creek embossing powders:
Blizzard baked texture
Forest Foliage allure
Gypsy Soul Laser Cuts: pine tree shape set
Ranger: Media white gesso
Ranger: emboss it dabber
Ranger: texture paste: opaque matte
skewers
Tim Holtz /Sizzix Alterations: prancing deer (660033)
Tim Holtz /Stampers Anonymous Etcetera:
mini tag, trims bat/web set (ledges only)
Tim Holtz /Stampers Anonymous stencil: speckles (THS021)
VersaMark embossing ink
Wagner heat tool

Wednesday, November 6, 2019

over the river and through the wood


I realize that for the majority of makers, the beginning of November signals that Christmas crafting is in full swing. I simply don't feel right skipping over Thanksgiving. I always try to work in at least one Thanksgiving project before fully committing to my Christmas and winter creations.
Today I am on the Gypsy Soul Laser Cuts blog sharing a harvest sleigh, perfect for a Thanksgiving table centerpiece or home decor piece. Inspired by the Thanksgiving poem by Lydia Maria Child, I thought it would be fun to decorate the GSLC Santa's sleigh with a harvest theme and fill it with all sorts of harvest goodies.
The sleigh arrives flat in seven pieces. This piece has many curves and decorative cuts. I suggest wiping down all edges with a soft cloth or paper towel to remove any of the black left over from the laser cutting process before beginning assembly. Next, I like to do a quick dry assembly to see how all of the pieces fit together. This allows me to envision the piece in its 3 dimensional form as well as gives me a good understanding of what areas are exposed and which ones are covered, which helps sequence the assembly process. Take note of the sections of the sleigh that remain exposed on the underside as well as the areas exposed when the back and front panels are in place. You want to be sure that all surfaces considered exterior to the sleigh will all be painted the same color.
I paint the exterior sides of the sleigh, as well as any exposed edges, with black soot paint. Be sure to cover the inside of the runners and decorative curves as these will be exposed when the sleigh is finished. While this is drying, I select the paper that I will be covering the interior of the sleigh with.
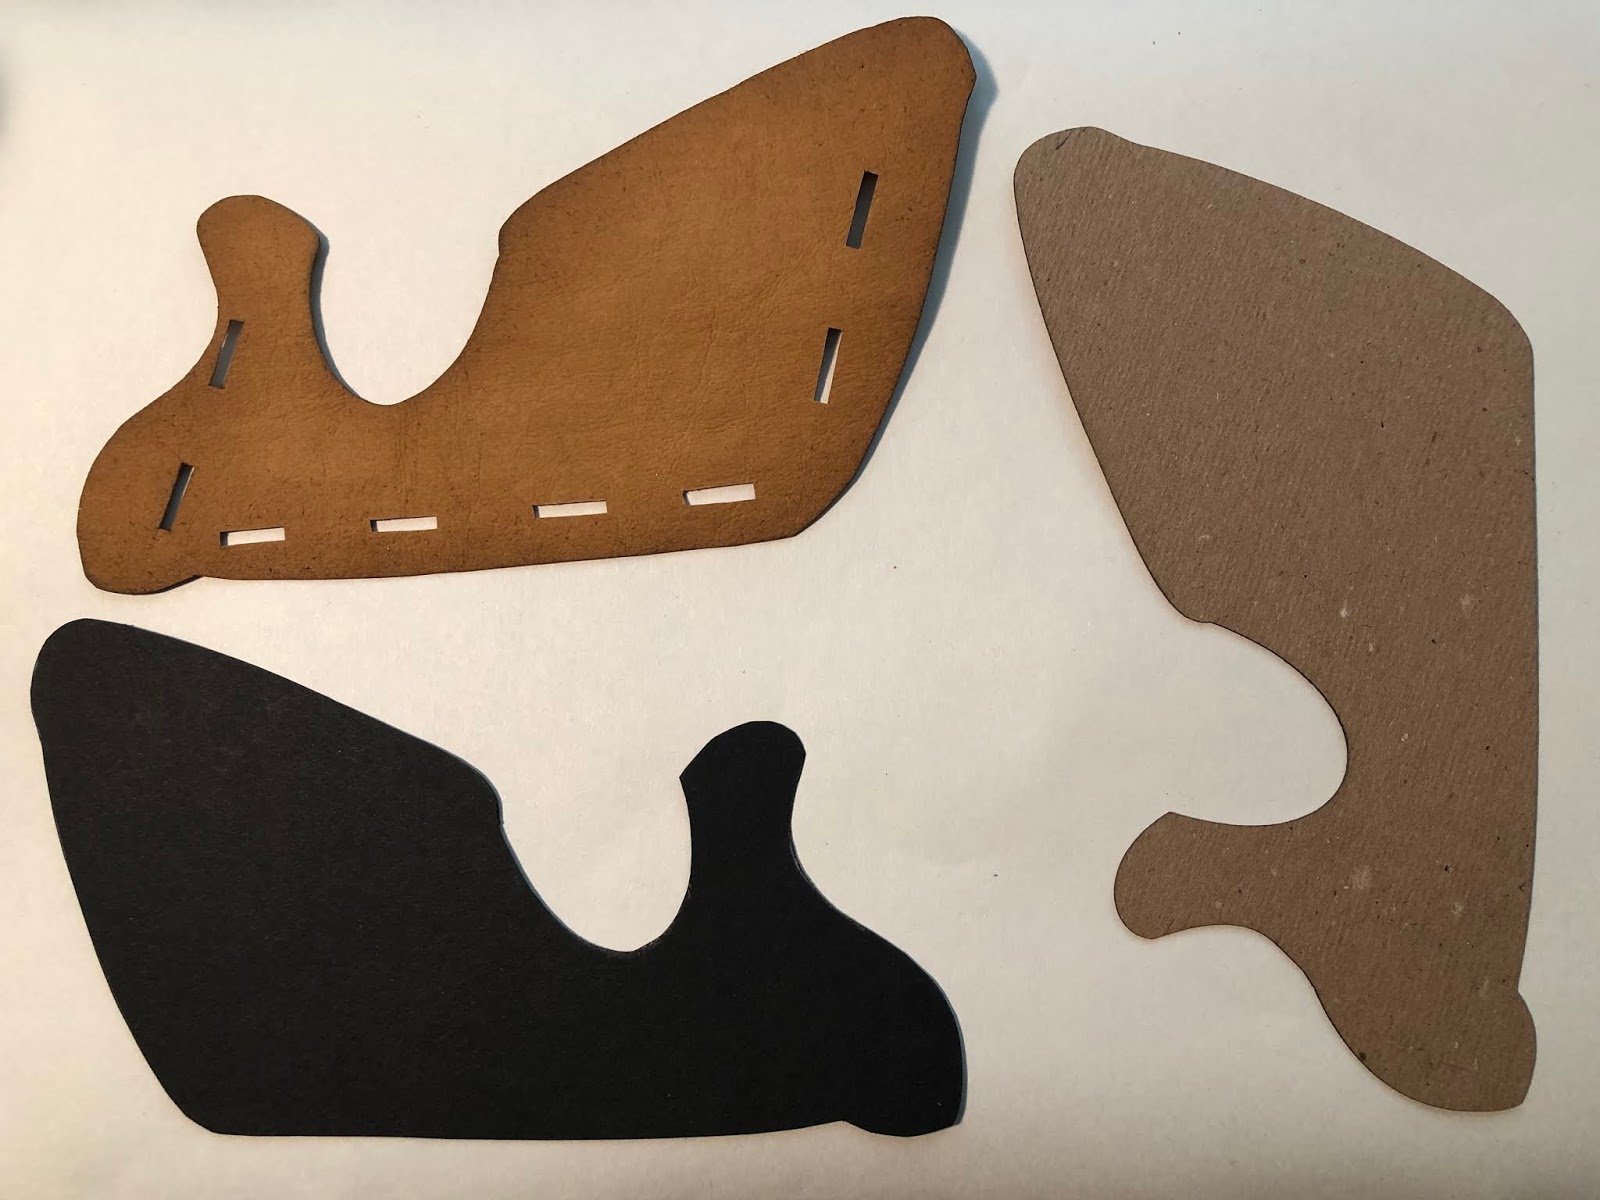
I want this sleigh to be used for multiple holiday celebrations. To avoid it having a distinguishable fall or Christmas look, I decide to use natural colored Kraft-tex. This will give the look of a traditional sleigh with leather interior. The Santa's sleigh set comes with a template that can be used to trace the basic sleigh shape (minus the decorative runners and fancy edge.) I use the template to trace the shape onto the reverse side of my paper. The shape is carefully cut out and labeled to match the surface it will be adhered to. I repeat this process for each of the interior surfaces of the sleigh.
Once all of the pieces are cut, I ink the edges and surface with distress ink. This gives an aged appearance. Before attaching the piece to the interior side, you will need to trace the slotted openings for the base, front and back pieces, then cut them out with an exacto knife. Be sure to test that the tabs are easily inserted into the openings before gluing down the paper.
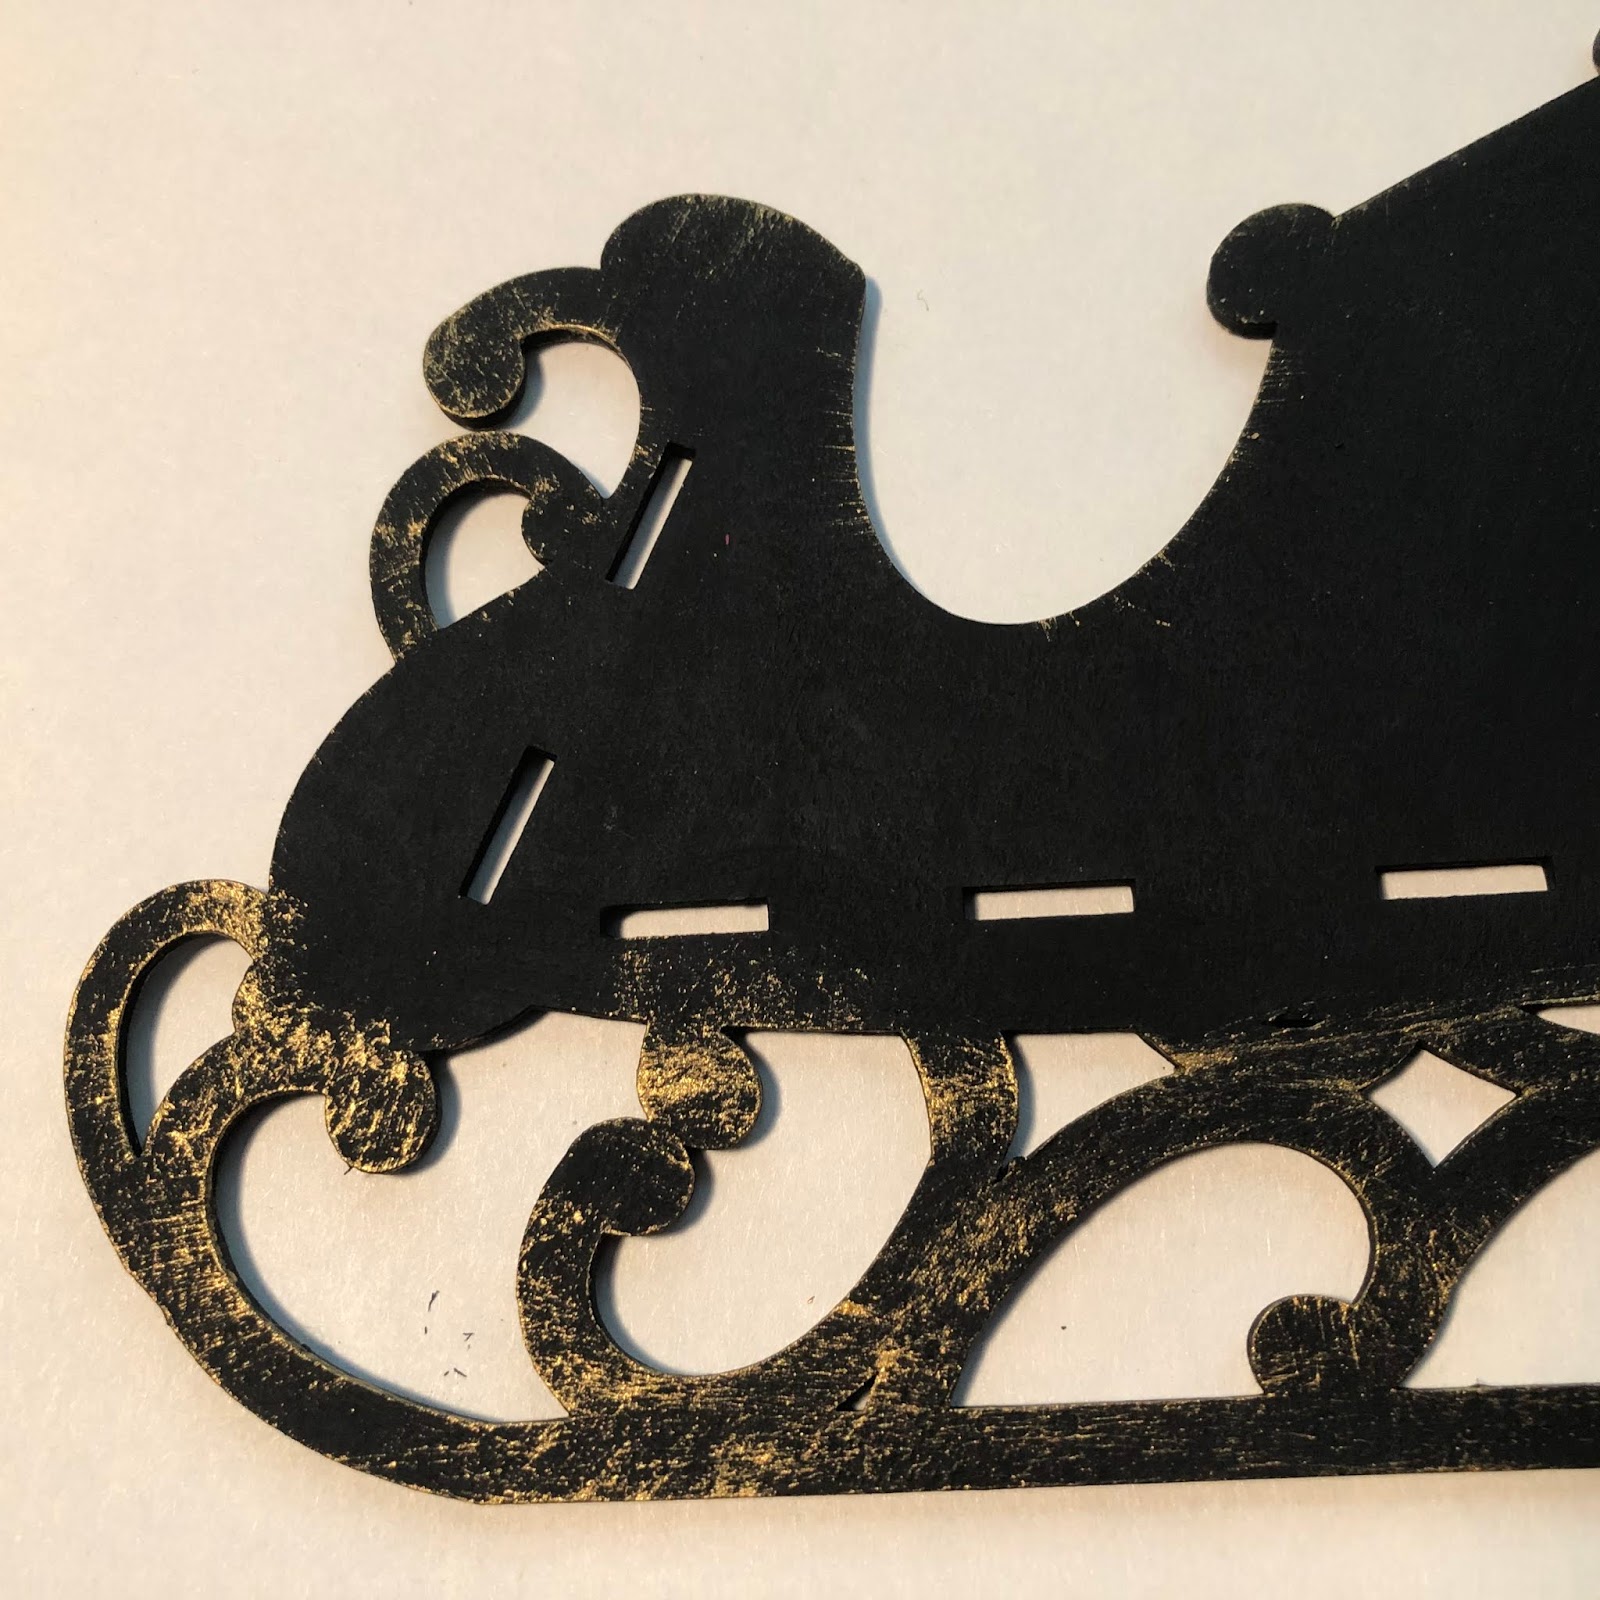
With all of the interior papers cut and ready to be attached, I return to the painted sleigh parts to add gilded details. This is much easier to add before the papers are adhered. Using an antique gold paint, I dry brush gilded edges and wisps of gold along the runners and edges of the sleigh. I add the gilded touches to all of the pieces where I want to achieve this look. Since I am essentially dry brushing the paint, it does not take long before everything is ready to be assembled.
I add collage medium to the back side of the paper, align it in place, then weight it down so it will dry flat. The same process occurs for both sleigh sides, as well as the front and back interiors. When the adhesive has cured, I dab glue onto the tabs for the base front and back panels and insert them  into the slots on each sleigh side, creating the three dimensional sleigh. Next it is time to add the decorative side panels to the exterior. I want to be sure that the slotted sections are not showing, so I use the template to create two black paper pieces. These are attached to the exterior sides before the decorative pieces. When everything is in place, I clamp the edges until the glue is dry.
I paint sections of the Acorn Border Set antique gold. These pieces are then dry brushed with black soot paint. When they are completely dry, I re-touch the acorn bottoms with the gold for highlights and to make them distinguishable.
I use gilded acorns in my holiday decor for both Thanksgiving and Christmas. This will be a nice accent for my sleigh that will tie it into both seasons.
 The finished acorn border set pieces are added the sides and front of the sleigh and it is ready to be filled with the splendor of the season.

"Over the river, and through the wood,
To Grandfather's house we go;
the horse knows the way to carry the sleigh
through the white and drifted snow.
Over the river, and through the wood,
to Grandfather's house away!
We would not stop for doll or top,
for 'tis Thanksgiving Day."
Lydia Maria Child

Thank you so much for taking time to visit today. 
I wish you all the happiness that holiday crafting brings, 
no matter which holidays you are creating for!
~Ann
  xxx


I am entering this project into the following challenges:
Simon Says Stamp Monday Challenge - Thanks/Thanksgiving
The Funkie Junkie Boutique Challenge - Fabulous Fall

supplies used:
black cardstock
clamps
Distress collage medium: matte
Distress ink: black soot, gathered twigs, walnut stain
Distress paint: black soot, antique brass
Exacto knife
Gypsy Soul Laser Cuts:
Acorn Border SetSanta's Sleigh
Kraft-Tex: natural
various paint brushes

Monday, October 28, 2019

the other side

Have you ever observed something so beautiful you were compelled to see what was inside?
The sheer beauty of it so incredible, you are drawn to it with no resistance.
That you succumb to the pull,
 only to find that what is inside is not at all what you had expected?
The other side is different,
 it is not glistening, it is somber, and quiet.
There are is no shimmering glory, only a dark and contemplative place.
This shrine was created drawing upon such an experience.
The Relics and Artifacts Gothic Arches Set spoke to me.
 Throughout my creative journey I have always admired the designs of the past.
The truly gifted architects and craftsmen that created everlasting structures.
I learned of them in my architectural studies, I researched them in my field experience, I draw upon them for their principals and attention to detail. I want to create a piece that reflects these elements.
I hope to invoke the warmth and glow of the stained glass windows that would be found within gothic mullions. The incredible clarity of vibrant colors and golden details highlighting everlasting designs. The same warmth that draws you to experience it from within. The exterior faces are finished using alcohol ink and gold paint, capturing the light like a beacon. The windows are stood on end to form a bay simulating a small chapel or apse.
Inside, I envision an old stone church. One created by masons, masters at their craft. The faux stone finish is stenciled on with texture paste and painted stone by stone, just as the structure would have been erected. A "wooden" floor mimics the timber floorboards.
And within the niche created, a statue of our lady, the Mother of Mercy stands. She is sculpted from Apoxie Sculpt and a Relics & Artifacts face, as taught by my fellow Muse, Sherry Matthews, in a 2016 Live from the Tribe video. The sculpture is painted, crackled and gilded. A somber presence, a reason to pause and reflect on all of the graces we have been given.
I have been blessed with many opportunities in my creative journey, 
both in the architecture field as well as the arts. 
I want to thank Sandra and David Evertson for the opportunity to be part of the Relics & Artifacts team these past months, 
and to wish them and my fellow Muse all the best as I continue on my artful journey. 

I truly appreciate you taking the time to visit today.
~Ann
xxx


I am entering this into the following challenges:


Wednesday, October 16, 2019

faerie hollow

Recently, my morning walks have left little doubt about the arrival of fall. Sightings of acorns and numerous pinecones littered across the path, falling leaves of varying colors, and the crisp air have me thinking about the creatures and faeries settling in for the coming winter. It inspired me to create something a little whimsical. Today I am on the Gypsy Soul Laser Cuts blog sharing faerie hollow, a little place to store some of my natural treasures found during my walks.
I begin with a Gypsy Soul Laser Cuts ATC sized faux book box. This box arrives flat, in 7 pieces. Whenever I create a three dimensional piece, I like to first put the pieces together without glue. This gives me an idea of what will go where, as well as a visual from which I can begin to imagine ways that I would like to decorate the piece. Once I have completed my "pre-assembly" I select a patterned paper that will be attached to the interior of the book.
I use the chipboard pieces as a template then cut the paper to the appropriate size. During this process, I always like to cut all my papers first. Then, once all of the cutting is complete, I adhere them. To keep track of which piece goes where, I label the back sides of the paper pieces with a letter or number and write that same letter/number on the corresponding chipboard. All of the writing ends up being covered when the papers are attached, it simply makes everything much easier when you are at the gluing stage. [Note: the insides of the box pieces will need to be sized to fit within the tabs, while the coverings for the outside edges of the box will need to extend to cover the interlocking tabs.] All of the edges of my cut papers are inked with gathered twigs distress ink. 
With all of the papers cut to size, the next step is to add paint to the chipboard. I paint all the edges of the chipboard pieces with brown paint. This piece is made of heavyweight chipboard so it doesn't warp when you add a thin coat of paint. I already know that I will be covering the book box with papers , so I do not bother to cover the entire pieces with paint, only the edges where my papers will end. The paint will give all the edges a more finished look.
When assembling the faux book box, I use a linen hinging tape along the spine where it attaches to the covers, this allows the "book" to open and close freely, without the worry of paper ripping or wearing out over time. If you don't have any hinging/binding tape, a piece of medical tape will also do the trick. Allow a gap between the spine and each cover. I cover the inside (gap) exposed portion of hinging tape with a piece of thin washi tape. This serves two purposes: covering any sticky portion of tape as well as presenting a clean and coordinating finished gap between the pieces. 
All of the cut papers are attached to the box with collage medium. If necessary, weight down the pieces while they dry to keep them from curling. For my purposes, I adhered the inside paper pieces then secured the box into the back cover piece, before I added the outside box covering (wood grained paper). You can work however you are most comfortable; however, if you would like to cut long strips of paper and wrap the outside corners of your box, it would be best to work like I have described. Be sure to cut out the slots from the base paper that will be attached to the back cover so that the box sides can easily fit into the openings.
When all of the interior papers are in place, I attach a faux wood-grained paper to the outside of the box portion of the book, as well as the back cover and spine. 
The "wood" is created with distress watercolor cardstock and the Sizzix Lumber 3D texture fades embossing folder. Once the grained pattern is embossed, I use a combination of inks, paints and mediums to create an authentic wood appearance. The papers are then cut and attached to the book box with collage medium. 
For the front cover, I cut a piece of Bristol to fit. I stamp some toadstools onto the lower section in archival ink, and color them with distress inks, using a water brush. The garden fairies small are the perfect scale for the stamped mushrooms. The set comes with six different fairies; for this piece, I am only using two of them. The rest will be used on a future piece.
I carefully remove the pieces and cover each one with Versamark embossing ink, then coat with a layer of mirror platinum embossing powder. The powder is heat set, then the fairies are set aside. Once cool, the fairies are attached to the cover paper with collage medium. Using a swirling stars stencil and perfect pearls, I add a bit of magic to the scene, which is completed by stamping the word "believe" in the upper left corner. 
When the book box is opened there is a small die cut mushroom in the corner of the box. I can't wait to begin filling this with small treasures found along my morning walks. 
I hope that you are inspired to create something of your own to keep your found treasures.
Thanks so much for stopping by today, 
I truly appreciate you taking the time. 
~Ann
 xxx 

supplies used:
Distress Archival ink
Distress Collage Medium: matte
Distress Crayon: black soot
Distress inks:
brushed corduroy, fired brick, forest moss, fossilized amber, tea stain, vintage photo, walnut stain
Distress Paint:
black soot, ground expresso, gathered twigs, vintage photo, walnut stain,
Emerald Creek Embossing Powder: mirror platinum
Gypsy Soul Laser Cuts:
ATC Sized Faux Book BoxGarden Fairies Small 
Linen Hinging Tape
Perfect Pearls: heirloom gold
Tim Holtz Ideaology paper stash: wallflower
Tim Holtz / Sizzix:
funky foliage dies, lumber 3D texture fades
Tim Holtz / Stampers Anonymous:
tiny toadstools, SSS Stamptember stencil
VersaMark embossing Ink