
As as the summer days grow shorter and preparations begin for the return to school, I often find myself contemplating the ocean. Maybe its the ebb and flow of the currents or perhaps just the peaceful lull it can induce. Regardless of the reason, whenever my thoughts drift to this wondrous aspect of nature, I often times envision the great depths where ships have gone to lie and sunken treasures abound. This is my inspiration for today's piece.


I want the treasure chest to be finished on both the inside as well as the outside. I plan to finish the inner sides of the pieces before it is assembled, this is most easily completed using paints. I paint the inner sides of all the pieces that will be exposed with distress paint creating a look that will closely mimic the exterior finish I am planning to use.

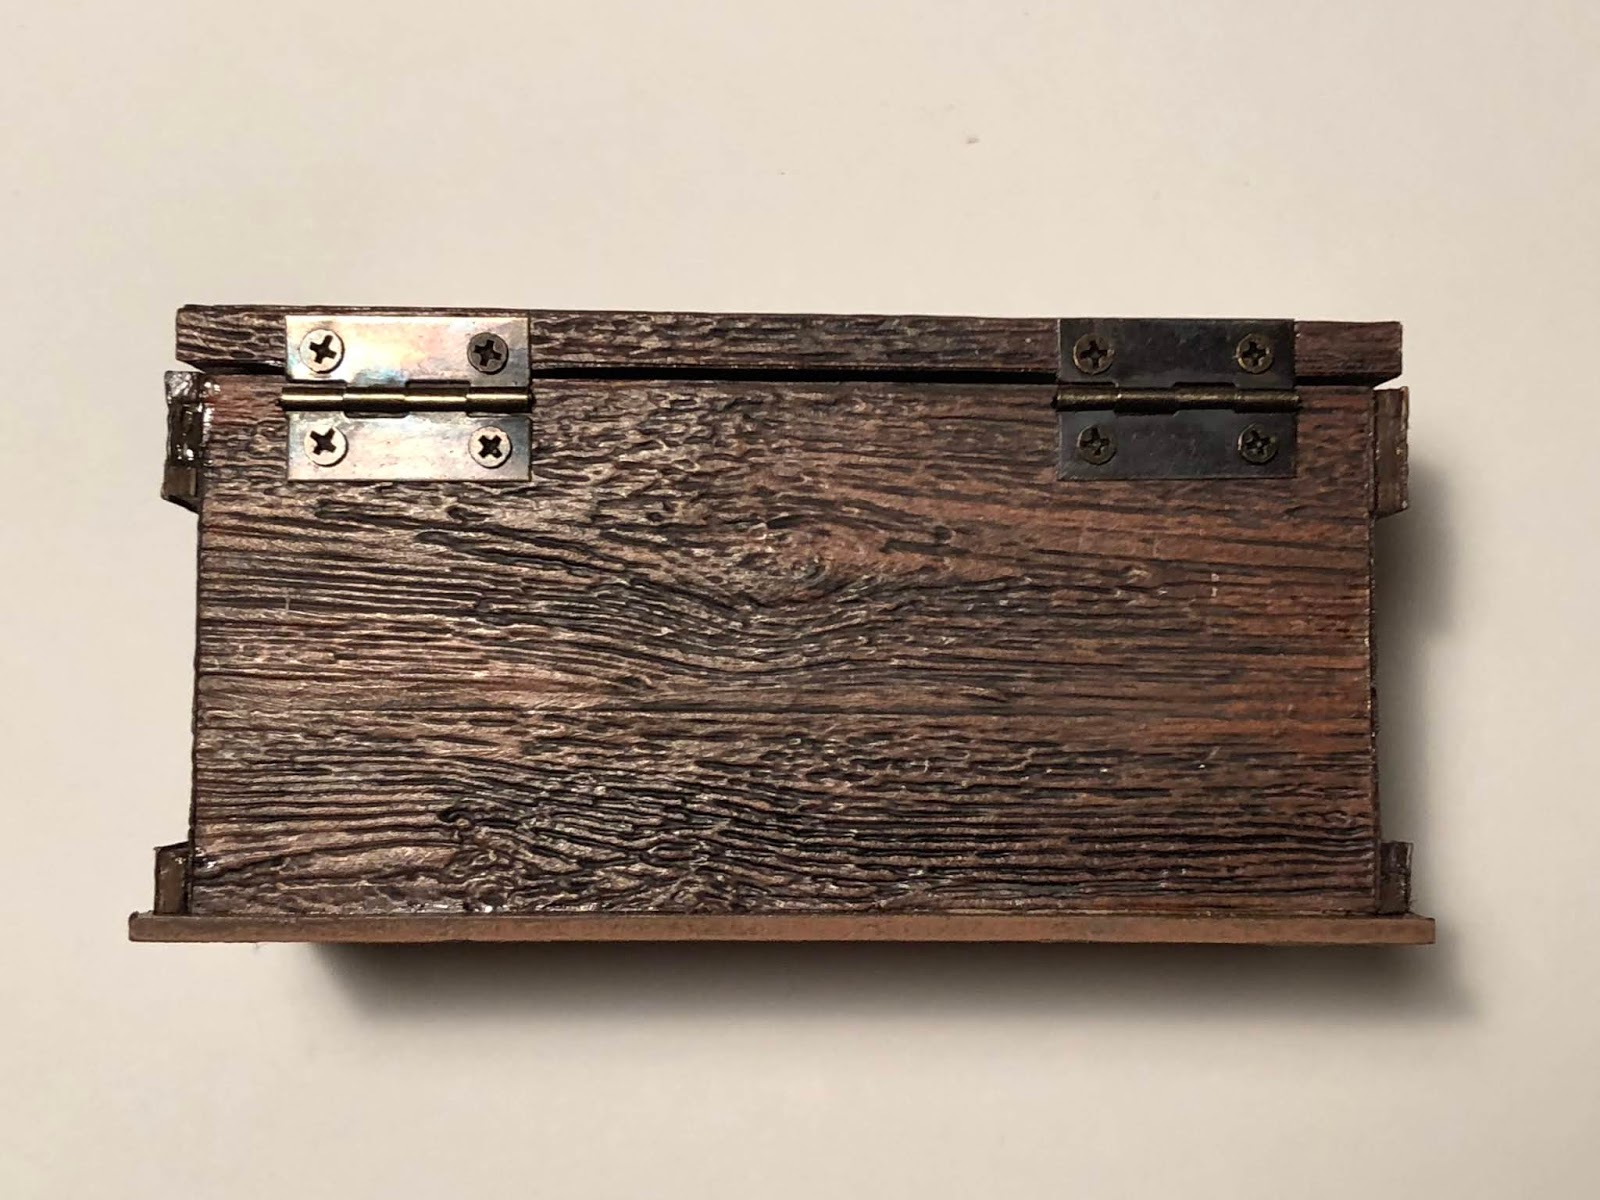
The exterior of the treasure chest is covered with embossed wood grain paper that has been painted to look like real wood. I am awed by the incredibly realistic look of this new 3D folder. In order to achieve a finish that might appear on an old sunken chest, I emboss pieces of watercolor paper and color them with vintage photo spray stain and a bit of water (to move the stain around) then allow to air dry. Once dry, I coat the pieces with vintage collage medium. When this has completely dried, I paint a layer of walnut stain distress paint on the pieces and wipe mostly off with a damp cloth. This layer is dried with a heat gun. I color areas with black soot distress crayon and rub around with a wet finger to get the pigment into the crevices. I am really pleased with the result.

These "wood" papers are cut to fit each exterior side of the treasure chest. I adhere them with collage medium in matte vintage finish. I also cover the top of the lid with this paper. After covering the sides, I realize that the embossed paper is fairly thick and affects the wood strapping pieces. I decide to modify the chest a bit. I cut the bottom strap in half lengthwise and apply the exterior finish paper. This wraps the chest on the front and both sides. The top strap is also only used on the from and sides. I use the remaining pieces as blocking inside the chest when I attach my hinges.


Once all of the exterior papers are applied, I install two hinges at the back of the lid. The small antique brass hinges have tiny screws that are easily attached by poking a hole and simply screwing into the chipboard. A latching mechanism is installed on the front of the lid to keep it closed.


With the added hardware, the box can be be displayed in an open position, if desired.

I love how the treasure chest looks even before I begin to embellish it to become a sunken treasure chest. This piece could be used in so many different ways, even as a simple keepsake box.

Now that the base of my project is complete, I set to making all of the pieces to create an undersea scene. I use multiple greenery dies and cut prices to mimic sea grass, coral and kelp. All of these pieces are colored with distress inks. The coral pieces are colored with distress oxide and when dry, I coat them with a layer of glue and sprinkle with rock candy glitter. This gives it a bit of texture and sparkle. When I create my embellishments, I always like to make a lot more than I believe I will need. This gives me more flexibility in placement, and whatever is left over I simply keep for future projects. I also put together a couple of mermaids from some favorite stamp sets. The mermaids are colored with distress inks, and copic markers then embellished with pieces of the die cuts and small shells. I also add some finish to a few resin blanks that will complete my scene.

The die cut pieces are adhered to the treasure chest with a multi purpose adhesive and allowed to dry.


Lastly, I add some vintage jewelry to "spill" out of the treasure chest, and arrange the two mermaids. I prop open the chest with a golden edged shell and miscellaneous
relics and pearls adorn the scene.

I hope that you enjoy these final weeks of summer, and perhaps this sunken treasure has inspired you to get creative. I truly appreciate you stopping by today.
~Ann
Frilly and Funkie Challenge: Back to Nature
Catherine Moore Character Constructions Stamps:
She Sells Seashells #1, #5, #7
Copic markers:
E000, E00, E02, E04, E21, E57, 0, YR000, YR000
DecoColor Premium gold metallic paint marker
Distress collage medium: matte, vintage
Distress crayon: black soot
Distress Inks:
bundled sage, cracked pistachio, forest moss, ground expresso,
lucky clover, mermaid lagoon, peeled paint, walnut stain
Distress Oxide Inks:
fossilized amber, wild honey
Distress Spray Stain: vintage photo
Distress Paints:
black soot, vintage photo, walnut stain
Distress Stickles: clear rock candy
Gypsy Soul Laser Cuts:
Sandra Evertson Relics and Artifacts: Coquille
Tim Holtz/Ranger:
Distress watercolor paper, Mixed Media Heavystock
Tim Holtz/Sizzix 3-D Texture Fades: lumberTim Holtz/Sizzix Thinlits:
funky floral 1, funky floral 3, garden greens, holiday greens


24 comments:
I LOVE THIS!!!! I think this is one of my favorites of all time. Thanks for sharing.
Wow! That faux wood technique is so realistic. Love the little chest all by itself but with your greenery and mermaids it is just gorgeous! Beautiful art and beautifully written post❤️🧜♀️
The color you got on the wood grain is just phenomenal. Really fantastic project!!
Thank you so very much, what a wonderful thing for you to say! I truly enjoyed creating the treasure chest and all of the sea life. These mermaid stamps are some of my favorites! Thanks for stopping by, I truly appreciate it. xx
Thanks so much Linda, I am truly grateful for your kind words, they mean so much to me! hugs to you xx
Thank you, it truly amazed me while I was working on it! Thanks so much for taking time to stop by and leaving some love. x
I know I keep saying this, but this really is a treasure in itself Ann. I just love the beautiful wood grain you created, the mermaids are beautiful and the greenery is just the perfect finishing touch on this wonderful creation! A brilliant make! Hugs, Anne xx
Thank you so much Anne, it truly warms my heart to have you say this. Your comments mean so much to me and I really appreciate you taking the time to stop by the blog and say so! hugs, Ann xx
Wonderful wooden treasure chest, Ann! The wood effects are outstanding, and I'm so happy you showed that closeup of the completed panel--wowsers! What authentic grain and colors! I love the details of the mermaids, seaweed, and shells to make this into an under sea sunken treasure! Truly, you are amazing! And so is your photography! It just occurred to me that this fits in perfectly with our current Back to Nature challenge at Frilly and Funkie! I hope you will consider playing along! Sending hugs!
Thank you so much Sara Emily, your comments always brighten my day! I just love this wood texture that can be created with simple paper and pigments. I appreciate you stopping by, and definitely I will consider entering it into the Frilly and Funkie challenge, I do so love their store and all of the projects in their challenges are so inspiring. hugs to you! ~Ann xxx
Love love love every bit of this!! The chest is fabulous!
I'm back to say I was delighted to see you played along with our Back to Nature challenge at Frilly and Funkie! Thank you, too, for leaving that sweet reply! Hugs for today!
always enjoy your inspiring art Sara Emily! xx
Thanks Anita! I truly appreciate you visiting my blog and always love your comments, they really are special to me. Hugs to you xxx
Awe Ann! This is just wonderful! I LOVE the textures on that chest- how very very cool!! I love your opening paragraph,made me feel like I too was being lulled by the ocean!
hugs my friend,Jackie xx
You are the sweetest ever, Jackie! Thanks so much for visiting, it really means a lot to me that you follow and your comments truly are so special to me. hugs! ~Ann xx
That is some gorgeous texture! Love your hidden treasure box with the sweet mermaids. Thanks for playing along in the "Back to Nature" challenge at Frilly and Funkie!
Oh, my word! This is such an amazing assemblage! You had me at ocean, by the way! The textures in that treasure chest are amazing! I thought it was a real wood box until I saw the steps in your marvelous tutorial. I love your color choices, the wonderful details and the whimsy of this piece! Thanks so much for playing along in our Back to Nature Challenge at Frilly and Funkie!
Thank you so much for stopping by! I was so amazed at the results when playing with the 3D folder, and thought it would create an amazing faux box. I always enjoy seeing all the inspiring posts in the F&F challenge, so much talent. ~Ann x
Thank you so very much for your kind words, this was so fun to make, especially after the idea for the treasure chest to hold. Any excuse to break out the mermaid stamps is always fun! I really appreciate you taking the time to stop by for a visit. ~Ann x
Your chest is amazing! Thanks for joining in the Frillie and Funkie Challenge.
What a wonderful weathered wood treasure chest - you've made that embossed paper look exactly like aged wood. I'm a little less serene about sunken treasure and ships - they slightly give me the heebeejeebies, I'll confess - but as long as your lovely chest hasn't actually been at the bottom of the ocean, I'll continue to love it!
Alison x
Thank you so much Maggi, I appreciate you taking the time to visit! ~Ann xx
Alison, your comment gave me a smile. Thankfully, this chest has not been to the bottom of the sea, the paper may turn to pulp, lol! I am amazed each and every time I work with papers and the 3D embossing folders, they truly form the basis for a real wood look. Thank you for stopping by, I really appreciate it! ~Ann xx
Post a Comment