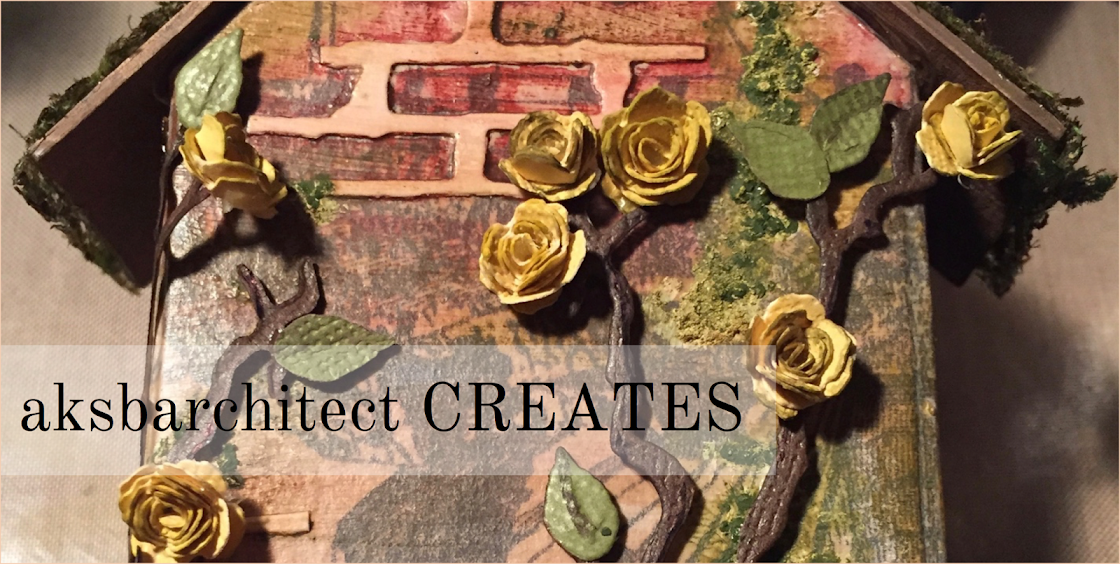
Hi everyone, the current topic over at the PaperArtsy blog is Vintage PaperArtsy stamps. This topic had me thinking contemporary ways to use these incredible vintage style images.
I decided I would try my hand at making a modern jewelry piece with resin; a clean and simple design that will allow the image to be the main focus. I learned a lot with this project, especially when it came to stamping on non-porous surfaces. While the process was definitely a struggle for me, the modern filmstrip jewelry pieces turned out better than I had hoped, definitely showcasing the vintage stamped image in a contemporary light.
I would love for you to visit the PaperArtsy blog to check out my process and see the different pieces that I created. You can read the blog here.
Thanks for stopping by, I hope that maybe this will inspire you to try something new with your own vintage stamps, or maybe even with a few new ones. I love the different collections available from PaperArtsy, there is a style to fit any need.
Hello everyone, I have a post on the PaperArtsy blog sharing some cards that I made for the "with 3 things" challenge. I was so excited to be able to participate in this new feature, especially to be able to stretch my imagination and creativity using the wonderful PaperArtsy products.
When my package arrived, I was looking forward to seeing which three products were chosen for me to create something with. I was certainly not disappointed! These new PaperArtsy Hot Picks stamps (HP2401) drew me in from the moment I watched the release video. This set contains wonderful small graphics, perfect for backgrounds as well as some bolder sentiments that could work in journals or on cards, even layered into a mixed media piece. Just as exciting is the package of Crunchy - Waxed Kraft Paper (WKPA5), oh the possibilities! I love the natural brown color of this paper and the waxed coating that gives way when the paper is scrunched up creating a web-like effect is simply divine. I have always wanted to experiment with just how much this crunchy waxed paper could handle and this was my chance! The final product included was a jar of PaperArtsy Infusions Just Walnut. Now this was a treat! The infusions line is so interesting and creates such beautiful finishes where each color includes some of these walnut crystals, but to have a jar of simply walnut crystals, it is pure joy. Now, I must admit, once I unpackaged these "3 things" my imagination went into overdrive. so many ideas came to mind. I may even have a little pile of experiments, as well as need to finish pieces, stacked on the corner of my table.
If you hop over to the PaperArtsy blog, you cab find a few more details about the cards I created and my experiments with these wonderful products.
I can't wait to send out my cards! I loved being able to take part in this new feature on the PaperArtsy Blog. I hope that maybe you have been inspired to pull out a few supplies and spark your own imagination.
Hi everyone, I am excited to share that I have been asked to join the PaperArtsy Blogging Team! I have been using various PaperArtsy products in my projects for many years and love the results that I can achieve with them. For anyone that may be unfamiliar, PaperArtsy produces wonderful supplies for crafting and art. Some of my favorites are their red rubber stamps, with many different collections, each having different styles, all of which are incredibly detailed and beautiful. Another favorite of mine is the PaperArtsy line of Fresco Finish Chalk Acrylic Paints. The colors are gorgeous with a finish that is perfect for layering and stamping! Their Infusions are water soluble particles with 2 components: a fine permanent dye color pigments mixed with a walnut crystal particle. These create the most interesting results when activated with water or any other wet medium. I am very excited to create for PaperArtsy, it is truly an honor to be among their talented team of artists.
Today I am on the PaperArsty Blog sharing my first project. The current topic is Miniature, and I have created a miniature under the sea book with tea bag pages. The post has all the details from how I created the translucent pages, to coloring the beautiful aquatic stamps, and adding the mixed media elements. I would love for you to head over and check it out. The pages contain the lines from the poem The Ocean by Nathaniel Hawthorne.
I am looking forward to the coming year and working with and creating for PaperArtsy. While my projects are all my own creations, PaperArtsy provides products as well as compensates me for my work. PaperArtsy is based out of France, however, their products can be found around the world at different stockists. You can find the current list of stockists here.
Don't forget to check out the PaperArtsy Blog. Thank you so much for stopping by, I truly appreciate it!
"Fate is the cards you were given when you were born. Destiny is what you do with them."
- Gina E. Jones
The StencilGirl® collaborations that Tina Walker dreams up are always an adventure! They challenge me to try new techniques, incorporate stencils into my artwork in unusual ways, and light a creative spark within me. The altered playing card collaboration was no different. The challenge delivered was simple: "alter a complete deck of playing cards. It can be as simple as collaging stenciled paper on the back sides of each card or as elaborate as altering both sides of each card with doodles, drawings, and (of course) stenciled parts using StencilGirl® stencils."
"we cannot change the cards we are dealt, just how we play the game"
-Randy Paulsch
The first order of business was to find a deck of cards to alter. My initial creative musings over how I would complete this challenge involved collaging stenciled papers to the deck in ways that would allow the cards to still be usable for playing games. With no intention to completely cover the cards, I wanted a deck that would provide an interesting base layer to build off of. I chose a deck of stylized Bicycle playing cards called Bourbon. I loved the coloration and thought that altering the face cards (or in particular their clothing) would be akin to creating paper dolls... In my eagerness to get started, I seem to have disregarded the actual size of a deck of cards. When the deck arrived, I realized that it would be nearly impossible to showcase stenciling in the areas that would be "clothing." I did however, love the coloration and retro vibe that the deck seemed to have. I needed to take a step back and reassess my original idea.
"Life consists not in holding good cards, but in playing those you hold well."
-Josh Billings
Each new idea that popped up was centered around the different suits in the deck, which would be a dead giveaway for anyone that would ever use this deck for playing a card game. This opened my mind to creating something altogether different from my altered deck. With the restriction of maintaining the integrity the card values removed, the possibilities were endless.
"Destiny plays its cards in a way that no one can comprehend."
-Anurag Shourie
I decided that I would create an interactive book with my deck. One that would contain inspiring quotes based on card playing, and that would showcase the style that drew me to this particular deck in the first place. With a plan in place, I searched through my ever growing stash of StencilGirl® stencils and chose a set that I felt would enhance the retro vibe of the deck. The Retro Chic stencil set by Lizzie Mayne contains five distinct designs, one larger and four smaller scaled stencils. For this project, I used three of the smaller scaled designs.
"The key to success is playing the hand you were dealt like it was the hand you wanted."
-Kaitlyn Walsh
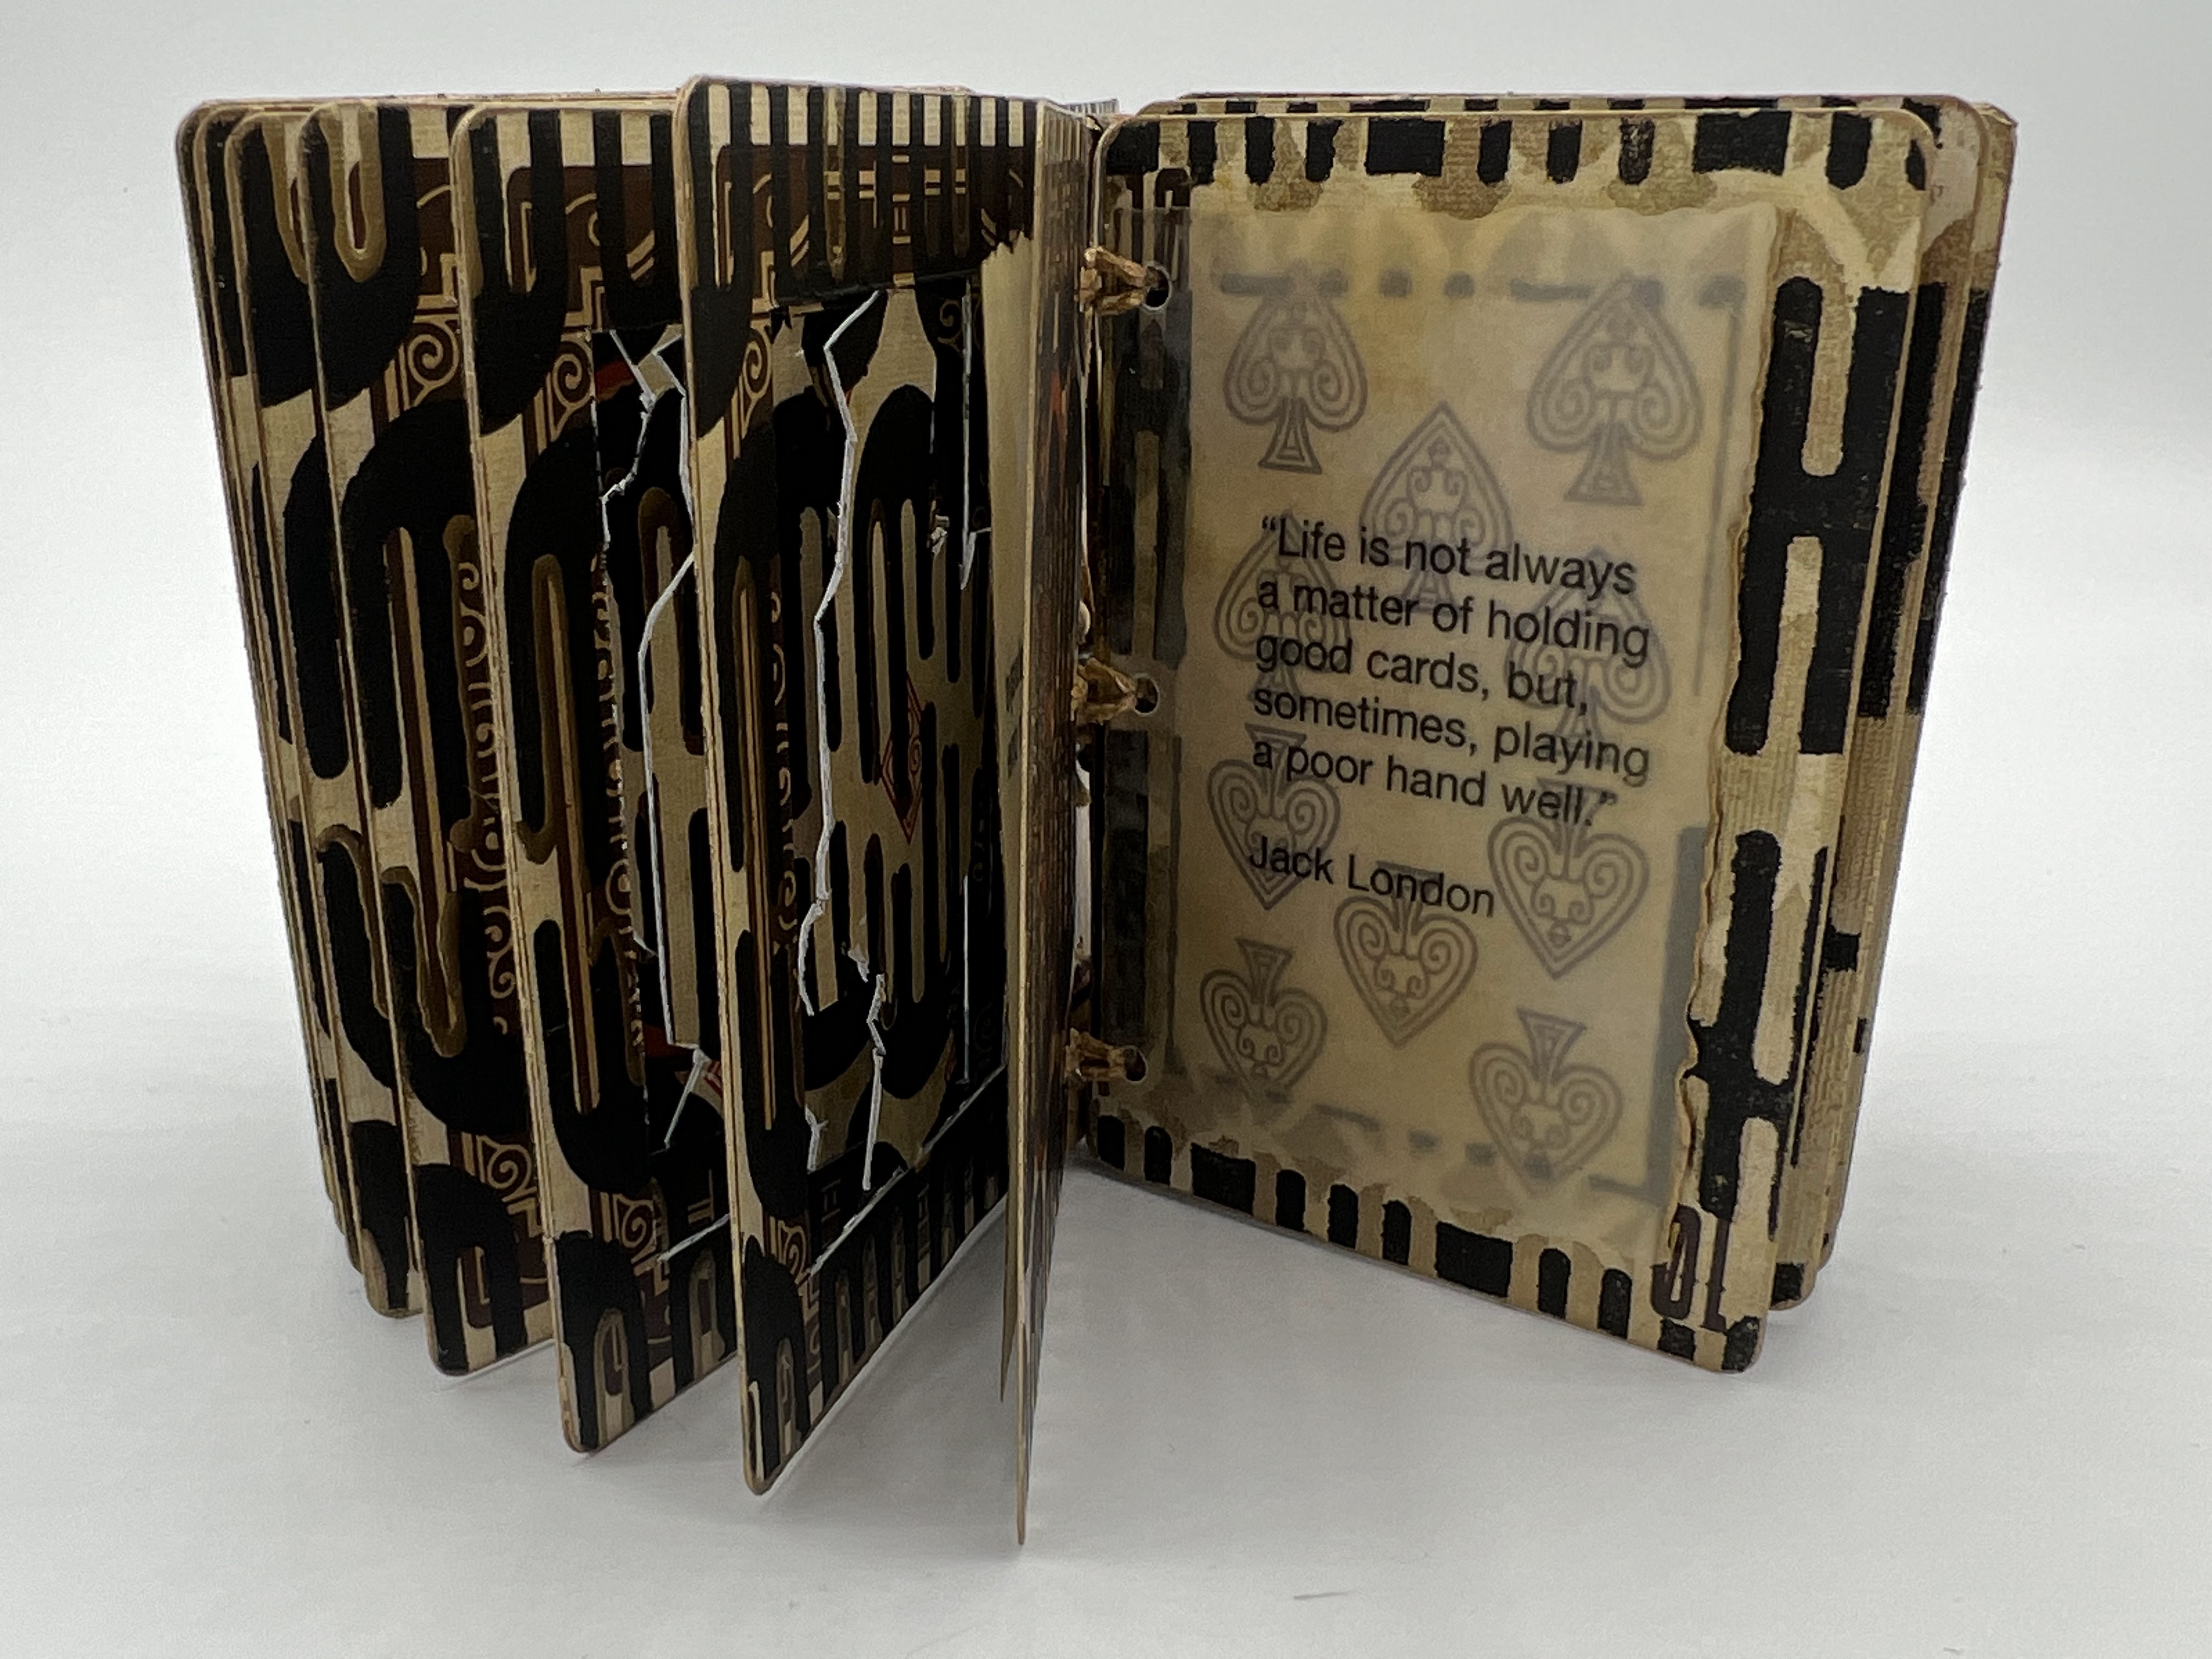
Within my book, each of the face cards has a central, rectangular portion removed. A matching rectangular section was removed from a number card of the same suit. A piece of clear fishing line is sandwiched between the two rectangles, which extends beyond the edges at both the top (crown) and bottom (vestments). The rectangles are glued together and then allowed to dry completely flat. I fussy cut each "royal" person from their respective rectangle. Since I intend to leave the face side of each royal unaltered, I stencil the "face side" of the outer frame pieces prior to assembling the spinning sections.
"One should always play fairly when one has the winning cards."
-Oscar Wilde
The "face side" frames contain two layers of stenciling, first a layer of Golden Bronze iridescent acrylic paint is lightly stenciled through one of the designs. Once this layer has dried, a second layer of stenciling (through one of the other designs in the set) is added using black gesso. The easiest way to accomplish a uniform design on a large number of cards is to create a "jig." I use a masking tape guide to align each card in the same position. Once I determine the optimal stencil placement, the stencil is taped down at the top creating a hinge so that I can lift it between each card. While everything is set up, I also stencil the "face side" of each of my number cards while covering the central area with a mask. I stencil all of the cards with the first layer before changing the "jig"to accommodate the second layer of stenciling. The stenciling on the back sides of all cards is completed once the spinning pieces are in place. This allows the stenciling to line up when an open page abuts one that is solid.
"Life is not always a matter of holding good cards, but sometimes, playing a poor hand well."
-Jack London
To assemble the framed spinners, I locate the frames that match each royal person. Then, placing the fussy cut piece in the center opening, the extended ends of fishing line are sandwiched between the two frames, which are then adhered together. This can be done using double sided tape or glue, whichever you prefer. I used glue; however, using tape would be just as effective and also not require additional drying time. To create a uniform thickness for the book pages, you can also double up the number cards. When all of the page assembly is complete, it is time to stencil the reverse sides.
"Its not the cards you have that make you a winner or a loser."
-Doyle Brunson
The easiest and most efficient way to create a uniform appearance is to use the"jig" method described above. The reverse sides have one layer of stenciling, done with black gesso. When all of the stenciling is dry, I add gold details using a fine liner filled with acrylic paint. The detailed cards are set aside to dry overnight.
The number cards in my book each contain an inspirational quote based on card playing. Each quote is printed on an inked vellum rectangle then attached to the card.
I cut chipboard to create the front and back book covers, these are covered with coordinating handmade paper. Stenciled cards are attached to the front and back.
Following a YouTube video by Lisbeth Degn, I utilized a slip Knot binding technique. This type of binding works perfectly for individual pages. Each of my pages have three holes along the leading edge where the waxed cord knots them together.
Click below for a flip through video of my altered playing card book.
One of the best parts of the StencilGirl® collaborations is being able to see the other ways that artists have interpreted the challenge. Check out all of the awesome altered playing card projects that were created foe this challenge in Tina's blog post on StencilGirl Talk.
Thanks so much for stopping by the blog today to check out my project, I truly appreciate you taking the time. I hope that maybe you will be inspired to create something today.
Hello everyone, I have some exciting news to share with you. Earlier this year, I was invited to be a contributing artist for the 2023 Artist Almanac. Nineteen artists submitted artwork that was used to create this incredible resource.
In a nutshell, the 2023 Artist Almanac is one part calendar plus one part inspiration and a whole lot of collage material! 365 days of daily collage-able artsy bits of paper. Tear it away each day to reveal a new piece of work from one of the 19 contributing artists. You can then use the past days as an art supply in any way you can imagine! The paper is perfect collage weight and the artwork/graphics are gorgeous. This is definitely a tool that will become a studio essential.
Here's a preview of some of my artwork that is among the pages:
Each contributing artist has their own available inventory. All of the calendars will go on sale at the same time. These limited edition calendars will go live on Monday, December 5th 2022 at 8am EST.
I will have 45 available for sale in my Etsy shop.
Here is the link if you are interested in purchasing one:
It's my understanding that last year the calendars sold out in hours, so I wanted to be sure to let my blog subscribers know in case you are interested in purchasing one!
Each calendar measures 2.75" x 3.75" and is $24.99 plus shipping.
Once they sell out they are gone, only a limited number were produced.
The 19 contributing artists and their social media links:
Some of these artists I have followed for many years, while others are new acquaintances, but ALL are incredibly talented! Whether or not you are interested in the 2023 Artist Almanac, I definitely recommend a visit to their sites to check out their art.
Thanks so much for taking the time to stop by my blog today, I hope that this finds you well as we wrap up 2022 and head into the new year!
It's an All Hallows' Eve Masquerade at Lost Souls Garden and the guests have traveled from near and far to join in the fun! Follow along as I introduce you to everyone...
For this collaboration project, we were each asked to create a Halloween themed piece using StencilGirl® stencils and a chipboard roloDEX tray and cards by UmWowStudio. We were to use any other supplies we wished for the theme, and to let our imaginations take us where they may. The pieces created by each artist are truly wonderful, each a unique representation of the artists' style. It is definitely worth a hop over to the StencilGirl® Blog to check them all out. You can click here to visit.
Now, onto the details for my All Hallows' Eve Masquerade Attendees inDEX.
I began by assembling the tray, using glue to secure the pieces in place. Once dry, I spray painted the base tray black. The exterior sides were covered in backdrop paper (by Tim Holtz). Next, I traced the Botanical Wildflowers stencil (L774) onto black paper and cut out the pieces by hand. These pieces were then glued onto the outside of the tray to create the "garden." An inked Idea-ology quote chip and resin skulls (for feet) were added to complete the base tray.
With the base tray complete, it was time to begin creating the cards that would fill it up. I wanted to create a garden gate to welcome all of the guests. Using a retired Tim Holtz Sizzix die, I cut two Gothic Gates out of heavyweight paper and adhered them together leaving the bottommost edges separate. the two bottoms were then glued to either side of a painted spine that would slide onto the DEX rails. Tiny type uppercase die cut letters were used to form the words Lost Souls Garden, and Golden bronze irridescent paint highlights were added.
To further create the setting, I added a spooky moon with bats and shadowed vines. Using a half circle tall card, I painted a base layer of Golden bronze iridescent, then stenciled the Linear Textures (L857) vines with black gesso. The bat confetti pieces were painted with gesso then glued onto the "moon".
The next piece we encounter is the Masquerade announcement, an altered Idea-ology baseboard frame. The highlight of the announcement being the reverse side, where I used the Botanical Wildflowers (L774) mask and lightly applied the Golden bronze iridescent paint around it, creating an ethereal appearance.
The line up of attendees begins with the Forsaken ones, Alice and Herman. Each of these lost souls were abandoned at an early age; neither have been able to find their soulmate. They have both donned their fineries in the hopes of finding someone special at the event. The halos for both of the Forsaken were created using the Beautiful Halo (S543) stencil, with modification.
Henry, the Undertaker, wears his majestic wings. Having to spend all his days with the dead, he looks forward to meeting up with other souls at the Masquerade. Henry's halo features the Beautiful Halo (S543) stencil, he also has a special detail on his lapel using a stencil from ATC Mixup Missigman #2 (L793).
The Gypsy, Madam, has traveled the world, oftentimes being called a weaver witch. Madam is always on the lookout for unique fabrics and fibers with which to weave her wonderful textiles. She has been known to cast spells through her complex weavings. Faithful Halo (S545) creates the perfect backdrop for this attendee, whose woven skirt was made using the DEX weaving frame.
The Apothecary has volunteered to utilize his formulation skills and serve libations at the Masquerade. Clyde fancies himself a concoction connoisseur. He has a modified Faithful Halo (S545) to highlight his dapper attire.
The next attendee is Palm Reader, Rosalie. When she is not reading palms, she can most often be found reading tea leaves, her true passion. I modified the Beautiful Halo (S543) stencil to incorporate some Botanical Wildflower (L774) stencil parts reflecting her talents. Rosalie's dress has an overlaid pattern from ATC Mixup Missigman #1 (L792)
The last Masquerade attendee in the tray is the Fortune Teller. Everett has his secured his future by predicting others'. Growing up, his favorite pastime was creating stories for his peers of where their futures would lead. After learning that many of his predictions became reality, Everett accepted his extra sensory abilities and decided to make a living from them. Lost souls are his favorites to work with. Faithful Halo (S545)
The final piece in my project is another Idea-ology Baseboard frame featuring the poem Night. The reverse side has been treated with the same technique used on the announcement, highlighting the Botanical Wildflowers(L774) mask.
I truly enjoyed creating each of these pieces, and look forward to adding more. Working with the roloDEX system is addictive and playtime with StencilGirl® stencils is never ending fun.
It is always a pleasure to be part of Tina Walker's StencilGirl® Collaborations, and this Halloween themed project was no exception. I hope you can stop by the StencilGirl® Blog to check out all the awesome projects that were created!
Thanks you for visiting my blog today, I truly appreciate it.
Hello everyone, today I am excited share a handmade book I created for the most recent StencilGirl® collaboration hosted by Tina Walker. The concept behind this challenge was fairly simple: each artist would receive a vintage 13 Days Adrift booklet. You would then deconstruct and reconstruct a book/journal with a technique/style of your choosing. You were welcome to use the original book however you chose, as long as it was incorporated into your new book.
The rules were as follows: pick one shape of stencils to be used throughout your book, the book pages must be created in black and white (and all shades of grey), you can use any mediums (as long as they are black white or any shade of grey), and you can use any theme, structure, or story.
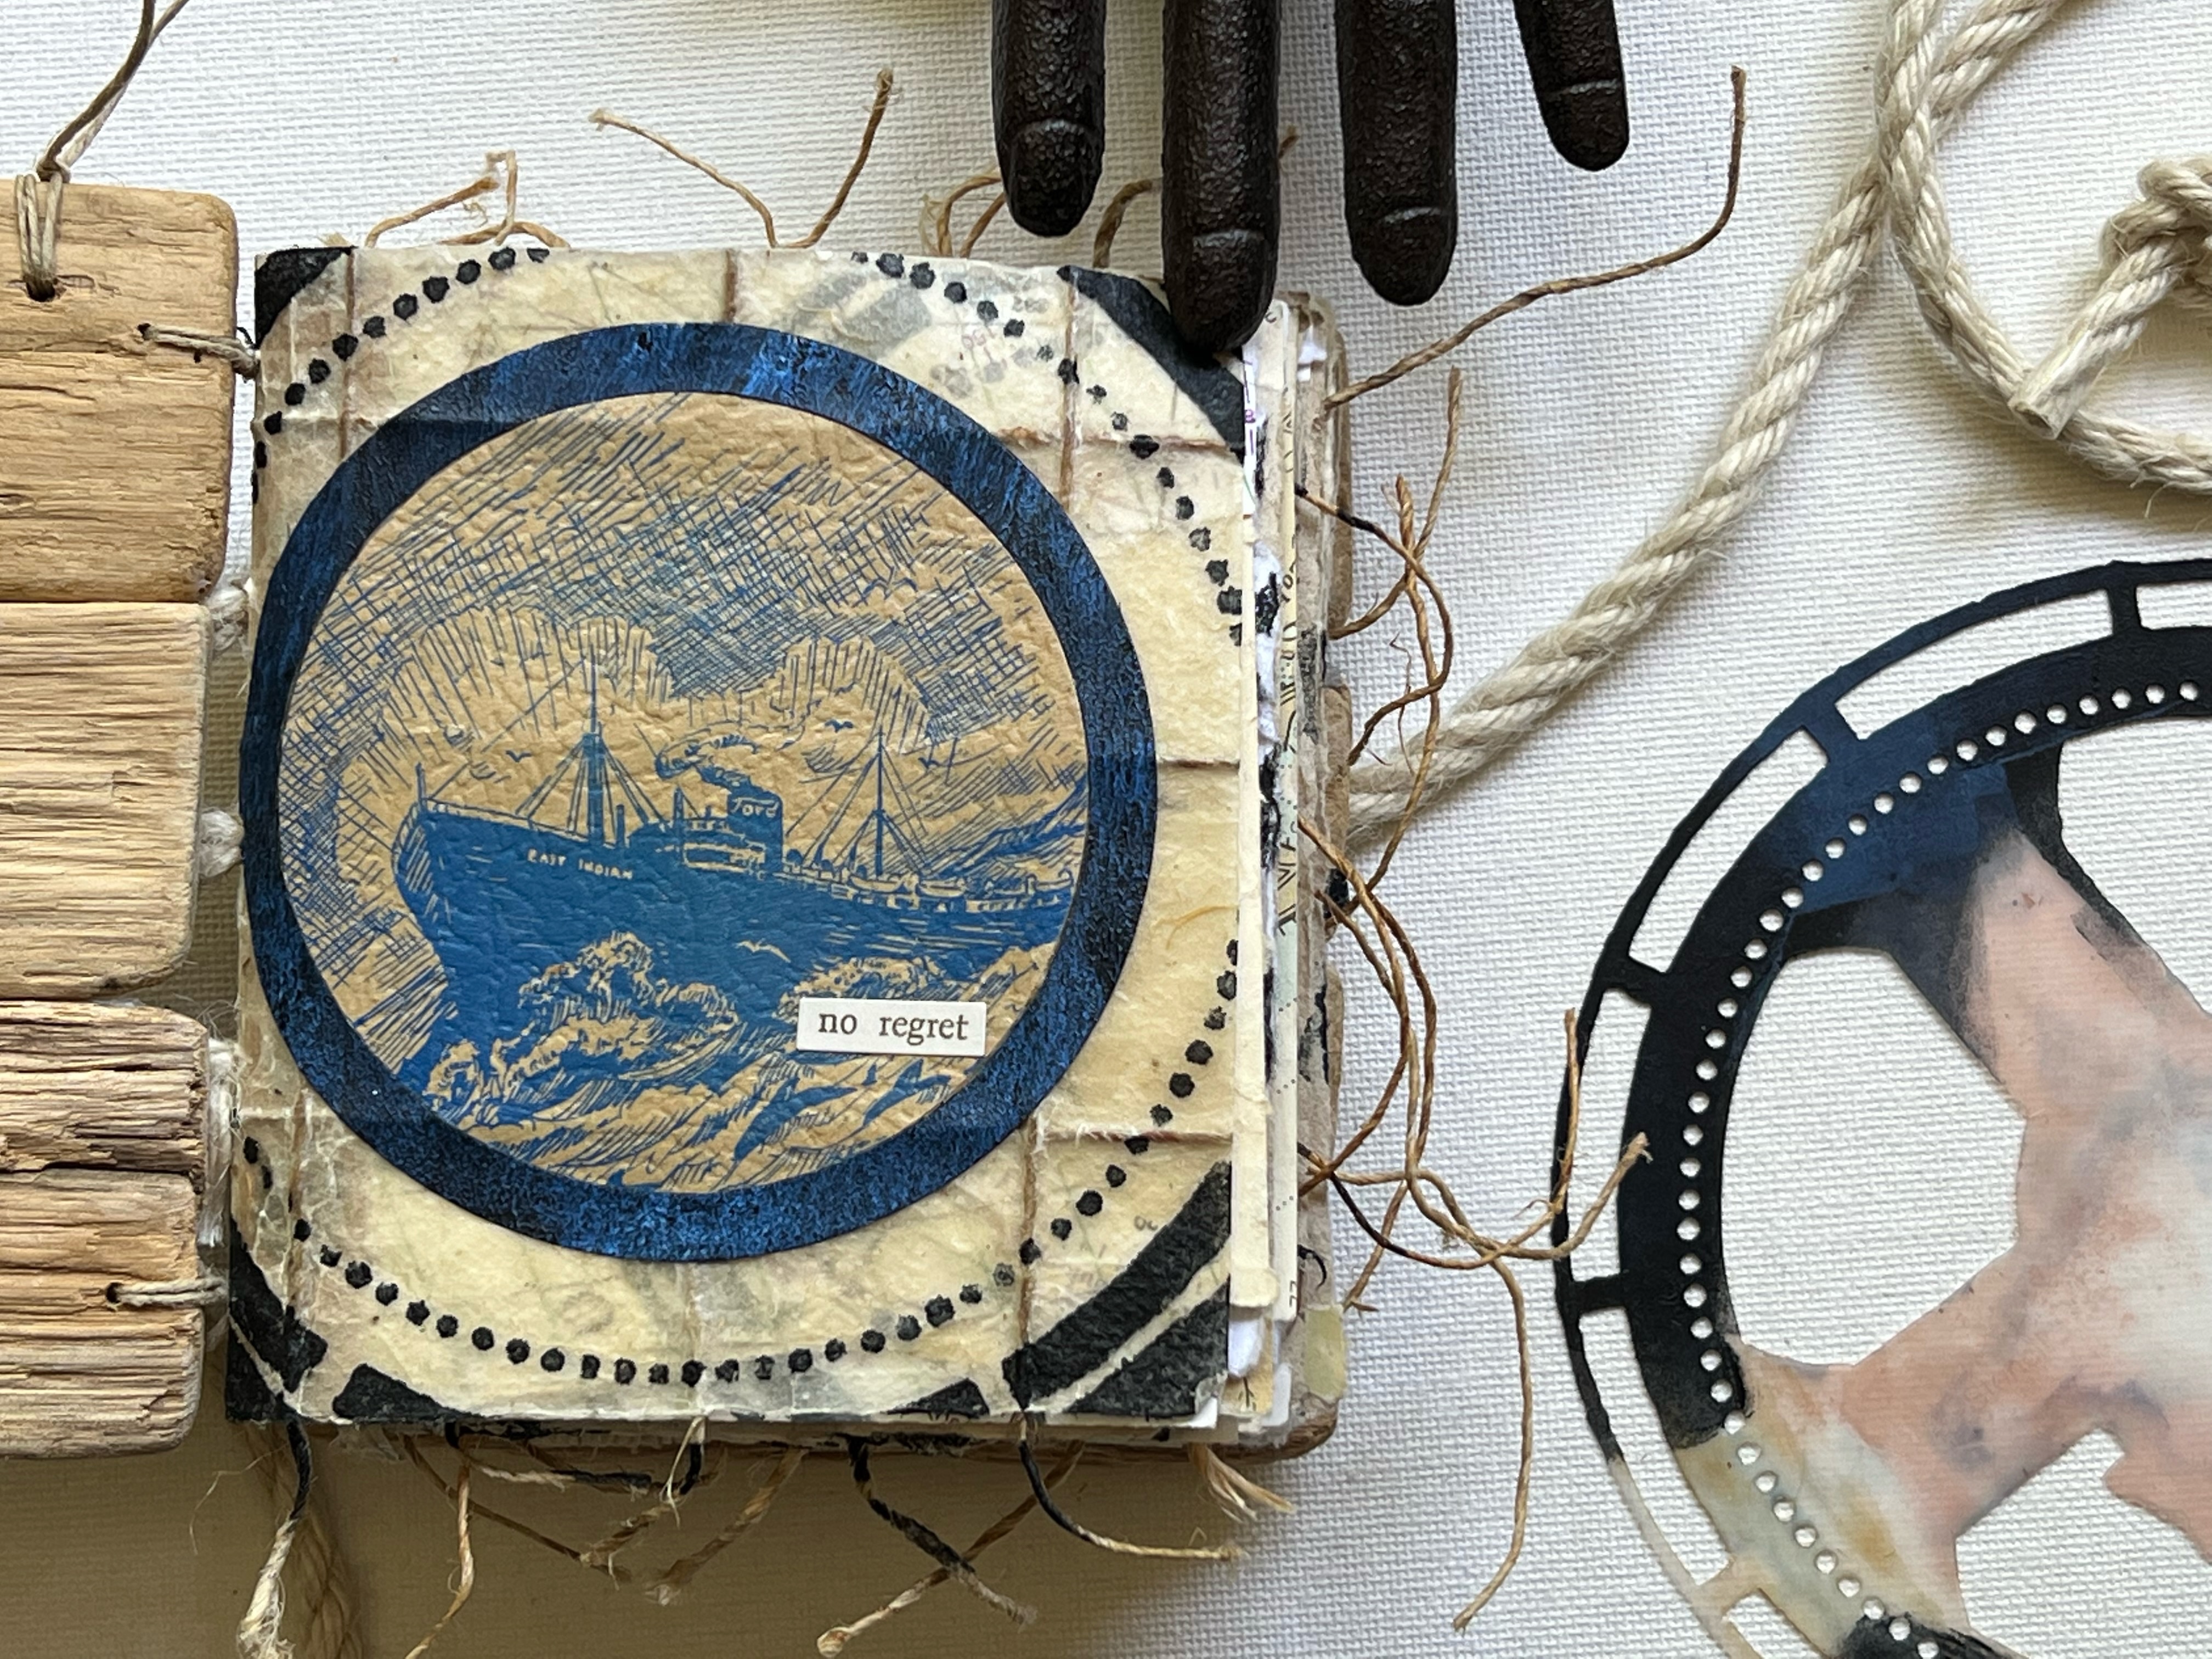
13 Days Adrift tells the story of the survivors of the East Indian, a ship that was sunk by a German U-Boat while out to sea. The book contains illustrations that I knew right away I wanted to incorporate into the new book. After reading the story and considering how I wanted to construct my new book, I wanted to create something that would be as true to the original book as possible.
The covers of my hand bound book are made from pieces of driftwood. I selected pieces for each cover that were similar in size and that somewhat fit together. The pieces were glued to each other along the edges; a piece of natural twill tape on the inside of each cover serves as additional reinforcement.
The book is comprised of five signatures. Each signature contains pages made of various materials. Marine maps, gel printed original book pages, watercolored illustrations, and handmade papers are collaged, layered, embellished and then sewn together with natural hemp cord. I utilized an exposed binding method that incorporated jute rope, reminiscent of a ship's rigging.
The stencil design I use throughout the book is a circle. Many of the stencils I chose were designed by Seth Apter for StencilGirl®; however, I also used many other designers' stencils, including Mary C. Nasser, Pam Carriker, Traci Bautista, Lauri Mika, and Rae Missigman.
All of the stencils used are listed below this post. The stencils were used on the gel plate, as well as direct to paper. I used a masking technique for the stencils that contained sections that were not circles.
When creating my pages, I wanted to achieve a nautical theme. To this effect I must admit I stretched the rules a bit... we were to use only black, white and ANY shade of grey... I chose payne's grey as my primary color, and then added black and white to create different hues.
The illustrations that I used from the original book were watercolored with payne's grey, white, and black. The main base color used on my gel plate, payne's gray, when layered with white, created a light blueish color.
After taking the original booklet apart, I removed all of the illustration pages, as well some of the pages that contained phrases I would be cutting out. The remaining pages were gel printed. Within the book I use torn pieces, die cuts and punches of these gel prints.
Many of my favorite pages are displayed within this post; however, I have done a complete flip through of the book on my YouTube channel. You can view the video by clicking the link below.
I never cease to be amazed by all of the incredible projects that result from these collaborations, each one is completely unique to the artist that created it, even though we all receive the same instructions. I hope that you can take the time to hop over to the StencilGirl® blog and check out all of the different books that were created. (Click here to visit.)
Thank you so much for stopping by, this was a very special project for me. I learned a lot during the process, from paper preservation to color theory and even a new bookbinding technique. Many thanks to Tina Walker for continually inspiring me and challenging me to expand my creativity.


